Manage Student Groups
Administrators can create, view, and manage groups of students to allow users to review assessment results for a pre-selected roster of student results. For example, a student group could represent all the students in a teacher’s classroom or a particular period of instruction. The TOMS roles and permissions system are used in conjunction with student groups to allow teachers access to student test results.
Student group files are comma-separated value (CSV) files administrators create to connect a group of students to one or more educators within CERS. Student group files may be uploaded either manually using the Administrator Tools or by an upload created by a Student Information Systems (SIS) vendor.
The Manage Student Groups page is accessed by selecting the [Student Groups] button on the Home Page.
The Manage Student Groups page elements are shown in figure 1.
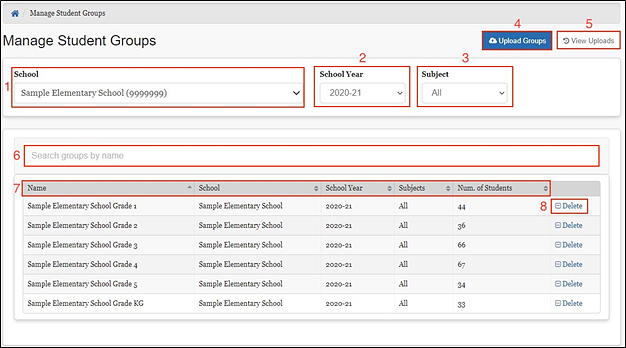
Figure 1. Manage Student Groups page
The Manage Student Groups page includes the following features and elements:
- [School]: Drop-down used to filter the displayed groups by school
- [School Year]: Drop-down used to filter the displayed groups by administration year
- [Subject]: Drop-down used to filter the displayed groups by subject
- [Upload Groups]: Used to upload a group file to create or update one or more groups
- [View Uploads]: Displays the history of group file uploads
- Search groups by name: Users can search for groups by name to limit which groups are displayed. Users can type partial or complete names, and the display changes as the user enters data.
- Student Groups Table: Displays groups matching the filter conditions selected in a table. The sortable table displays the group and school name, school year, subject(s), and the number of students in the group.
- [Delete]: Button to delete the group
Selecting a school, school year, or subject immediately updates the list of student groups displayed in the Student Groups Table. If groups do not exist for the selected school, year, and subject filters, a message appears in the Student Groups Table as shown in figure 2.

Figure 2. “No groups found” notice
Creating a Student Group File
A student group is defined by a unique combination of school, school year, and group name. The CSV file format includes group name, school identifier (County District School or CDS code), school year, subject, student identifier, and TOMS user login, as shown below in figure 3.

Figure 3. Example Student Group File
For a student group upload to be accepted, the file must be a properly formatted CSV file with column names and cell values matching the required CSV file format. The uploaded file must contain these column headers in the first row (column order must match exactly) with appropriate values in each row:
group_name: Name of the group (must be unique per school)
school_natural_id: The school identifier (CDS code)
school_year: Four-digit school year (e.g., 2022 represents the 2021–22 school year)
subject_code: ALL or single subject code
- Single-subject codes: ELA, Math, CAAELA, CAAMATH, CAST, CSA, or ELPAC
student_ssid: Statewide student identifier
group_user_login: Email address of the user(s) who has permission to access the group’s assessment results
Refer to the Group Template File section to learn how to download a template with the correct column headers.
Group File Rules
In addition to these column requirements, the following validation rules are applied to determine whether a file is accepted:
- The input file must be in CSV format
- All numbers must be in a number format without decimals or abbreviations
- Each row must contain valid values for school_natural_id, school_year, and group_name
- No more than 200 students may be assigned to a single student group
- If the group file contains multiple schools, groups, or years, the group file rows must be sorted in the following order: first by the school id, then group name, last by administration year.
- Each cell may contain no more than one identifier (e.g., email address, SSID)
- The administrator uploading the file must have permissions to the school(s) listed in the file
Uploading Student Group Files
Selecting the [Upload Groups] button on the Manage Student Groups page opens the Upload Groups page shown in figure 4. Here, administrators can upload comma-separated value (CSV) files of student-group information in one of two ways. First, by dragging the file(s) from a file system and dropping it into the dotted box, or second, by browsing for file(s) on a computer. The Upload Results list at the bottom will update the status of files after the files are uploaded. In the example in figure 4, no files have been uploaded during that session yet.

Figure 4. Upload Groups page without files
- [CSV File Format]: Displays the CSV File Format page describing how to set up a CSV file for upload, revise student groups, and how to download a template (refer to the Group Template File section).
- Browse for Files: To upload a file, select the “browse for files” link. A system pop-up then displays to allow users to browse and select a file from their computer.
- Drag and Drop Box: To upload a file, a user may drag a file from the computer to this area on the screen.
- File Results Table: Results of uploads are shown here
If the uploaded file is formatted correctly and passes all validation rules (refer to the Group File Rules section), the system displays the file with an “Accepted” status. If the file is not formatted correctly or fails validation, the system rejects the file and displays a “Bad Data” status. In the case of a failed upload, the user can select the drop-down icon next to the file name to display the error(s) that caused the file to fail validation.
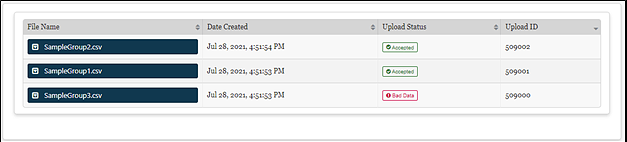
Figure 5. File Results Table
The “Bad Data” upload status informs the user that the uploaded CSV file failed validation and includes a message describing the error(s). Select the drop-down icon next to the group name to access more information.

Figure 6. Bad Data
- [Drop-down Icon]: Displays the error causing the Bad Data status message
- Bad Data: Status message indicating there is an error with the file
Refer to the Troubleshooting Common Issues section to see frequent errors and their resolutions.
Once the system has successfully processed the file, the View Uploads page (figure 7) updates the upload status to “Processed.”
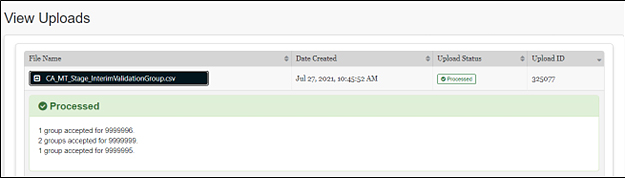
Figure 7. View Uploads page
Group Template File
To be accepted, a student group file must be a properly formatted CSV file with column names (headers) and cell values matching the CSV file format template exactly. Selecting the [CSV File Format] button displays the CSV File Format page, as shown in figure 8.
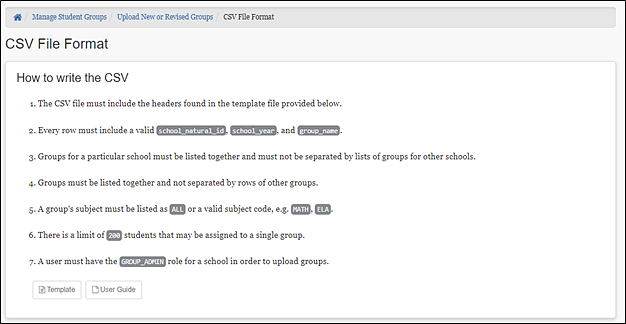
Figure 8. CSV File Format page
This page gives instructions on how to create a CSV file to be uploaded. Selecting the [Template] button downloads a CSV file with the required column headers, as shown in figure 9.
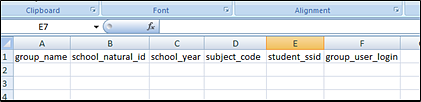
Figure 9. CSV file with column titles
View Previous Uploads
Selecting the [View Uploads] button on the Manage Student Groups page opens the View Uploads page, shown in figure 10.
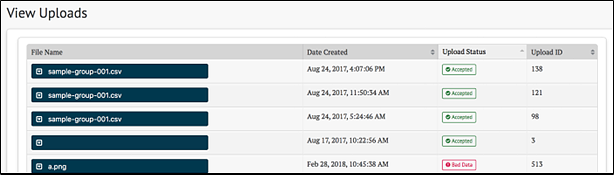
Figure 10. View Uploads page
This page shows all of the student group file uploads, from most recent to oldest. If there are no uploaded student group files, the system displays the message “Upload results will be shown here.” as shown in figure 11.

Figure 11. Message when no student group files are uploaded
View Student Groups
Selecting a specific group on the Manage Student Groups page displays the list of students in the group matching the filter criteria (figure 12).
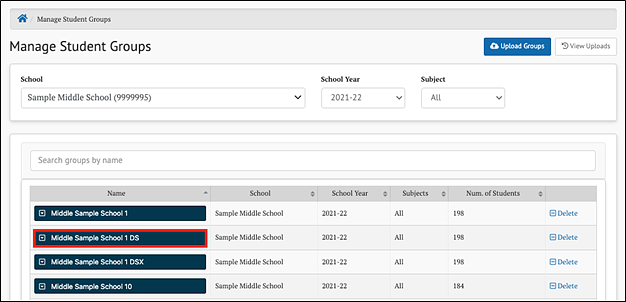
Figure 12. Specific group on the Manage Student Groups page
The selected group expands, and the table displays a list of all the students associated with that group by:
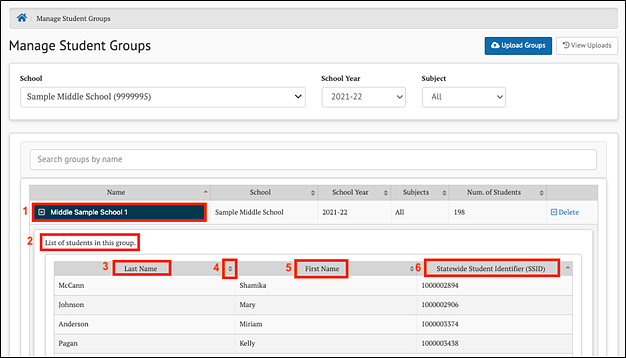
Figure 13. Expanded specific group on the Manage Student Groups page
- A specific group on the Manage Student Groups page
- List of students in this group
- Last Name: last name of student (mandatory). The system default is to list students alphabetically by Last Name.
- Toggles at the top of each of the three columns can be used to sort the listed students by their First Name, Last Name, or Statewide Student Identifier (SSID).
- First Name: first name of student (mandatory)
- Statewide Student Identifier (SSID): unique identifier for students (mandatory)
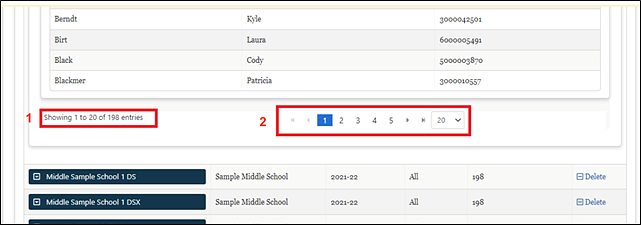
Figure 14. View student groups' pagination
- Total number of students in the group
- Page selection is located at the bottom of the table.
Troubleshooting Common Issues
The following are common mistakes and issues that users may experience while creating or uploading the student group files and their recommended resolutions.
Microsoft Excel Number Formatting
One frequent issue users experience is when Microsoft Excel reformats values to scientific notation. This reformatting is commonly seen in the school_natural_id and student_ssid columns as the numerical values are frequently lengthy.
For example, the school_natural_id value is a long number (e.g., 12345671234567) that Excel may convert to scientific notation (e.g., 1.23457E+13). If saved in this format, the reporting system does not match it to a valid school identifier.
Figure 15 shows an example of Excel making this change while creating a new CSV file.
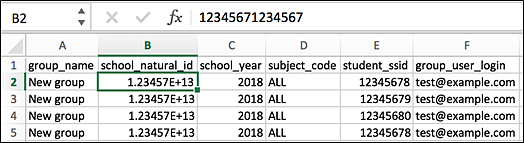
Figure 15. CSV file with problematic scientific notation in Excel
The column must be formatted as a number with zero decimal places to avoid Excel auto-formatting data in scientific notation. Follow these steps to format the school_natural_id column:
- Highlight the school_natural_id column by selecting the header of the column (B in the example shown).
-
Right-click on any highlighted cells (or otherwise bring up the context menu) and select [Format Cells] as shown in figure 16.
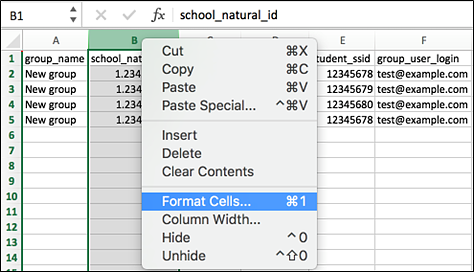
Figure 16. Format Cells option in Excel
-
Select [Number] as the Category and update the Decimal places field from 2 to 0, as shown in figure 17. Select [OK].
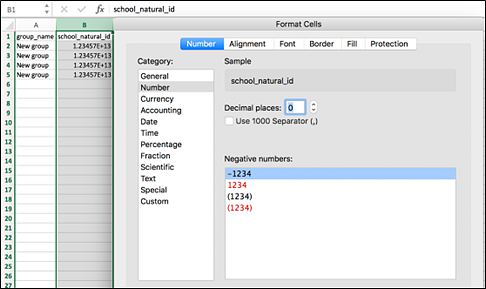
Figure 17. “Number” category and “decimal places” values in Excel
- Confirm the value in each cell is displayed as the full number and not in scientific notation. Save the file in CSV format.
Incorrect Headers
The system displays a “Bad Data” error message, shown in figure 18, if the order of the column headers does not match the expected order exactly or the file was saved in a format other than CSV. Row 0 represents the header row of the file.
Message: Row: 0 Failure: Invalid headers. Headers must be in order: [group_name, school_natural_id, school_year, subject_code, student_ssid, group_user_login]

Figure 18. “Invalid Headers” error message
To resolve this error, update the CSV file to ensure the column header names in the first row match the expected values in the correct order or use the [CSV File Format] button to download a template.
School Cannot Be Found
The system displays an error message, shown in figure 19, if it cannot find a school associated with the uploaded school_natural_id value. The message will be similar to what follows:
Message: Row: 1 Failure: School [ 1.00E+07 ] cannot be found

Figure 19. “School cannot be found” error message
To resolve this error, update the CSV file to include a valid school identifier. If the school listed in the error message is in scientific notation (e.g., 1.00E+07), the spreadsheet program such as Excel may have automatically formatted to scientific notation.
Refer to Microsoft Excel Number Formatting for instructions on correcting this issue.
If the school_natural_id value is valid, the administrator may not have permission to upload student groups at the listed school. Refer to Technical Support to correct this issue.
Record is Out of Order
The system displays an error message if the file is not sorted in the correct order. The error may happen if groups are not sorted by school or group names are repeated.
Message: Row: 8 Failure: School [9999995] is out-of-order: sort CSV by school, group, year

Figure 20. Record Out of Order error message
To resolve this error, re-sort the CSV file to ensure the rows follow the correct order. Refer to Group File Rules section.
Empty File
The system displays an error message if the CSV only has headers with no other data.
Message: Row: 0 Failure: Empty file

Figure 21. Empty File error
To resolve this error, verify the correct file was uploaded and has at least one row of data. The file may not have been saved correctly or could be an empty template.