Accessing Specific Report Types
There are three report options:
Refer to the Plan and Manage Testing and Participation by SSID Reports topic for descriptions of report fields.
Plan and Manage Testing Option
The Plan and Manage Testing option allows for monitoring students’ test progress by generating customized Completion Status reports to determine which students have completed testing, as well as which students have yet to begin or complete a test opportunity. Data displays according to the parameters selected. If no students are listed, it means that no students currently match the specified report criteria.
The Plan and Manage Testing option can generate reports by LEA, school, or test administrator or test examiner within an LEA or school. It can be generated by first selecting the Plan and Manage Testing option from either the Completion Status home page or the Completion Status Reports drop-down list (indicated in figure 1).
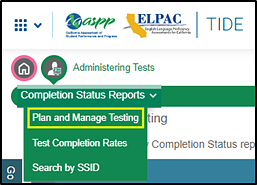
Figure 1. Plan and Manage Testing option in the Completion Status Reports drop-down list
Navigation
The Plan and Manage Testing screen offers the “Go to section” bar on the far left (figure 2). The bar allows the user to quickly access a section of the Plan and Manage Testing screen.
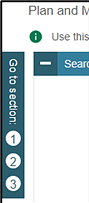
Figure 2. “Go to section” bar
This bar contains the numbers 1, 2, and 3, which correspond with the following sections of the Plan and Manage Testing screen:
- Search Students
- Choose What
- Get Specific
Selecting a number jumps to that section of the screen. Hovering over a number shows the name of the section.
Generate a Plan and Manage Testing Report
The Plan and Manage Testing Report is available through the Plan and Manage Testing screen. Take these steps once this option has been selected.
Report parameters are selected on the Plan and Manage Testing screen. These steps enable the user to specify the type of report to generate, the entity for which to generate the report, and the type of data to be viewed.
Step 1. Search Students
The “Search Students” section of the Plan and Manage Testing screen, shown in figure 3, allows for the generation of a report for a specific LEA and school and can include specific students or grade levels.
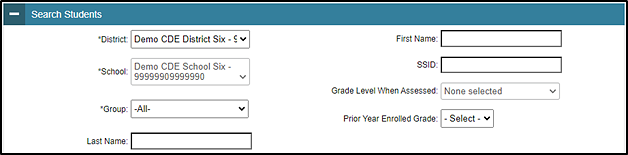
Figure 3. Search Students options
The constituent fields in the “Search Students” section are as follows:
- District: This option is only applicable for users who are associated with more than one LEA. For most users, the LEA with which the user is associated in TOMS will already be selected. This field, which is indicated by an asterisk, is required.
- School: This is only applicable for users, such as LEA-level users, who are associated with more than one school. For most users, the school with which the user is associated in TOMS will already be selected. Users associated with multiple schools will have additional values (i.e., schools) from which to select. Users can filter results by typing part of or the complete school name or school ID in the Search field. This field, which is indicated by an asterisk, is required.
- Group: This field enables the generation of a report for a specific test administrator or test examiner. It appears when a single school has been selected. The drop-down list contains all of the assigned test administrators and test examiners associated with the selected school. When it does appear, it is defaulted to All.
- Last Name
- First Name
- SSID
- Grade Level When Assessed
- Prior Year Enrolled Grade
A user can also make an advanced search for statuses associated with a student or students during testing by selecting a status from the Search Fields drop-down list (figure 4) that applies to the student or students.
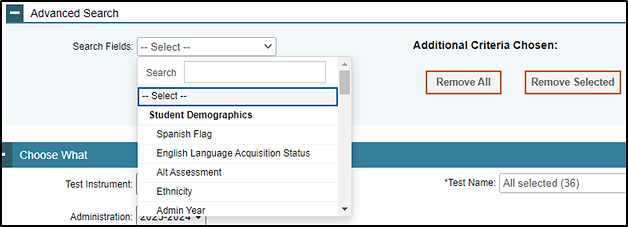
Figure 4. Advanced Search options
Provide additional information or criteria if prompted.
Step 2. Choose What
The “Choose What” section of the Plan and Manage Testing screen, shown in figure 5, provides the fields used to generate a report based on specific tests.

Figure 5. Choose What options
The essential fields in the “Choose What” section are as follows:
- Test Instrument: Select the test type from the Test Instrument drop-down list, which displays available tests and may include the following:
- CAA (for ELA and mathematics)
- CAA Science
- CAST
- CAST Interims
- ELPAC Interims
- CSA
- Initial Alternate ELPAC
- Initial ELPAC
- Smarter ELA (for the summative assessment)
- Smarter IAB (for the interim assessment)
- Smarter ICA (for the interim assessment)
- Smarter Math (for the summative assessment)
- Summative Alternate ELPAC
- Summative ELPAC
- Administration: This option allows for the selection of the current test administration year, which is the only option.
- Test Name: This option enables the selection of one or all of the test names from which to generate a report.
Step 3. Get Specific
This section, shown in figure 6, provides a choice of filters that best match the data a user wants to view. Each filter generates a report containing students whose information matches the selected parameters.
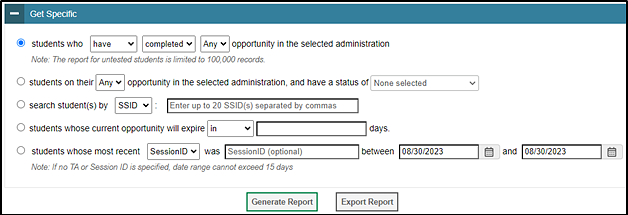
Figure 6. Get Specific options
To select the parameters in this section, complete the following steps:
- Select the radio button for the row that has the desired parameters.
- Specify the required values for the parameters in the selected row.
The report filter options are listed next. The report can be filtered by a number of criteria, including grade level, test, school, group, and test statuses, such as students who have started tests and who have started within the test administration window. The values in [brackets] represent the parameter values available for selection. The options are:
- students who [have or have not] [completed or started] [Any or—depending on the assessment—a specific number] opportunity in the selected administration
- Note the following about the report produced by this filter:
- Determine which students have or have not completed testing.
- Determine which students have or have not started testing.
- If the test instrument was a summative assessment, the opportunity options are Any and 1st.
- Refer to table 1 in the Plan and Manage Testing and Participation by SSID Reports topic for additional information about test opportunities.
- Note the following about the report produced by this filter:
- students on their [Any—depending on the assessment—a specific number] opportunity in the selected administration, and have a status of [student test status]
- Note the following about the report produced by this filter:
- Determine which students have a specified test status for the selected test opportunity. For a list of test statuses and associated definitions, refer to table 2 in the Plan and Manage Testing and Participation by SSID Reports topic.
- Refer to table 1 in the Plan and Manage Testing and Participation by SSID Reports topic for additional information about test opportunities.
- If the test instrument was a summative assessment, the opportunity options are Any and 1st.
- Note the following about the report produced by this filter:
- search student(s) by [SSID or Name]: [## or Student Name]
- Note the following about the report produced by this filter:
- Search for students by entering an SSID or a name.
- Enter up to 20 SSID(s) separated by commas.
- Note the following about the report produced by this filter:
- students whose current opportunity will expire [in or between] [##] days
- Note the following about the report produced by this filter:
- Determine which of the students currently testing have at least one test that will expire shortly. For example, enter “2” days to determine who needs to complete testing by the end of the next day.
- Note the following about the report produced by this filter:
- students whose most recent [SessionID or TA Name] was [SessionID or LastName, FirstName] between [start date] and [end date]
- Note the following about the report produced by this filter:
- Search for students who were in a specific session and view the current test status.
- To view this report, enter the test administrator or test examiner’s Session ID or enter the test administrator or test examiner’s name, and then select a Session ID associated with the test administrator or test examiner. It is necessary to select the Date fields to enter the time frame associated with the test administration.
- This report will return the most recent completion status data for students who have taken the selected test. The Session ID and TA Name fields are optional. These fields may be left blank and the user can simply search for completion information within a particular date range. If the Session ID or TA Name is not specified, the date range is limited to 15 days.
- Note the following about the report produced by this filter:
Step 4. Generate Report
Refer to the Column Definitions subtopic in the Plan and Manage Testing and Participation by SSID Reports topic for a description of the columns in the on-screen and Excel or CSV reports.
-
Select the [Generate Report] button on the bottom of the Plan and Manage Testing screen to view the results of the selected parameters on the screen. For an LEA, a report where 20 or fewer schools are selected appears on-screen; if there are 21 or more schools, the report goes directly to the Secure File Center as an Excel spreadsheet or CSV file. A test site (school) has the option to view the report on the screen by selecting [Generate Report] or to download the report by selecting the [Export Report] button. These buttons are shown in figure 7.

Figure 7. Report buttons
-
When the report includes results for 21 or more schools within an LEA, the report will default to a separate file, either an Excel spreadsheet or CSV. When the Export to Secure File Center dialog box appears (figure 8), select [Export Secure File Center] to make the report available in the Secure File Center, or select [Modify Search] to change the search criteria.
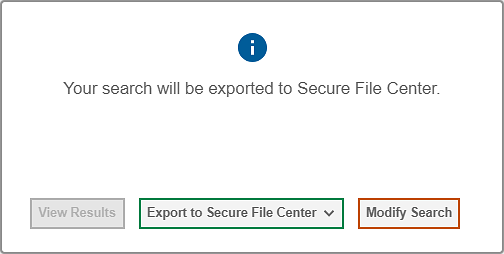
Figure 8. Export to Secure File Center dialog box
- After selecting the [Export to Secure File Center] button, select either Excel or CSV from the drop-down list to select a file type.
-
-
Update the report using different criteria by following the previous steps. A sample screen showing different criteria being selected is presented in figure 9.
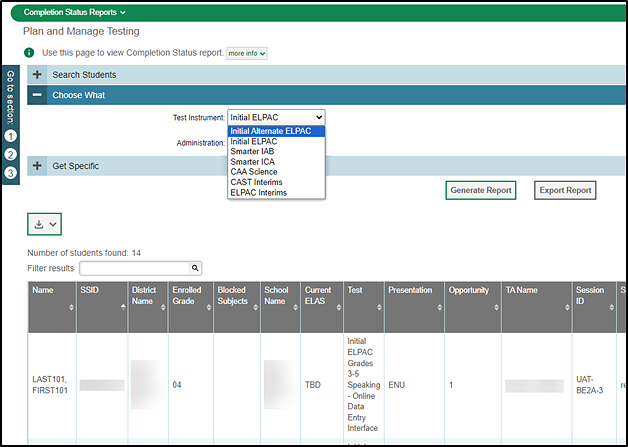
Figure 9. Update Plan and Manage Testing Report parameters
- Show or hide columns by selecting the [Show/Hide Columns] list-plus and down arrow icon [
 ] in the top-right corner of the table.
Generate a Test Administrator Report
Refer to the Column Definitions subtopic in the Plan and Manage Testing and Participation by SSID Reports topic for a description of the columns in the on-screen and Excel or CSV reports.
The Test Administrator Report provides information about the test sessions that match the search parameters, the name of the test administrator or test examiner for the sessions as selected from the Group drop-down list, and the number of students associated with each of those sessions. For the Test Administrator Report, the date range is a required field.
Similar to the Plan and Manage Testing Report, the Test Administrator Report allows columns to be hidden or shown, data to be sorted, and the general tools available on the screen to be used.
Follow the steps to generate the Plan and Manage Testing Report, and then take these additional steps to access the Test Administrator Report:
-
In the “Search Students” section, select at least one school and either a test administrator or test examiner’s name or All from the Group drop-down list, as indicated in figure 10.
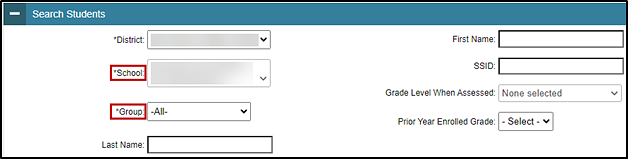
Figure 10. Search Students options for creating a Test Administrator Report
-
Select the students whose most recent radio button, TA Name from the first drop-down list, optionally enter the test administrator’s or test examiner’s name, and enter a specific date range (figure 11).
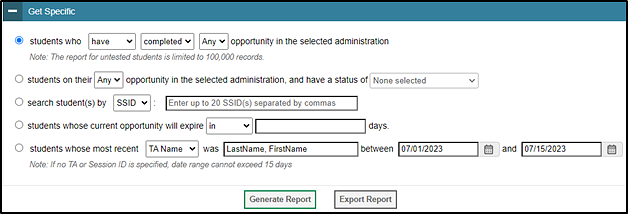
Figure 11. Get Specific options for creating a Test Administrator Report
- Select the [Generate Report] or [Export Report] button.
The report generated, either on-screen or exported to a spreadsheet, contains the same data as the Plan and Manage Testing Report.
Test Completion Rates Option
The Test Completion Rates Report summarizes the number and percentage of students who have started or completed a test. This report can be generated by first selecting the Test Completion Rates option from either the Completion Status home page or the Completion Status Reports drop-down list (indicated in figure 12).
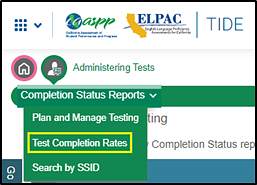
Figure 12. Test Completion Rates option in the Completion Status Reports drop-down list
Step 1. Report Criteria
The “Report Criteria” section of the Test Completion Rates screen, shown in figure 13, provides the fields used to generate the test completion rates for a specific test.
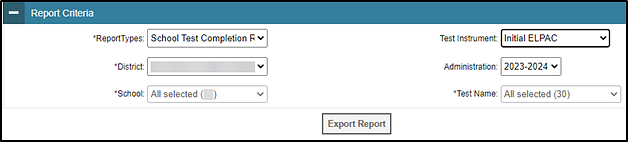
Figure 13. Report Criteria options
The essential fields in the “Report Criteria” section are as follows:
- Report Types: This option indicates an entity, either LEA (district) or school.
- District: This option is only applicable for users who are associated with more than one LEA. For most users, the LEA with which the user is associated in TOMS will already be selected. This field, which is indicated by an asterisk, is required.
- School: This option is only applicable for users, such as LEA-level users, who are associated with more than one school. For most users, the school with which the user is associated in TOMS will already be selected. Users associated with multiple schools will have additional values (i.e., schools) from which to select. Users can filter results by typing part of or the complete school name or school ID in the Search field. This field, which is indicated by an asterisk, is required.
- Test Instrument: Select the test type from the Test Instrument drop-down list, which displays available tests, which can include the following:
- CAA (for ELA and mathematics)
- CAA Science
- CAST
- CAST Interim
- CSA
- ELPAC Interim
- Initial Alternate ELPAC
- Initial ELPAC
- Smarter ELA (for the summative assessment)
- Smarter IAB (for the interim assessment)
- Smarter ICA (for the interim assessment)
- Smarter Math (for the summative assessment)
- Summative Alternate ELPAC
- Summative ELPAC
- Administration: This option allows for the selection of the current test administration year, which is the only option.
- Test Name: This option enables the selection of one or all of the test names from which to generate a report.
Step 2. Generate the Report
Refer to the Column Definitions subtopic in the Test Completion Rates Reports topic for a description of the columns in the Excel or CSV reports.
-
Generate the report by selecting the [Export Report] button (figure 14). This will create the report in an Excel spreadsheet or a CSV file, which can be saved or viewed.
Figure 14. [Export Report] button
-
Update the report using different criteria by following the previous steps. An example is presented in figure 15.
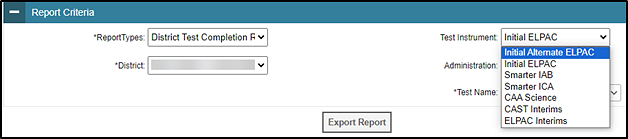
Figure 15. Update Test Completion Rate parameters
Search by SSID Option
The Participation Report by SSID details a student’s test opportunities and the status of those test opportunities. It can be generated by selecting the Search by SSID option from either the Completion Status home page or the Completion Status Reports drop-down list (indicated in figure 16).
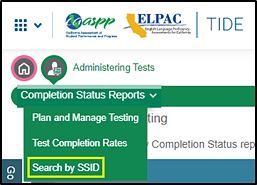
Figure 16. Search by SSID option in the Completion Status Reports drop-down list
Users have the option of entering SSIDs manually or uploading a single-column spreadsheet with the SSIDs to be reported.
Step 1. Enter SSID(s)
The “Enter SSID(s)” section of the Search by SSID screen, shown in figure 17, provides the field used to generate the test completion rates for a specific test. The default means of entry is entering SSIDs in the Student ID(s) field.
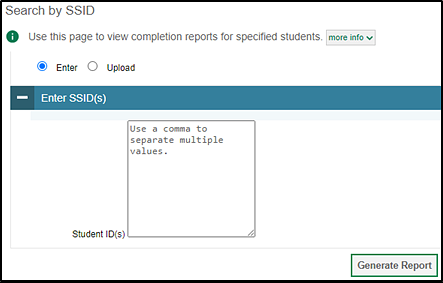
Figure 17. Enter SSID(s) options
A user can either enter SSID(s) into the Student ID(s) field, using a comma to separate multiple SSIDs; or take the following steps to upload up to 1,000 SSIDs from an Excel spreadsheet or CSV file:
-
Select the Upload radio button above the “Enter SSID(s)” section (indicated in figure 18).
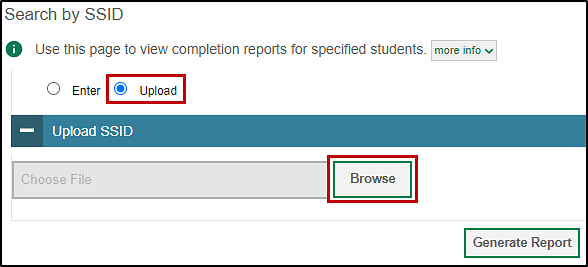
Figure 18. Upload SSID options
- Select the [Browse] button and then follow the prompts to select an Excel spreadsheet or CSV file, with students’ SSIDs listed in a single column, for upload.
Step 2. Generate the Report
Refer to the Column Definitions subtopic in the Plan and Manage Testing and Participation by SSID Reports topic for a description of the columns in the on-screen and Excel or CSV reports.
Generate the report by selecting the [Export Report] button (figure 19). This will create the on-screen report.

Figure 19. [Export Report] button