Plan and Manage Testing Option
The Plan and Manage Testing option allows for monitoring students’ test progress by generating customized Completion Status reports to determine which students have completed testing, as well as which students have yet to begin or complete a test opportunity. Data displays according to the parameters selected. If no students are listed, it means that no students currently match the specified report criteria.
The Plan and Manage Testing option can generate reports by LEA, school, or TA or TE within an LEA or school. It can be generated by first selecting the [Plan and Manage Testing] button on the Home Page Dashboard screen or the [Plan and Manage Testing] link on the menu bar (indicated in figure 1).
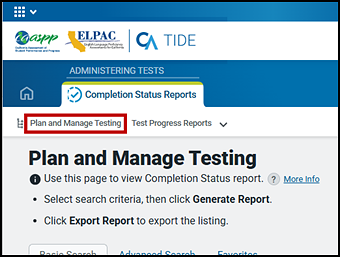
Figure 1. [Plan and Manage Testing] link
Generate a Plan and Manage Testing Report
The Plan and Manage Testing Report is available through the Plan and Manage Testing screen. Take these steps once this option has been selected.
Report parameters are selected on the Plan and Manage Testing screen. These steps enable the user to specify the type of report to generate, the entity for which to generate the report, and the type of data to be viewed.
The report data can be requested using either a basic search or an advanced search. A basic search allows searching of only full groups of students by school or schools, assessment, and test administration. An advanced search allows the user to select additional options including a prior-year enrolled grade, demographic student groups, and TA or TE name.
Basic Search
Take these steps to run the basic search and generate a report based on this data.
Step 1. Students
-
Define a student group to begin by selecting the LEA and school(s) from the District and School drop-down lists that are indicated in figure 2.
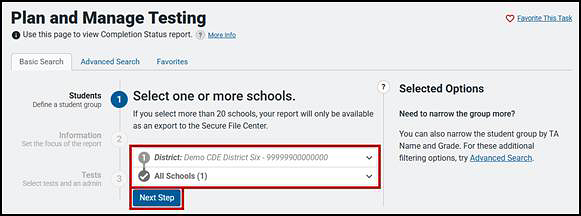
Figure 2. Basic Student options
- Select the [Next Step] button to continue (also indicated in figure 2).
Step 2. Information
- Set the focus of the report to continue by selecting one radio button from either the “Group Testing Overview” or “Tests with Potential Issues” list. Options are as follows:
- Group Testing Overview
- Students who have not started assigned tests
- Students who have started but not completed assigned tests
- Students who have not completed assigned tests
- Students who have completed an assigned test
- Tests with Potential Issues
- Students with tests in a paused status
- Students with current tests expiring within 7 days
- Group Testing Overview
-
The Information options step, which also shows the options selected in the previous step, is presented in figure 3.
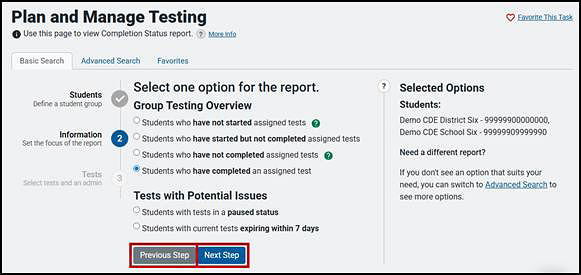
Figure 3. Basic Information options
- Select the [Next Step] button to continue (indicated in figure 3).
Step 3. Assessments
- Select the assessments and test administration and then select the [Search] button to create the report. Only the current test administration can be selected from a basic search. When selecting the test type from the Test Instrument drop-down list, the available assessments may include the following:
- CAA ELA & Math
- CAA Science
- CAST
- CAST Interims
- CSA
- ELPAC Interims
- Initial Alternate ELPAC
- Initial ELPAC
- Smarter IAB (for the interim assessment)
- Smarter ICA (for the interim assessment)
- Smarter Summative (ELA and mathematics; computer-based and PPT)
- Summative Alternate ELPAC
- Summative ELPAC
- Once a selection is made from the Test Instrument drop-down list, one or all of the test names for a grade level, domain, or test type can be selected (for example, select Initial ELPAC Kindergarten Listening Test to generate data for just this domain-level assessment, or All selected (#) for all assessments within that type).
-
The Tests options step, which also shows the options selected in the previous step, is presented in figure 4.
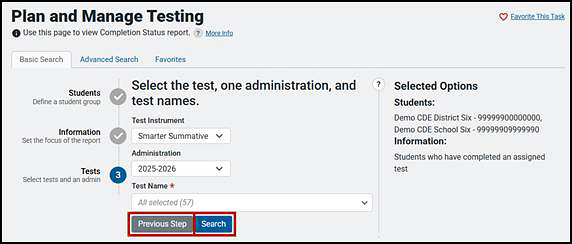
Figure 4. Basic Test options
-
When the report includes results for 21 or more schools within an LEA, the Secure File Center information box appears because the report will default to a separate file. Select a file type—either Excel or CSV—from the Export to Secure File Center drop-down list to complete the process of report generation (figure 5) or select [Modify Search] to change the search criteria.
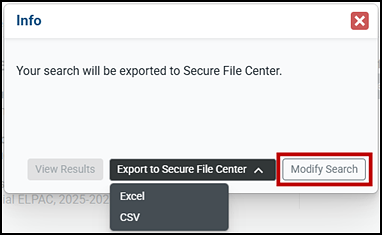
Figure 5. Secure File Center information box
-
To generate a report with different options, select the [Adjust Search Settings] button on the right in the Search Summary screen to clear the parameters entered (figure 6).
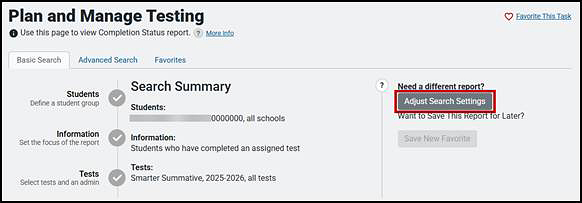
Figure 6. Basic Search Summary screen
Advanced Search
After selecting the [Advanced Search] tab on the Plan and Manage Testing screen, take these steps to set parameters for an advanced search and generate a report based on this data.
The advanced search builds on the parameters of a basic search by including the following additional criteria:
- Prior-year enrolled grade
- Specific student
- Student grade level when tested
- Optional criteria, including student demographic information and accessibility resource used (Multiple optional criteria can be selected.)
- Test instrument, test administration year, and test name
- Information (such as test progress, test status, test expiration, session ID, or the TA or TE’s name)
Once criteria are set, they can be saved as a “new favorite” so the report can be rerun multiple times during the test administration window.
Step 1. Student Group
The “Student Group” section of the Plan and Manage Testing screen, shown in figure 7, contains the name of the LEA by default and allows the user to select one or more schools in the LEA. Selecting the prior grade level of the student or students being reported further refines the criteria.
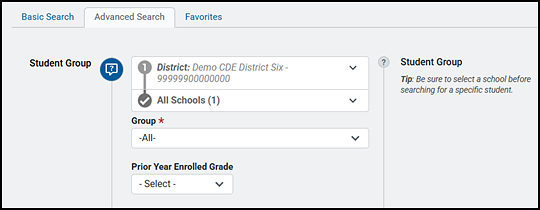
Figure 7. “Student Group” section in the [Advanced Search] tab
The selectable drop-down lists in the “Search Students” section are as follows:
- District—This option is only applicable for users who are associated with more than one LEA. For most users, the LEA with which the user is associated in TOMS will already be selected.
- School—This field is only applicable for users, such as LEA-level users, who are associated with more than one school. For most users, the school with which the user is associated in TOMS will already be selected. Users associated with multiple schools will have additional values (that is, schools) from which to select. Users can filter results by typing part of or the complete school name or school ID in the required Select School field.
- Group—This field, which shows the TAs and TEs in an LEA or school, is defaulted to All.
- Prior Year Enrolled Grade—This option allows the user to select one particular grade level from the prior test administration year to report. The default is the current test administration year.
Step 2. Specific Student
The “Specific Student” section of the Plan and Manage Testing screen, shown in figure 8, allows for a specific LEA and school’s report generation and can include a specific student, assessed grade level(s) for the LEA and school(s), or just the assessed grade level(s).
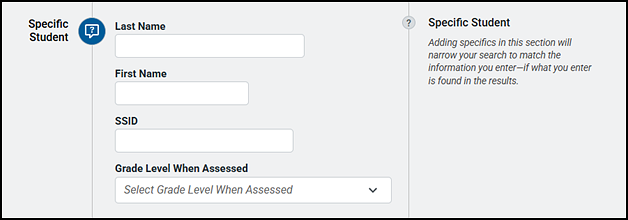
Figure 8. “Specific Student” section in the [Advanced Search] tab
The options in the “Specific Student” section are as follows:
- Last Name
- First Name
- SSID
- Grade Level When Assessed—This drop-down option allows the user to select one, multiple, or all grade levels at which the student(s) was tested.
Step 3. Advanced Search (Optional Criteria)
A user can also make an advanced search for a status or additional information in the Add New Criteria drop-down list, including by specified demographic student group; ELPAC form; content area; or whether a specified embedded or any non-embedded designated support or accommodation was associated with a student or students during testing (figure 9).
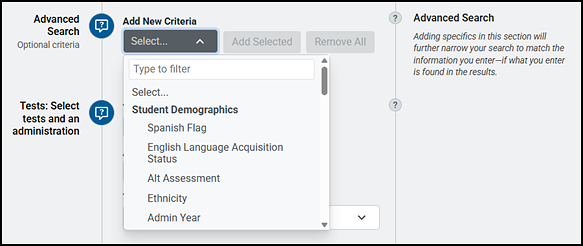
Figure 9. “Advanced Search” section in the [Advanced Search] tab
Depending on the selected criterion, an additional search drop-down list or field may appear—for example, selecting Unlimited Playback from the list’s “Auditory Assistance Resources” section adds the Select criterion (figure 10). Provide additional information or criteria if prompted; not all selections will require additional criteria.
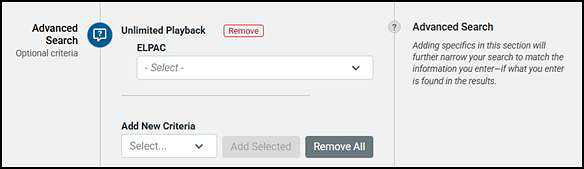
Figure 10. Additional criteria for an advanced search
Once an option is decided, select the [Add Selected] button to add it as a report criterion and refine its criteria. Select the [Remove] button to remove the criterion or the [Remove All] button to remove all optional criteria from the reports (also shown in figure 10). A new Add New Criteria drop-down list opens to further refine the search after adding a criterion.
Step 4. Tests
The “Tests” section of the Plan and Manage Testing screen, shown in figure 11, provides the fields used to generate a report based on specific assessments.
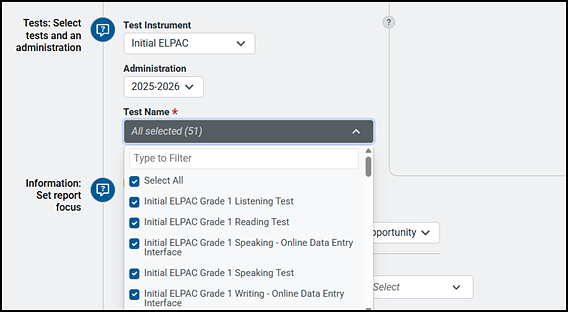
Figure 11. “Tests” section in the [Advanced Search] tab
The selectable drop-down lists in the “Tests” section are as follows:
- Test Instrument—Select the test type from the Test Instrument drop-down list, which displays available assessments and may include the following:
- CAA ELA & Math
- CAA Science
- CAST
- CAST Interims
- CSA
- ELPAC Interims
- Initial Alternate ELPAC
- Initial ELPAC
- Smarter IAB (for the interim assessment)
- Smarter ICA (for the interim assessment)
- Smarter Summative (ELA and mathematics; computer-based and PPT)
- Summative Alternate ELPAC
- Summative ELPAC
- Administration—This option allows for the selection of the current test administration year, which is the only option.
- Test Name—This option enables the selection of names for one or all of the grade-level assessments for the report.
Step 5. Information
The “Information” section of the Plan and Manage Testing screen, shown in figure 12, provides a choice of filters that best match the data a user wants to view. Each filter generates a report containing students whose information matches the selected parameters.
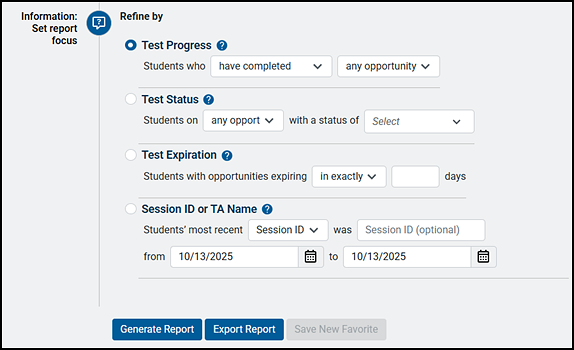
Figure 12. “Information” section in the [Advanced Search] tab
To select the parameters in this section, complete the following steps:
- Select the radio button for the row that has the desired parameters.
- Specify the required values for the parameters in the selected row.
The report filter options are listed next. The report can be filtered by a number of criteria, including grade level, assessment, school, group, and test statuses, such as students who have started assessments and who have started within the test administration window. The values in [brackets] represent the parameter values available for selection. The options are:
- Test Progress: Students who [have completed, have not completed, have started, or have not started] [Any opportunity or opportunity #]
- Note the following about the report produced by this filter:
- Determine which students have or have not completed testing and which students have or have not started testing—results are not based on status.
- If the test instrument was a summative assessment, the opportunity options are Any and 1.
- “Any opportunity” selects the student’s most recent opportunity.
- Refer to table 1 in the Plan and Manage Testing, Search by SSID, and Progress Summary Reports section for additional information about test opportunities.
- Note the following about the report produced by this filter:
- Test Status: Students on [any opportunity or opportunity 1] with a status of [student test status]
- Note the following about the report produced by this filter:
- Determine which students have a specified test status for the selected test opportunity. For a list of test statuses and associated definitions, refer to table 2 in the Plan and Manage Testing, Search by SSID, and Progress Summary Reports section.
- If the test instrument was a summative assessment, the opportunity options are Any and 1.
- “Any opportunity” selects the student’s most recent opportunity.
- Refer to table 1 in the Plan and Manage Testing, Search by SSID, and Progress Summary Reports section for additional information about test opportunities.
- Note the following about the report produced by this filter:
- Test Expiration: Students with opportunities expiring [in exactly or within] [##] days
- Note the following about the report produced by this filter:
- Determine which of the students currently testing have at least one test that will expire shortly. For example, enter “2” days to determine who needs to complete testing by the end of the next day.
- Use in exactly for a certain day and within to search for a range of days.
- Note the following about the report produced by this filter:
- Session ID or TA Name: Students’ most recent [Session ID or TA Name] was [Session ID (optional)] from [start date] to [end date]
- Note the following about the report produced by this filter:
- Search for students who were in a specific session and view the current test status.
- To view this report, enter the TA or TE’s Session ID or enter the TA or TE’s name, and then select a Session ID associated with the TA or TE. It is necessary to select the Date fields to enter the time frame associated with the test administration.
- This report will return the most recent completion status data for students who have taken the selected assessment. The Session ID and TA Name fields are optional. These fields may be left blank, and the user can simply search for completion information within a particular date range. If the Session ID or TA Name is not specified, the date range is limited to 15 days.
- Note the following about the report produced by this filter:
Step 6. Generate Report
Refer to the Column Definitions subsection in the Plan and Manage Testing, Search by SSID, and Progress Summary Reports section for a description of the columns in the on-screen and Excel or CSV reports.
-
Select the [Generate Report] button on the bottom of the Plan and Manage Testing screen to view the results of the selected parameters on the screen. For an LEA, a report where 20 or fewer schools are selected appears on-screen; if there are 21 or more schools, the report goes directly to the Secure File Center as an Excel spreadsheet or CSV file. A test site (school) has the option to view the report on the screen by selecting [Generate Report] or to download the report by selecting the [Export Report] button. Report criteria can be saved by selecting the [Save New Favorite] button. These buttons are shown in figure 13.

Figure 13. Report buttons
-
When the report includes results for 21 or more schools within an LEA, the Secure File Center information box appears because the report will default to a separate file (figure 14).
Figure 14. Export to Secure File Center dialog box
- Select a file type—either Excel or CSV—from the Export to Secure File Center drop-down list to complete the process of report generation (figure 14) or select [Modify Search] to change the search criteria.
- Retrieve the report by selecting the [Secure File Center] button at the top of the Home Page Dashboard screen. Refer to the Secure File Center section for a description of this feature.
-
-
Update the report using different criteria by first selecting the [Support] question mark in the speech bubble [
 ] icon next to the criteria type (indicated in figure 15) and then following the previous steps.
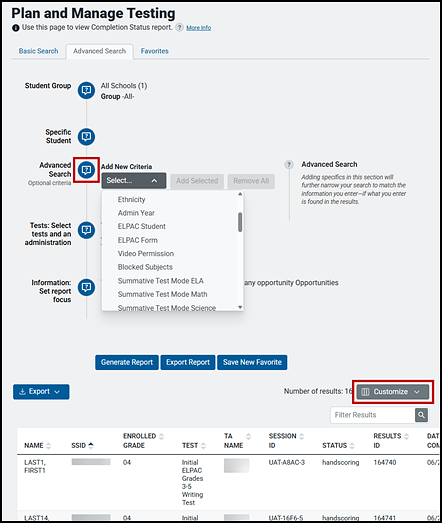
Figure 15. Update Plan and Manage Testing Report parameters
- Customize the table’s columns and display features (such as text size) by selecting the [Customize] button in the top-right corner of the table (also indicated in figure 15).
Favorite Searches
A user can save report-generation criteria to re-create the report during the test administration year.
Take the following steps after a report has been generated:
-
Select the [Save New Favorite] button at the bottom of the report summary details screen to save the criteria (indicated in figure 16).

Figure 16. [Save New Favorite] button
-
Enter a title and description of the report in the Save New Favorite pop-up window (figure 17).
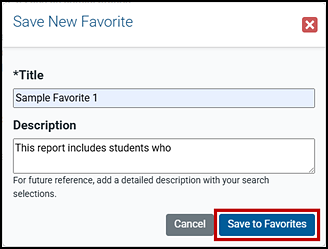
Figure 17. Save New Favorite pop-up window
- Select the [Save to Favorites] button (indicated in figure 17). This will close the pop-up.
-
Favorite report criteria are listed next to the [Plan and Manage Testing] button on the Home Page Dashboard screen. Select the [Search Favorites] button on the right (indicated in figure 18) and then select a report from the Favorite Searches list to run the report.
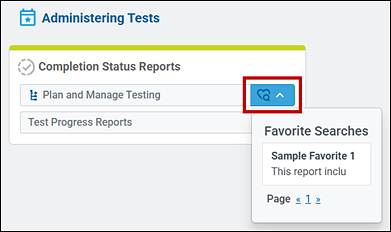
Figure 18. [Search Favorites] button on the Home Page Dashboard screen
-
Another way to open the list of favorite reports is to select the [Advanced] tab on the Plan and Manage Testing screen and then select the report’s hypertext link in the TITLE column of the Favorites table to run the report (figure 19).
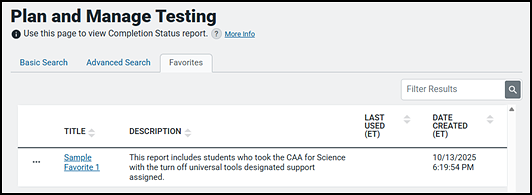
Figure 19. Favorites table
- Select the ellipses next to the favorite’s hypertext title to edit or delete a favorite.
Test Administrator Reports
The Test Administrator Report provides information about the test sessions that match the search parameters, the name of the TA or TE for the sessions as selected from the Group drop-down list, and the number of students associated with each of those sessions. For the Test Administrator Report, the date range is a required field.
Similar to the Plan and Manage Testing Report, the Test Administrator Report allows columns to be hidden or shown, data to be sorted, and the general tools available on the screen to be used.
Follow the steps to generate the Plan and Manage Testing Report, and then take these additional steps to access the Test Administrator Report:
-
In step 1 of an advanced search, after selecting the LEA and school, select a TA or TE name from the Group drop-down list (indicated in figure 20).
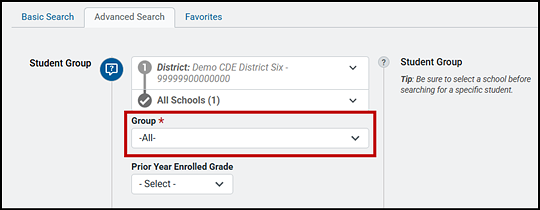
Figure 20. Advanced Search Students options for creating a Test Administrator Report
- Enter any additional criteria, such as a student, optional criteria, or assessments from step 2, step 3, and step 4.
-
In the “Information” section, select the Session ID or TA Name radio button TA Name from the Students’ most recent drop-down list, and then enter a specific date range (figure 21).
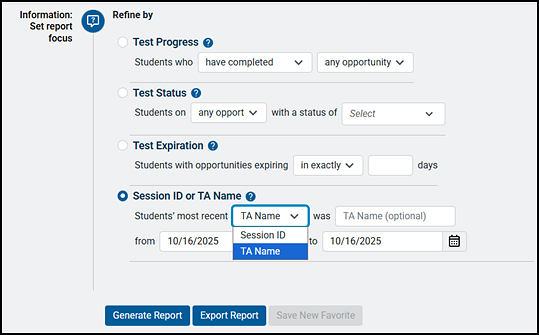
Figure 21. “Information” section options for creating a Test Administrator Report
- Select the [Generate Report] or [Export Report] button (figure 21).
The report generated, either on-screen or exported to a spreadsheet and saved to a default “downloads” folder, contains the same data as the Plan and Manage Testing Report.