macOS
This section describes how to configure macOS desktop and laptop devices for online testing.
Testing Device
A feature in the supported versions of macOS, called Assessment Mode, works with the CAI secure browser to lock down a Mac device for online testing. Users in the field need to do nothing to set up Assessment Mode. Once the secure browser is launched, Assessment Mode starts automatically. For more information about Assessment Mode, including a list of features it disables, refer to Apple’s Set up iPad and Mac to give tests and assessments.
Disabling Fast User Switching
Fast User Switching is a feature in macOS that allows for more than one user to be logged on at the same time. If Fast User Switching is not disabled and students try to access it during a test, the secure browser will pause the test.
To disable Fast User Switching:
-
Choose the Apple menu ➔ System Settings (figure 1) to open the System Settings screen.
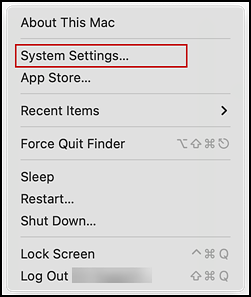
Figure 1. Apple menu
-
Select [Control Center] from the left navigation panel in the System Settings screen (indicated in figure 2).
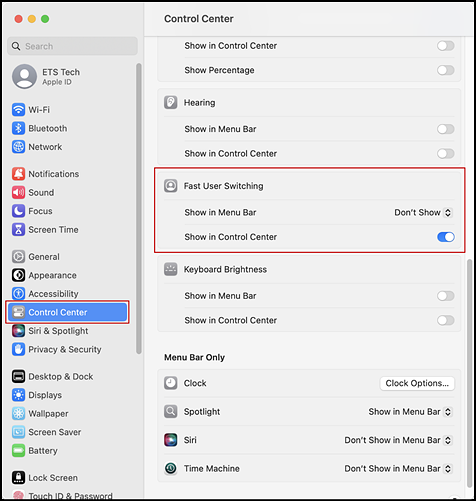
Figure 2. “Fast User Switching” section in the macOS System Settings Control Center panel
- Scroll down the Control Center panel on the right. In the “Fast User Switching” section, verify that the “Show in Menu Bar” option is set to Don’t Show (also indicated in figure 2). Use a toggle arrow to reset it if it is not set to Don’t Show.
- Close the System Settings screen.
Disabling the Text-to-Speech Keyboard Shortcut
A feature in the supported versions of the macOS allows users to have any text on the screen read aloud by selecting the text and pressing a preset key or set of keys on the keyboard. By default, this feature is disabled and must remain disabled so as not to compromise test security. These instructions describe how to toggle this feature.
-
Choose the Apple menu ➔ System Settings (figure 3) to open the System Settings screen.

Figure 3. Apple menu
-
Select [Accessibility] from the left navigation panel (indicated in figure 4).
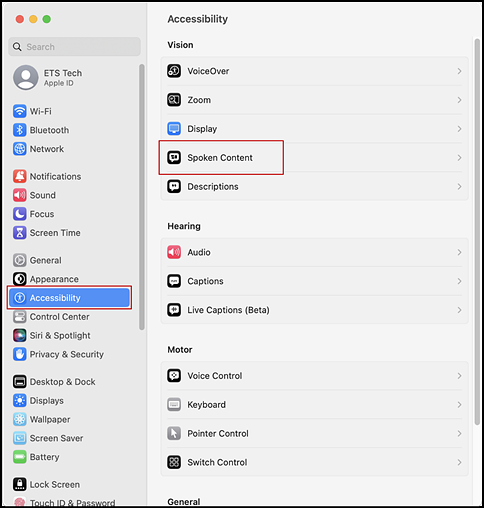
Figure 4. Spoken Content option in the macOS System Settings Accessibility panel
- In the “Spoken Content” section of Accessibility on the right side of the screen, select Spoken Content (also indicated in figure 4).
-
When the Spoken Content panel opens on the right, confirm that Speak selection and the rest of the settings in that group are toggled left, to the “off” position (figure 5).
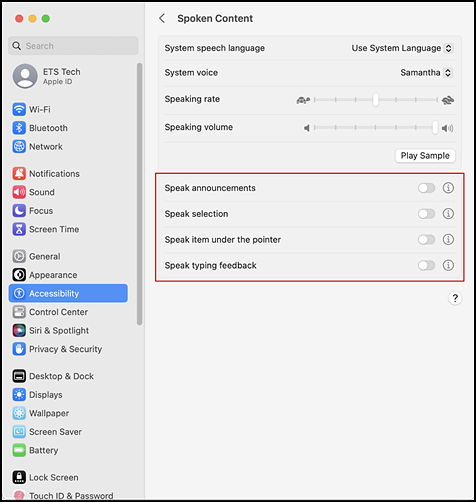
Figure 5. Spoken Content panel in the macOS System Settings screen
- If the settings in the following group are not already disabled, toggle them off by sliding the toggle to the left:
- Speak announcements
- Speak selection
- Speak item under the pointer
- Speak typing feedback
- Close the System Settings screen.
Disabling Third-Party Apps Updates Manually
Updates to third-party apps may include components that compromise the testing environment. This subsection describes how to disable updates to third-party apps.
The following instructions are based on macOS 12.6; similar instructions apply for other supported versions of macOS.
To disable updates to third-party apps:
- Log on to the student’s account.
-
Choose the Apple menu ➔ App Store (figure 6) to open the App Store screen.
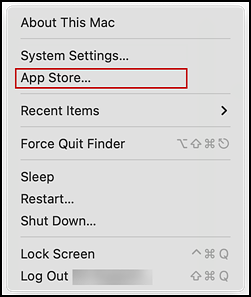
Figure 6. Apple menu with the App Store option
- Select Settings on the App Store menu.
-
If it is checked, uncheck the Automatic Updates box on the Settings screen (indicated in figure 7).
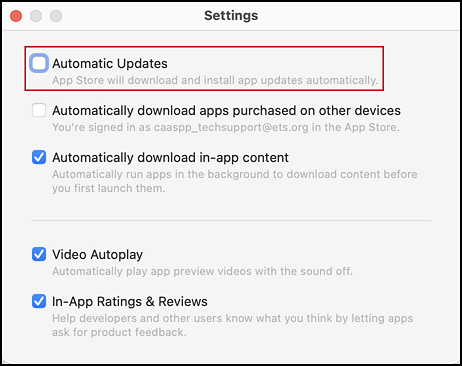
Figure 7. App Store Settings screen
- Close the Settings and App Store screens.
Setting MacBook Pro Touch Bar to Show Function Keys
MacBook Pro touch bars may allow students to access features on a device that should not be accessible while a student is testing. If students try to access these features while taking a test, the secure browser will pause the test. To prevent students from getting exited from a test if they try to use the touch bar to access unwanted features, configure the touch bar to show only function keys.
-
Choose the Apple menu ➔ System Settings (figure 8) to open the System Settings screen.

Figure 8. Apple menu
-
Select [Keyboard] from the left navigation panel (indicated in figure 9).
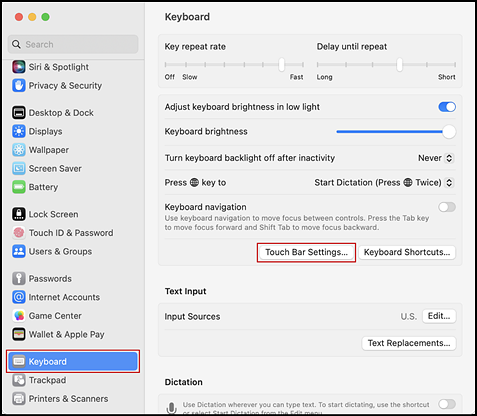
Figure 9. “Keyboard” section in the macOS System Settings screen
- Select the [Touch Bar Settings] button (also indicated in figure 10).
-
In the Touch Bar shows field, verify that the F1, F2, etc. Keys option, as indicated in figure 10, is set. Use a toggle arrow to reset it if it is not.
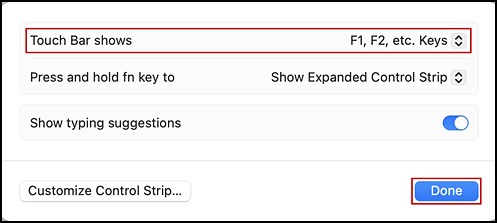
Figure 10. Touch Bar shows option
- Select [Done] (also indicated in figure 10.)
- Close the System Settings screen.
Secure Browser
This subsection provides instructions for installing the secure browser on Mac desktop or laptop computers only; it does not apply to Apple mobile devices such as the iPad.
Installation
Installing on an Individual Device
In this scenario, a user installs the secure browser on Apple desktop and laptop computers. The steps in this procedure may vary depending on the version of macOS and the web browser.
- Previously installed versions of the secure browser will be uninstalled automatically during the installation process.
- Navigate to the CAASPP and ELPAC Secure Browsers website by visiting Technology Resources and Secure Browsers and then selecting the [Secure Browsers] link.
-
Select the [macOS] tab and then select the [Download Secure Browser] button (figure 11).

Figure 11. [Download Secure Browser] for macOS button
- If prompted for a download location, select the Downloads folder.
-
Open [Downloads] from the dock, and then select the downloaded.dmg file (such as CASecureBrowser18.0.dmg) to display its contents (figure 12).
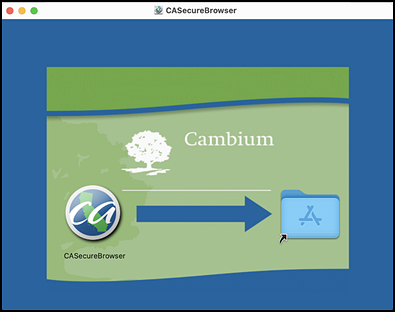
Figure 12. Contents of the CASecureBrowser.dmg folder
- Either hold down the [Control] key when opening the downloaded file to bypass the security on an ad hoc basis; or follow these additional steps to temporarily allow installation from any source. Otherwise, proceed to step 7.
-
Choose the Apple menu ➔ System Settings (figure 13) to open the System Settings screen.
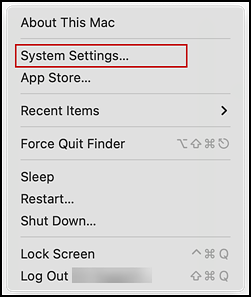
Figure 13. Apple menu
-
Select [Privacy & Security] from the left navigation panel (indicated in figure 14).
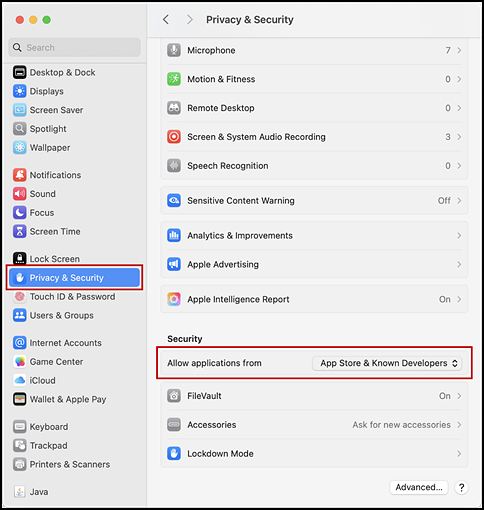
Figure 14. “Security” section in the macOS System Settings Privacy & Security panel
- In the Privacy and Security panel, verify that the App Store & Known Developers has been selected in the Allow applications from scrollable list in the “Security” section (also indicated in figure 14). Select it if it is not.
- Close the System Settings screen.
-
-
Drag the [CASecureBrowser] icon in the CASecureBrowser.dmg to the folder icon on its right (figure 15). This installs the secure browser into Applications.
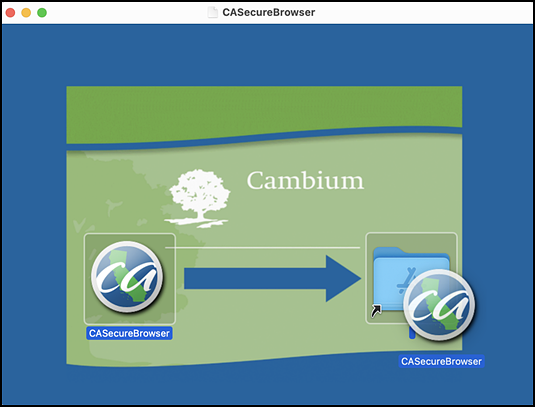
Figure 15. [CASecureBrowser] icon dragged in the CASecureBrowser.dmg folder
- Ensure all background jobs, such as virus scans or software updates, are scheduled outside of scheduled testing days or time frames. For example, if testing takes place between 8 a.m. and 3 p.m., schedule background jobs outside of these hours, making sure they are completed by the time testing begins.
-
In Finder, navigate to Go ➔ Applications, and then double-click [CASecureBrowser] to launch the secure browser (figure 16). (The user must launch the secure browser to complete the installation.)

Figure 16. [CASecureBrowser] shortcut icon for macOS
-
The secure browser opens displaying the student logon screen. The secure browser fills the entire screen and hides the dock.
- To exit the secure browser, select the [X] in the upper-right corner of the screen.
- To create a desktop shortcut, from the Applications folder, drag the [CASecureBrowser] icon (figure 16) to the desktop.
Cloning the Installation
Depending on the local networking and permissions, it may be faster to install the secure browser on to a single Mac, take an image of the disk, and then copy the image to other Macs.
To clone the secure browser installation to other Macs:
- Take the following steps on the Mac where the user will clone the installation:
- Install the secure browser following the directions in the subsection Installing on an Individual Device. Be sure to run and then close the secure browser after the installation.
-
In Finder, display the Library interface (Go ➔ [Option] + Library) and then open the Application Support folder (figure 17).
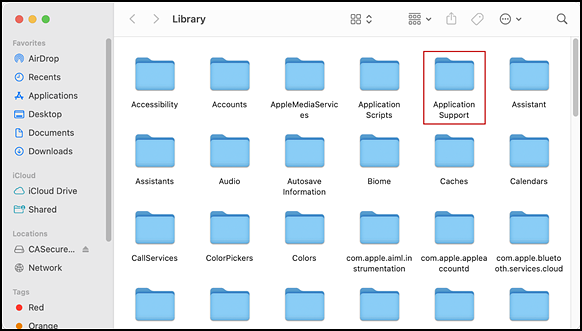
Figure 17. Apple Library interface with the Application Support folder
-
Delete the CASecureBrowser folder containing the secure browser (figure 18).
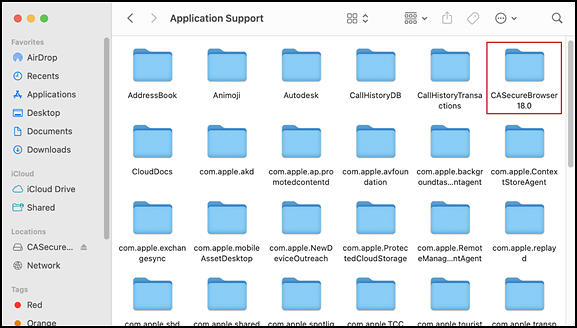
Figure 18. Apple Application Support configuration interface
- Create a shell script that creates a new secure browser profile when a user logs on. The basic command to create a profile is <install_directory>/Contents/MacOS/CASecureBrowser‑‑CreateProfile profile_name, where profile_name is unique among all testing computers.
- Clone the image.
- Deploy the image to the target Macs.
Modifying Desktop Shortcuts
- In Finder, navigate to Applications ➔ Utilities and open Terminal.
-
Change to the desktop directory.
Cd ~/Desktop
-
Create a file securebrowser.command on the desktop using a text editor such as pico.
Pico securebrowser.command.
-
Copy or type the following lines:
#!/bin/sh
/Applications/CASecureBrowser.app/Contents/MacOS/./ CASecureBrowser ‑proxy 1:http:[LEA proxy URL]:8080 & aHR0cHM6Ly9jYS50ZHMuY2FtYml1bWFzdC5jb20vc3R1ZGVudA==
- Be sure to specify the complete path to the secure browser and the desired proxy option. Ensure the command ends with an ampersand (&). Save the file and exit the editor by pressing [Ctrl] + [O], [Enter], and then [Ctrl] + [X].
-
Apply execute permission to the file. In Terminal, type
chmod a+x securebrowser.command
- Close Terminal.
- Select the securebrowser.command icon on the desktop. The secure browser opens with the configured proxy setting.
Resetting Profiles
A user who has been advised by an LEA Success Agent to reset the secure browser profile should take the following steps:
- Log on as the admin user or the user who installed the secure browser and close any open secure browsers.
- Start the Finder.
-
In Finder, display the Library interface (Go ➔ [Option] + Library) and then open the Caches folder (figure 19).
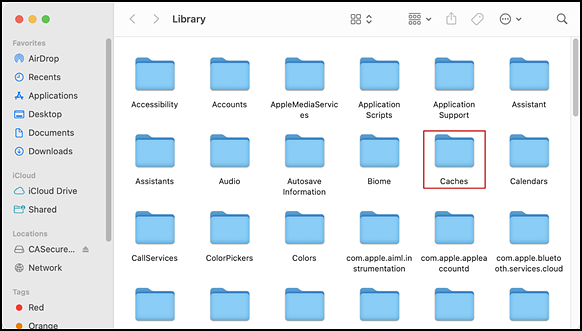
Figure 19. Apple Library interface with the Caches folder
-
Delete the folder containing the secure browser (figure 20).
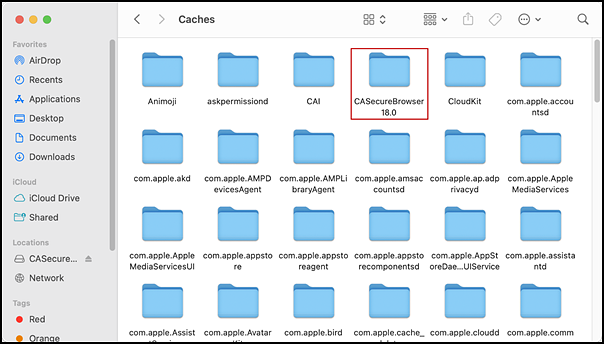
Figure 20. Apple Caches interface
- Restart the secure browser.
Uninstallation
To uninstall a macOS secure browser, drag its folder to the Trash.