Using the TA Interface
Overview of the Test Administration Sites for In-Person Testing
Sites for TAs and TEs
The sites for TAs and TEs, including the Test Administrator Interface and the Test Administrator Practice and Training Site, are accessed through the CAASPP website. To log on to either site, a TA or TE must have an authorized username and password. If a TA or TE has not yet received an email with account information, the TA or TE should contact the LEA CAASPP coordinator or CAASPP test site coordinator (as applicable).
This section describes the test administration sites for TAs and TEs. Throughout the rest of this user guide, “Test Administrator Site” refers to both the Test Administrator Interface and Test Administrator Training Site.
Test Delivery Site
The test delivery site delivers California’s computer-based CAASPP assessments. The following sections describe highlights of computer-based testing in general and the test delivery site in particular.
The test delivery site consists of practice sites and summative testing sites. The features of the questions in the practice sites function identically to the summative testing sites, although the practice and training tests themselves are not adaptive, and students have the option of selecting their own designated supports and accommodations.
- Practice Sites
- The Test Administrator and Test Examiner Training Site allows TAs and TEs to practice administering tests.
- The Student Training Site allows students to practice taking tests online and using test tools.
- Operational Testing Sites
- The Test Administrator Interface allows TAs and TEs to administer summative assessments.
- The Student Testing Application allows students to take CAASPP computer-based assessments.
Understanding User Roles
Types of Access
Access to the practice and summative testing sites depends on the user role and web browser.
- TAs and TEs can use any supported web browser to access the Test Administrator Site.
- Students, TAs, TEs, and parents/guardians can use a supported web browser or secure browser to access the Student Training Site as guests. Students can also sign in to a practice test session created by a TA or TE.
- Students use a secure browser to access the student testing application.
For information about supported operating systems and browsers, refer to the CAASPP and ELPAC Technical Specifications and Configuration Guide for Online Testing.
Using the Single Sign-On System
Switching Between Systems
The SSO system allows a TA or TE to log on to multiple systems provided by ETS and CAI. After logging on, the TA or TE can switch between systems without having to log on to and off each system.
SSO integrates the following systems:
- CERS
- Completion Status System
- Lexile® & Quantile® Hub
- Teacher Hand Scoring System
- Test Administrator Interface
- Test Administrator Practice and Training Site
- TOMS
Logging On to the SSO System
Refer to the Single Sign-On section in the CAASPP and ELPAC TOMS User Guide for instructions on how to sign on to the Test Administrator Interface (and all systems that use the SSO service).
About Usernames and Passwords
The username is the email address associated with an account in TOMS. When a TA or TE is added to TOMS, the system sends an email containing a temporary password and a logon link for the CAASPP SSO. To activate the account, the TA or TE must log on within 30 minutes of receiving the email. Do this by entering the code received via email after entering the username and temporary password and then updating the password.
Refer to the Single Sign-On section, Resetting a Password topic, in the CAASPP and ELPAC TOMS User Guide for instructions on what to do if the temporary password has expired or if the password was forgotten.
Test Administrator Site Layout
Figure 1 displays the layout of the Test Administrator Site during an active test session when assessments are administered in person.
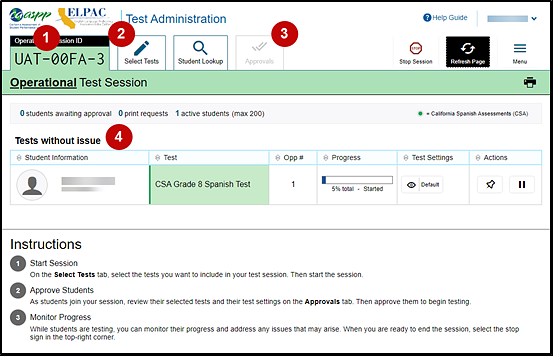
Figure 1. Test Administrator Site layout
Essential Features
The following are essential features in the Test Administrator Site that are indicated in figure 1:
- Session ID
- [Select Tests] tab
- [Approvals] tab
- Tests with potential issues and Tests without issue tables
Figure 2 and table 1 provide an overview of the major features available in the Test Administrator Site.
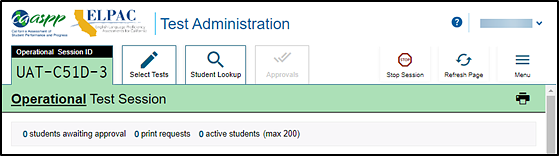
Figure 2. Top of the Test Administrator Interface screen
| Feature | Description or More Information |
|---|---|
| Session ID | This section displays the unique ID generated for the test session. This feature appears after the test session has begun. |
| [Select Tests] tab | This tab opens the Test Selection window. Refer to the subsection How to Start a Test Session. |
| [Student Lookup] tab | This tab starts the process to search for student information; refer to the subsection How to Look Up Students. |
| [Approvals] tab | This tab opens the Approvals and Student Test Settings screen after starting a test session. Refer to the subsection How to Approve Students for Testing. This feature appears after starting a test session. |
| [Help] button | This button displays an online help guide. |
| [Name] drop-down list | This drop-down list displays the Logout option. |
| [Log Out] option | This option logs the TA or TE off the Test Administrator Interface. Refer to the subsection How to Log Off the Test Administrator Site. |
| [Stop Session] button | This button ends the existing test session. Refer to the subsection How to Log Off the Test Administrator Site. |
| [Refresh Page] button | This button updates the on-screen information during a test session. |
| Menu drop-down list | This drop-down list displays the Toggle Screensaver option and the Approved Requests option. |
| Toggle Screensaver option | This option, in the upper-right corner of the Session ID section, enables the screen saver feature. Refer to the subsection How to Enable Screen Saver Mode. |
| Approved Requests option | This option displays a list of print requests approved by the TA or TE during the current session. Refer to the subsection How to Approve Print Requests. |
| [Print] icon | This button starts the process to print the session information on the screen. Refer to the subsection How to Print Session Information. |
| Tests without issue and Tests with potential issues tables | These tables display the testing progress for approved students in the test session. Entries in each table are based on whether or not the student requires assistance with the test session (for example, if a student had submitted a print request). This feature appears after approving students for testing. |
Creating a Test Session
Provide Student Logon Information
Each student will log on to the TDS using a first name, SSID, and test session ID. It is suggested that the SSID and the student’s first name be printed on a card or piece of paper and distributed to each student just prior to testing to help the student type it in the device accurately. It is also permissible to include a photo of the student or include the student’s last name with the logon information as additional safeguards to ensure that the students receive the correct logon information. This information must be provided to each student to complete the logon process.
For students taking the CAAs for ELA, mathematics, and science, the TE must log the student on to the TDS to begin.
Student information is confidential; therefore, the cards or papers with this information must be kept secure until used during a test session and must be securely shredded (destroyed) when testing has been completed. The loss of logon information is considered a security incident at the local level and does not need to be reported in STAIRS.
About Test Settings (Universal Tools, Designated Supports, and Accommodations)
In the test delivery site, “test settings” include embedded universal tools, designated supports, and accommodations, as well as non-embedded designated supports and accommodations. Thus, “test settings” is used throughout this user guide to refer to all embedded universal tools and all embedded and non-embedded designated supports and accommodations, unless otherwise indicated.
TAs and TEs may view student test settings in the Test Administrator Interface. Test settings are grouped into categories. The resources displayed differ by content area.
- Presentation
- Literacy Assistance Resources
- Integration with Assistive Technology
- Visual Assistance Resources
- Auditory Assistance Resources
- Concentration Assistance Resources
- General Testing Resources
Students’ test settings must be reviewed prior to starting a test session.
A student’s accessibility resource test settings must be assigned by the LEA CAASPP coordinator or the CAASPP test site coordinator in TOMS 24 hours before the student’s first day of testing.
How to Start a Test Session
After a TA or TE has logged on to the Test Administrator Interface, the Operational Test Selection window appears. (If it is not open, select the [Select Tests] button in the upper-right corner of the Test Administrator Interface.) Select a test to create a session.
-
The Operational Test Selection window, shown in figure 3, color-codes tests and groups them into various categories. For example, the Smarter Balanced Summative Assessments are likely found in the second category and are colored in red. A test group, such as “Smarter Balanced Summative Assessments,” may include one or more subgroups. All test groups and subgroups appear collapsed by default.
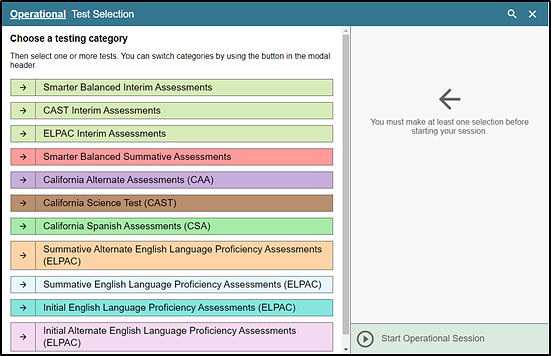
Figure 3. Operational Test Selection screen
- To select a test or tests for the session, first select the test name and then use one of the following on-screen icons; these are indicated in figure 4.
- To expand a collapsed test group, select the [Plus] plus-sign [
 ] icon
 - To collapse a test group, select the [Minus] minus-sign [
 ] icon.
 - To expand the list of all tests, select the [Expand All] outward arrows [
 ] icon
 -
To select individual tests, mark the checkbox for each test to be included.
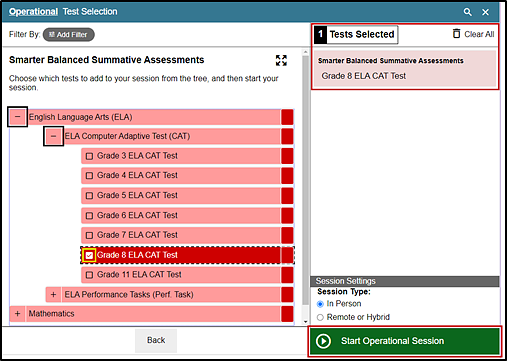
Figure 4. Selected tests in the Operational Test Selection screen
- To expand a collapsed test group, select the [Plus] plus-sign [
- Either use the filtering feature to open specific grade level, grade span, or content-area assessments; or, to start the test or tests listed in the “Tests Selected” section on the right, select the [Start Operational Session] button. These features are indicated in figure 5. Take the following steps to use the filtering feature:
- Select the [Add Filter] button [
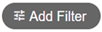 ] to access the filter panel.
 -
Expand the available filter categories by selecting a [Plus] plus-sign [
 ] icon.
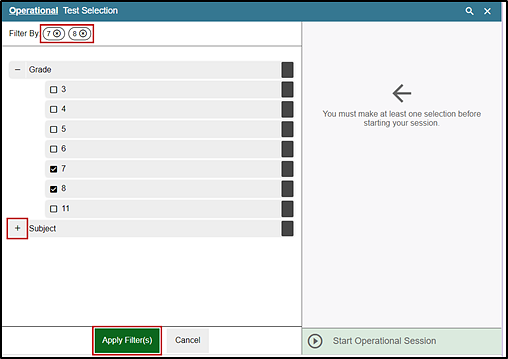
Figure 5. Sample Operational Test Selection screen with filtering option
- Check the criteria to filter.
- Select the [Apply Filter(s)] button [
 ].
]. - Remove the filter by selecting the [Remove Filter] “X” icon [
 ].
]. -
Select the [Start Operational Session] button to start the test (indicated in figure 6).
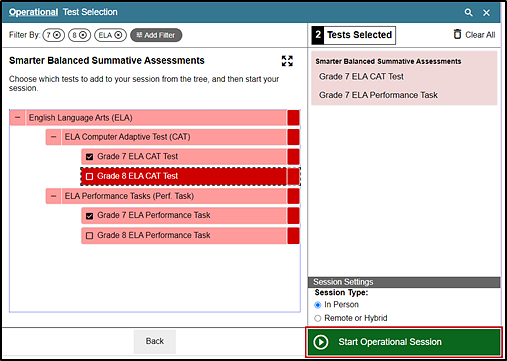
Figure 6. Sample Operational Test Selection screen with filtering applied
- Select the [Add Filter] button [
-
The TA will receive a warning advising that the TA is about to administer a summative assessment and warning that a testing session for a Smarter Balanced assessment or the CAST will be started. If the TA selects [OK] (indicated in figure 7), the TA can either continue with the test administration or exit from the Test Administrator Interface if the TA selected a summative assessment unintentionally.

Figure 7. Summative Assessment confirmation box
- Make a note of the test session ID and then inform students of it.
-
The session ID is automatically generated upon selecting [OK] in the previous step; it is indicated in figure 8.
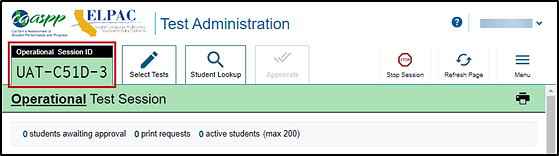
Figure 8. Sample session ID at the top of the Test Administrator Interface
- Write the session ID on a place where all students taking a Smarter Balanced assessment, the CAST, or the CSA can clearly refer to it. If the TE is administering the CAAs for ELA or mathematics, make a note of it to enter into the TDS on behalf of the student.
-
To add tests to an active test session:
- In the upper-right corner of the Test Administrator Site (to the right of the session ID indicated in figure 8), select [Select Tests].
- A confirmation message asks if the TA or TE is sure about modifying the tests in the session. To continue, select [Yes].
- In the Operational Test Selection screen, mark the checkbox for the required test and select [Add to Session] in the lower-left corner.
How to Approve Students for Testing
After students sign in and select tests, the TA or TE must verify that their settings, including any designated supports and accommodations, are correct before approving them for testing. Once that occurs, students can be approved to test, either individually or as a group.
Take the following steps to approve students for testing:
-
Approve students for testing by selecting the [Approve] check mark [
 ] icon in the Actions column for individual students or the [Approve All Students] button, as indicated in figure 9. The list of students awaiting approval can include students at multiple test sites so long as the TA has a user role at those test sites and has provided students with the current session ID.
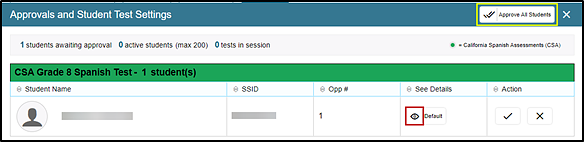
Figure 9. [Approve All Students] button on the Approvals and Student Test Settings screen
-
To confirm a student’s test settings, select the [View] eye [
 ] icon for that student (also indicated in figure 9). The student’s information appears in the Test Settings screen (refer to figure 10). This window groups test settings by their area of need.
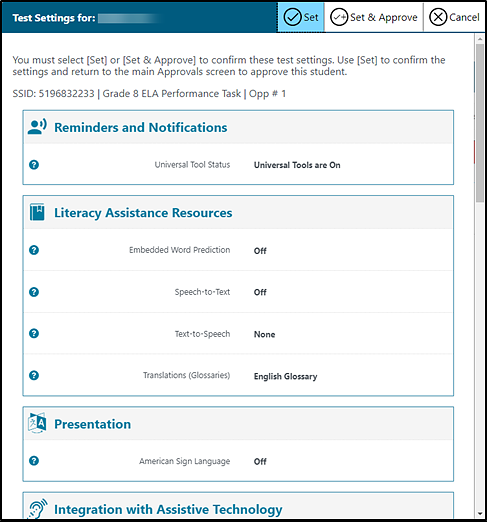
Figure 10. Part of the Test Settings screen for a selected student
-
Review the list to ensure that students are taking the correct test (summative or interim), the correct content area (mathematics, ELA, science, or Spanish) and the correct portion of a test (CAT or PT).
- Verify that students have access to and use of the additional required resources in the Establishing Appropriate Testing Conditions subsection specific to each assessment and content area (e.g., scratch paper for all tests, headphones for ELA, graph paper for mathematics grades six and above).
- If any settings are incorrect, report the incorrect test settings to the CAASPP test site coordinator, who will update them as required in TOMS and reschedule the student’s testing. Students should not begin testing until their settings are correct. Ensuring the test settings are correct before the student begins testing is critical to avoid the need for a test reset that may result in additional testing for the student later.
- Take one of the following steps; buttons are shown in figure 10.
- To confirm the settings, select [Set] at the top of the student’s Test Setting screen. The TA or TE must still approve the student for testing (refer to step 5).
- To confirm the settings and approve the student, select the [Set & Approve] button.
- To return to the Approvals and Student Test Settings screen without confirming settings, select [Cancel].
-
-
Repeat step 2 for each student in the list.
- If the TA or TE needs to deny a student access to testing because, for example, test settings are not correct, take the following steps (otherwise, skip to step 5):
- Select the [Deny] “X” [
 ] icon in the Actions column for that student.
 - Optional: In the window that appears, enter a brief reason for denying the student.
-
Select the [Deny] icon. The student receives a message explaining the reason for the denial and is logged off the student testing application.
- Select the [Deny] “X” [
- If the TA or TE wants to approve students directly from the Approvals and Student Test Settings screen, take one of the following actions:
- To approve individual students, select the [Approve] check mark [
 ] icon in the Actions column for each student.
 - To approve all students displayed in the list, select [Approve All Students].
- To approve individual students, select the [Approve] check mark [
How to Monitor Student Testing
A TA may also use the Test Administrator Interface to view the testing progress of any student. However, because the CAA is administered one-on-one, it is not necessary for a TE to monitor student progress in this way. This screen will not show test questions or scores but will let the TA or TE know the percentage of questions that have been delivered to each student.
At the start of the test, all the students in the session are listed in the Tests without issue table. If the Test Administrator Interface detects that a student requires assistance, such as that a student has a pending print request or a student’s test has been paused because of an environment security breach or the launch of a forbidden application, the Tests with potential issues table appears at the top listing the students who need intervention.
The Progress column is called out in figure 11. Student sessions can be sorted by selecting any of the column heads.
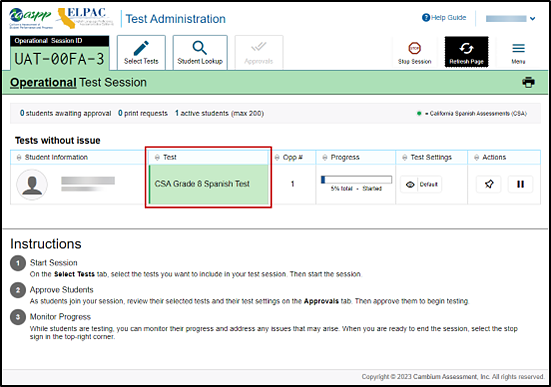
Figure 11. Monitoring student status in the Test Administrator Interface
Table 2 describes the columns in the Tests table. To sort the table by a given column, select that column header.
| Column | Description |
|---|---|
| Student Information | This column displays the first and last name of the student in the session as well as the SSID associated with the student (as they appear in CALPADS and TOMS). |
| Test | This column displays the name of the test the student selected. |
| Opp # | This column displays the opportunity number for the student’s selected test. Each student has only one opportunity for each summative test. |
| Progress | This column displays the student progress through the test and shows the percentage of items presented from the number of items available as well as the questions that were skipped (displays in a different color; not shown in figure 10) as well as including a status. Statuses are listed in table 3. |
| Test Settings |
This column displays one of the following: Default: Default test settings are applied for this test opportunity; there were no additional test settings assigned in TOMS for this student. Custom: One or more of the student’s test settings or universal tools, designated supports, or accommodations differ from the default settings. To view the student’s settings for the current test opportunity, select the [View] [ |
| Actions |
The icons in this column allow the TA or TE to perform an available action for an individual student’s test. Select the [Pause] double-line [ The [Pin] push-pin [ When a student approved for and assigned the print-on-demand accommodation requests a printout of a reading passage or other test material, a [Print] icon will appear in this column. Select the [Print] icon to review and authorize or deny the student’s request. For more information, refer to the subsection How to Approve Print Requests. |
 ] icon.
 ] icon to pause a student’s test. When a test pauses, this column displays an information button that opens a pop-up message explaining how the test became paused. For more information, refer to the
  ] icon allows educators to bring specific tests into focus at the top of the screen during test session monitoring. This might be useful if a student needs extra time, has issues with focus, or has experienced technical issues during testing.
Table 3 describes the describes the status under the student’s progress in the Progress column of the Tests table.
| Status | Description |
|---|---|
| Approved | The student has been approved but has not yet started the assessment. |
| Started | The student started the test and is actively testing. |
| Review | The student had gone through all questions and is currently reviewing answers before completing the test. |
| Completed | The student has submitted the test, so the student can take no additional action. |
| Reported | The test passed quality assurance and is undergoing further processing. |
| Paused* | The student’s test is paused. The time listed indicates how long the test has been paused. |
| Expired* | The test was not completed by the end of the testing window and the opportunity expired. |
| Pending* | The student is awaiting approval for a new test opportunity. |
| Suspended* | The student is awaiting approval to resume a test opportunity. |
* Statuses marked with an asterisk (*) appear when the student is not actively testing. The student’s row grays out in such cases.
How to Pause a Student’s Test
The TA or TE can pause a student’s test via the Actions column in the Tests without issue table (refer to figure 1). For information about pause rules, refer to the subsection Pause Rules.
To pause an individual student’s test:
- Alert student(s) the test is being paused.
- In the Actions column, select the [Pause] double-line [
 ] icon for a student.
 - Select [OK] to confirm. The TA or TE logs the student off, and an information button appears in the Actions column.
How to Look Up Students
The TA or TE can use the student lookup feature to perform a quick or advanced search for student information. This is useful if students signing in to the test session cannot remember their logon information. The student must enter a first name exactly as it appears with the student lookup tool. If the first name contains a space or a special character, it must be entered as it appears. (Refer to the guidelines in the Step 1: Signing a Student In subsection for information about entering Unicode characters for special characters such as accented letters.)
To perform a quick search:
- In the banner at the top of the Test Administrator Interface (figure 11), select the [Student Lookup] tab.
-
Enter a student’s full SSID in the SSID field and select the [Search] magnifying glass [
 ] icon. Quick Search results appear below the search field (refer to figure 12).
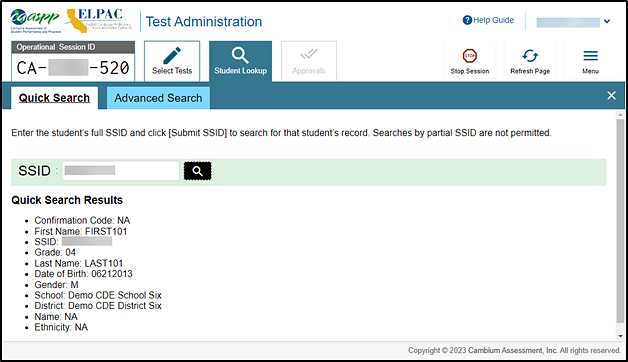
Figure 12. Student Lookup: Quick Search
To perform an advanced search:
- Select [Student Lookup] > [Advanced Search].
- Select the appropriate LEA and school from the District/School drop-down lists.
- Select the appropriate grade level.
- Optional: Enter all or part of a student’s first or last name. If there are special characters in the student’s first or last name, refer to the guidelines in the Step 1: Signing a Student In subsection for information about entering Unicode characters.
-
Select the [Search] magnifying glass [
 ] button. Advanced Search results appear to the right of the search fields (refer to figure 13).
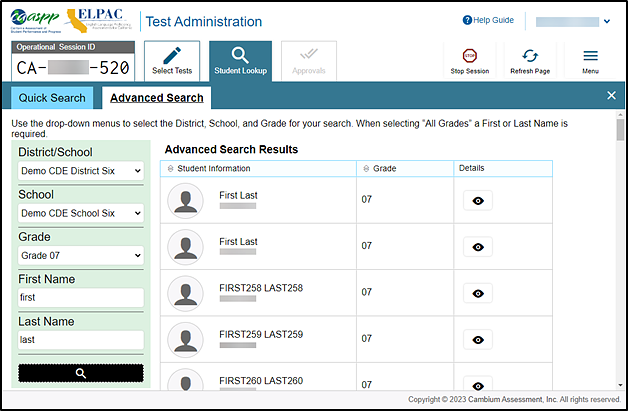
Figure 13. Student Lookup: Advanced Search
- To view a student’s information, select the [View] [
 ] icon in the Details column.
How to Enable Screen Saver Mode
Because the student test progress tables in the Test Administrator Interface may contain sensitive student information, such as SSIDs, there is a screen saver built in to the Test Administrator Interface that will be active in the web browser application window either when the TA or TE activates it or will activate automatically, if the TA or TE is not active in the Test Administrator Interface for five minutes. It turns off when the TA or TE returns the device’s focus to the web browser window by, for example, moving a mouse’s cursor over it. It will also turn off automatically if the test session times out due to TA, TE, or student inactivity.
The screen saver masking hides data from view and shows the session ID, as presented in figure 14. When students are awaiting approval when the screen saver is active, this information is included under the session ID.
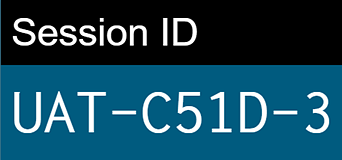
Figure 14. Sample session ID in the Test Administrator Interface screen saver
The TA or TE can turn the screen saver on manually by selecting the Toggle Screensaver option from the Menu drop-down list. The Toggle Screensaver option is indicated in figure 15.
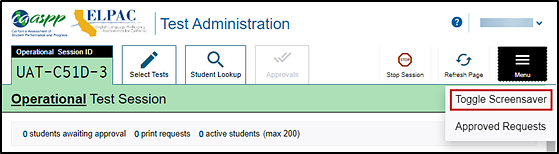
Figure 15. [Toggle Screen Saver] section of the “Session ID” box
How to Approve Print Requests
A student using the print-on-demand tool can request printouts of test passages and questions. When the student sends print requests, the request notification appears in the Tests table (refer to figure 1). The print-on-demand designated support must be assigned in the test settings in TOMS.
To approve print requests:
-
Select the [Print] printer [
 ] icon in the Actions column of the Tests with potential issues table. The Student Print Request window appears (figure 16).
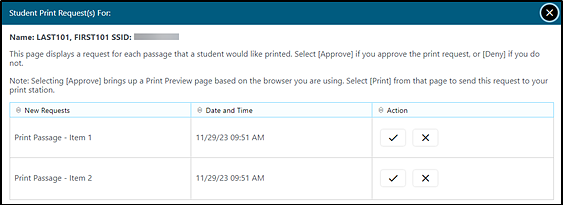
Figure 16. Student Print Requests window
- Review the print request and take one of the following actions in the Student Print Request window (figure 16):
- To approve the request, select the [Approve] check mark [
 ] icon in the Action column. A cover sheet appears in a new browser window.
 - To deny the request, select the [Deny] “X” [
 ] icon in the Action column. In the window that appears, enter a brief reason for denying the request and select the [Deny] button. Do not proceed to step 3.
- To approve the request, select the [Approve] check mark [
- A printer dialog box opens with a cover page and the items that were selected to print.
- Select [Print] to print the requested test elements.
Viewing Approved Requests
The TA or TE can view a list of every print request approved during the current session.
To view approved requests:
-
Select Approved Requests from the Menu drop-down list (figure 17).
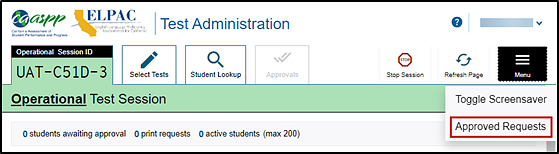
Figure 17. Approved Requests option on the Test Administrator Interface
-
The Approved Requests window opens, listing print requests by student. To print the list of approved requests, select the [Print] button (indicated in figure 18).
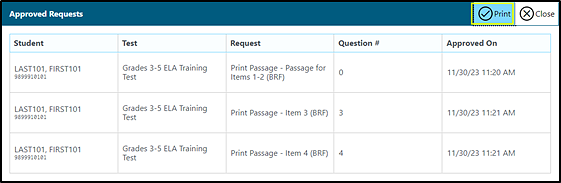
Figure 18. Approved Requests window
How to Print Test Session Information
The TA or TE can print a snapshot of the Test Administrator Site as it currently appears if a hard-copy record of the session ID or list of approved students is wanted.
To print a snapshot of the page (i.e., screen):
- In the banner at the top of the Test Administrator Interface, select [Print Session]. The device’s print dialog window appears.
- Select the required print settings and then select the approval button ([Print] or [OK], depending on the web browser).
Ending a Test Session
This subsection explains how to stop a test session and log off the Test Administrator Site.
How to Stop a Test Session
When students finish testing or the current testing period is over, the TA or TE should stop the test session. Stopping a session automatically logs off all the students in the session and pauses their tests. Once the TA or TE stops a test session, the TA or TE cannot resume it. To resume testing students, the TA or TE must start a new session.
To stop a test session:
-
In the upper-right corner of the Operational Test Session screen, select the [Stop Session] button (refer to figure 8). When selected, the Important message box appears (figure 19). However, ending the test session will pause any student test in the session that is still in progress.
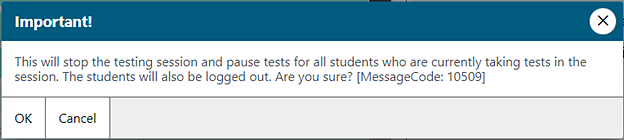
Figure 19. Important! message box
- Select [OK]. The test session stops.
How to Log Off the Test Administrator Site
Use caution when logging off the Test Administrator Interface, as this will log off other related systems (for example, TOMS). The TA or TE should log off the Test Administrator Site only after stopping a test session.
To log off the Test Administrator Site:
-
Select the [Name] drop-down list in the top-right corner of the screen, and then select Logout (figure 20).
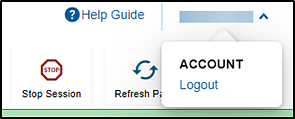
Figure 20. Logout option under the [Name] drop-down list
- When the warning message appears, select [OK]. The session will close, and the front page of the CAASPP website appears.
Accidentally Closing the Browser Window
If the TA or TE accidentally closes the browser while students are testing, the session remains open until it times out in 30 minutes. To return to the test session in the Test Administrator Site, the TA or TE must navigate back to the Test Administrator Interface and enter the active session ID.
If the TA or TE does not return to the active session within 30 minutes, the test delivery site logs the TA or TE off and pauses the students’ tests.
Testing Over Multiple Sessions or Days
Refer to the Duration and Timing Information subsection for estimated testing times and estimated test durations.
Smarter Balanced Assessments, CAST, and CSA
For some tests, particularly the Smarter Balanced PTs and the optional CSA, students may be best served by sequential, uninterrupted time that may exceed the time in a student’s schedule. Smarter Balanced recommends that the ELA PT be administered in two sessions, corresponding with Part 1 and Part 2. Students can be provided breaks within each part; however, once a student moves on to Part 2, the student will not be able to review or revise items in Part 1. For this reason, it is recommended that students complete Part 1 in one test session; Part 2 would ideally be delivered the next school day. For the mathematics PT, Smarter Balanced recommends that it be administered in one test session of 40–120 minutes.
For the CSA, given the total estimated testing time—approximately four to four and one-half hours—it is recommended to administer the CSA over multiple sessions spanning several days.
If the TA intends to administer a test over the course of multiple days for a student or group of students, the TA may ask students to pause at a designated point. There is nothing built into the system to prevent students from progressing from one item or segment of the test to another. The TA should give the students clear directions on when to pause and be made aware that they will not be able to return to any partially completed CR items after a pause of more than 20 minutes. This guidance may be written on a dry-erase board, chalkboard, or another place to which students can easily refer.
Students will receive a notification when they reach the end of the segment or the assessment, similar to the notification shown in figure 21.
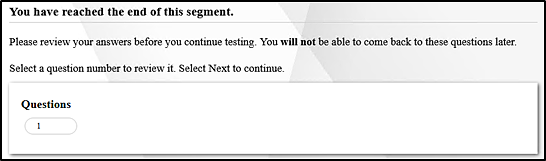
Figure 21. Sample End Segment screen
When testing is resumed on a subsequent day, the TA will need to start a new test session and provide a new session ID. When instructing the students to log on, TAs should read the unitalicized sections of the general script (SAY statements) to the students from the beginning.
CAAs
Students typically take approximately 60 to 100 cumulative minutes or less to successfully complete a single content area—ELA, mathematics, or science—of a CAA. If at any time the TE administering the test feels the student is no longer engaged in the test, is not actively participating, or is showing signs of behavioral or functional concerns related to the test, the TE can make the decision to pause or end the test. If the choice is made to pause the test, the student can reenter and complete testing once settled, or when the TE feels it is appropriate. If the decision is made to end the test based on the best interests of the student, the TE will need to advance through the remaining test items until reaching the [Submit Test] button and then submitting the test.
Transferring a Test Session
The TA or TE can transfer an active test session from one device or web browser to another without stopping the session or interrupting in-progress tests. This is useful in scenarios when a device malfunctions while a session is in progress.
The test delivery site ensures that the TA or TE can only administer a test session from one web browser at a time. If the TA or TE moves a test session to a new device, the TA or TE cannot simultaneously administer the session from the original web browser or device.
These instructions apply to both the Test Administrator Interface and Test Administrator Training Site. Additionally, the TA or TE cannot transfer a session from the Test Administrator Interface to the Test Administrator Training Site or vice versa.
To transfer a test session to a new device or web browser:
-
While the session is still active on the original device or web browser, log on to the Test Administrator Site on the new device or web browser. The [Active Sessions] tab appears, listing the active session (figure 22).
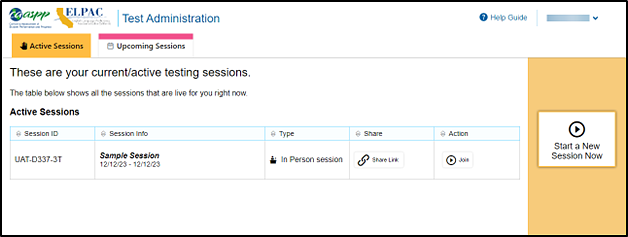
Figure 22. [Active Sessions] tab
- Select [Join]. The test session screen appears, allowing the TA or TE to continue monitoring students’ progress. The test session on the previous device or web browser automatically closes.
Scheduling a Test Session
Test sessions can be scheduled only after the testing window has opened. Sessions can be scheduled for any date within two weeks from the current date. Take the following steps to schedule a test in advance:
- Log on to the Test Administrator Interface.
-
Select the [Upcoming Sessions] tab and then the [Schedule a Session] button (figure 23).
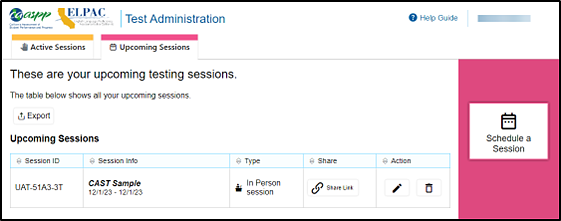
Figure 23. [Upcoming Sessions] tab with the [Schedule a Session] button
- Select the start and end date for the future test session and then the [Next] button.
-
Choose the testing category of the assessment to schedule. An example of the Operational Test Selection screen showing the testing categories is presented in figure 24.
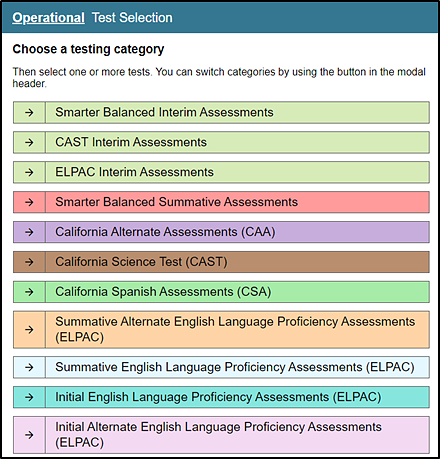
Figure 24. Operational Test Selection screen
-
Select the plus-sign [Expand] icon to expand the options for the exact grade and name of the test students will take (figure 25). Test categories are separated by color and identified by name.
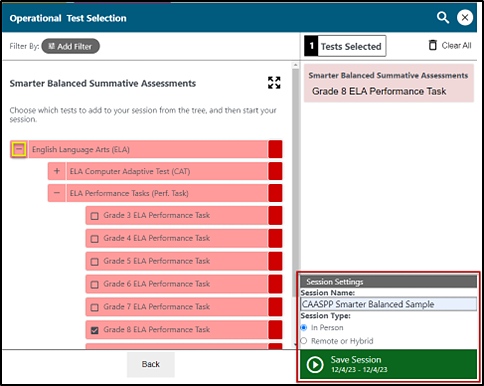
Figure 25. Expanded tests in the Operational Test Selection screen
-
In the “Session Settings” section in the lower-right corner, enter a session name, select the In Person radio button, and then select the [Save Session] button. A Session Information pop-up box appears, providing the session ID and session link (figure 26).
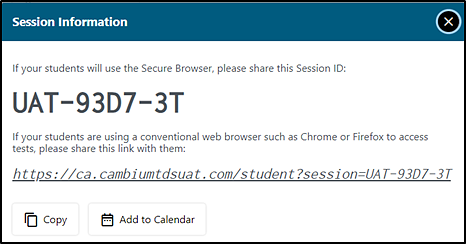
Figure 26. Session Information pop-up box with session ID
- Edit or delete the session in the days prior to the scheduled session date. Note the following about this action:
- Session information is not editable on the day of the session.
- The edit function permits changing the date or selecting additional tests to add to the testing session.
- Only the session type cannot be edited.
- To switch from an in-person session to a remote session or vice versa, delete the session and recreate it with the correct session type.
In-person test sessions are scheduled and administered separately from remote-testing sessions. This allows student results to be categorized and reported correctly.
Test Expiration
Smarter Balanced CAT Items, CAST, and CSA
A student’s Smarter Balanced CAT, CAST, or CSA remains active until the student completes and submits the test or 45 calendar days after the student has begun the test, whichever occurs first. However, it is recommended that students complete the CAT items portion of the test, CAST, or CSA within five days of starting the designated content area.
Smarter Balanced PT
The Smarter Balanced PT is a separate test that remains active for no more than 15 calendar days after the student has begun the PT. However, Smarter Balanced recommends that students complete the PT in each content area within three days of starting. A summary of recommendations for the number of sessions and session durations is provided in subsection Duration and Timing Information.