Administering a Computer-based Test Session
Computer-based Assessments:
- Green—all interim assessments
- Red—Smarter Balanced Summative Assessments
- Indigo—California Alternate Assessments (CAA)
- Brown—California Science Test (CAST)
- Mint—California Spanish Assessment (CSA)
- Teal—Initial ELPAC
- Blue—Summative ELPAC
- Orange—Summative Alternate ELPAC
- Purple—Initial Alternate ELPAC
Online Practice and Training Tests:
- Pink—All practice tests
- Golden Yellow—All training tests
A test session must be created before students can log on to the secure student browser. For a student to take a specific assessment, the assessment must be included in the test session.
This section contains information on how to start a test session, add assessments to the session, verify students’ test settings, approve students for testing, and monitor their progress. The appropriate grade-level or grade-span DFA must also be used when administering the assessments.
Entering Student Responses into the System
A student may enter responses into the testing device using a mouse, keyboard, or other assistive technology.
In the Listening and Reading domains, students are required to select a response for an item before they can move on to the next item. All items must have responses before a student can submit the assessment.
The Writing and Speaking domains do not require a student response for each item to submit the assessment.
Using the Mark as No Response Feature
A Mark as No Response option is available in the grades two through twelve Listening and Reading domains in the context menu. The TE may select this option as the response if the student is no longer able to respond during the assessment.
Selecting Mark as No Response causes the answer options for that question to be grayed out and unselectable. After Mark as No Response has been turned off manually, the TE or student can select a response.
An item marked as No Response is not identified as skipped or omitted at the end of a student’s assessment.
For kindergarten and grade one, No Response is an answer choice for the TE to select if a student does not provide a response to the test question.
Pause Rules
The pause rules that follow apply regardless of whether the student or the TE pauses the assessment, or there was a technical issue (for example, power outage or network failure) that resulted in the student being logged off. For the computer-based ELPAC, there will only be pause rules for the Listening and Reading domains. This means the following:
- When a Listening or Reading assessment is paused for less than 20 minutes, the student must still log back on to the student interface to resume testing. The student will be able to review and edit any previously answered items. Upon resumption, the student is automatically directed to the first page that has an unanswered item.
- When a Listening or Reading assessment is paused for more than 20 minutes, the student must still log back on to the student interface to resume testing. Upon resumption, the student is automatically directed to the first page that has an unanswered item. The student will not be able to view and change any previously answered items.
- For a student to resume testing and change previously answered items, the LEA must submit a Grace Period Extension Appeal. Without the Grace Period Extension Appeal, the student will not be permitted to review or change any previously answered items, even if the items are marked for review. An assessment is reopened or reset within 24 hours of the Appeal’s approval.
- Any highlighted text and notes in the digital notepad will be saved when an assessment is paused.
The Writing domain for grades three through twelve and the Speaking domain for all grade levels do not have pause rules. This means the following:
- When the Writing or Speaking assessment is paused for more than 20 minutes, the student must log back on to the student interface to resume testing. Once logged on again, the student can continue entering responses or review or change any previously answered items.
- Any highlighted text and notes entered in the digital notepad will be saved when an assessment is paused.
Test Timeout (Due to Inactivity)
As a security measure, students and TEs are automatically logged off after 30 minutes of test inactivity. For students, activity is defined as selecting an answer or navigation option in the assessment (for example, selecting [Next] or [Back] or using the Questions drop-down list to navigate to another item). Moving the mouse or selecting an empty space on the screen is not considered activity. This timeout also results in the assessment being paused automatically.
For TEs, activity means that a student or students are registering test activity. As long as students are testing, the TE will not be logged off. The TE should be monitoring the Test Administrator Interface for inactivity, as a paused or inactive assessment may indicate that student may need assistance.
Before the secure browser logs the student off the assessment, a warning message will be displayed on the screen. If the student does not select [OK] within 60 seconds after this message appears, the student will be logged off. Selecting [OK] will restart the 30-minute inactivity timer.
Figure 1 provides an example of the message that appears in a test timeout warning.
![Test timeout warning message that says, 'Are you still there? Click OK to continue or you will be logged out in 30 seconds. [Message Code: 10906].'](/s/elpac-otam/administering-to-students/online-test-session/2024-7c-clip_image001.jpg)
Figure 1. Test timeout warning message
Test Expiration Rules
“Opportunities” refers to the number of times a student can take an assessment within a range of dates. “Test session” is a timeframe in which students actively test in a single sitting.
For the ELPAC, a student has only one opportunity to take each domain of the assessment. The test remains active until the student completes and submits the assessment or until the assessment expires, whichever occurs sooner. The following are the expiration rules:
- Initial ELPAC
- 30 days for all domains
- Summative ELPAC
- 20 days for Speaking and Writing domains
- 45 days for Listening and Reading domains
Once a test opportunity expires, the student cannot complete or review the test unless a Reopen Appeal is submitted through STAIRS.
Beginning the Assessment
The steps for starting the test session and logging the student on to the TDS are found in How to Start an ELPAC Test Session.
Monitoring Student Progress
Test Administrator Site Layout
Figure 2 displays the layout of the Test Administrator Site during an active test session.
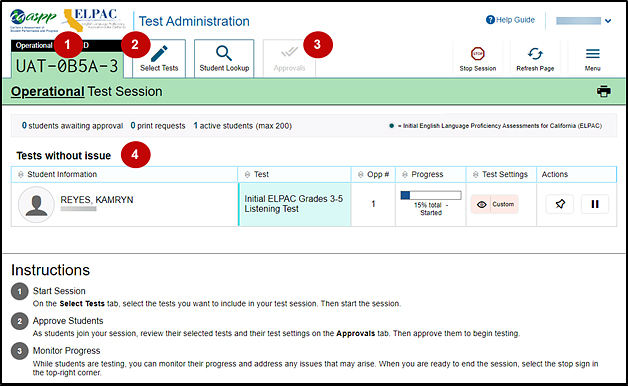
Figure 2. Test Administrator Interface layout
Essential Features
The following are essential features in the Test Administrator Site that are indicated in figure 2:
- Session ID
- [Select Tests] tab
- [Approvals] tab
- Tests without issue table
Figure 3 and table 1 provide an overview of the major features available in the Test Administrator Interface.

Figure 3. Top of Test Administrator Interface screen
| Feature | Description or More Information |
|---|---|
| Session ID | This section displays the unique ID generated for the test session after the test session has begun. |
| [Select Tests] tab | This tab opens the Test Selection window. Refer to the subsection Test Selection. |
| [Student Lookup] tab | This tab starts the process to search for student information. |
| [Approvals] tab | This tab opens the Approvals and Student Test Settings window after starting a test session. |
| [Help Guide] button | This button displays an online help guide. |
| [Name] drop-down list | This drop-down list displays the Logout and Back to Dashboard options. |
| Logout option | This option logs the TE off the Test Administrator Interface. Refer to the subsection Logging Off. |
| [Stop Session] button | This button ends the existing test session. |
| [Refresh Page] button | This button updates the on-screen information during a test session. |
| Menu drop-down list | This drop-down list displays the Toggle Screensaver option and the Approved Requests option. |
| Toggle Screensaver option | This option toggles the screen saver feature. Refer to the subsection Enabling Screen Saver Mode. |
| Approved Requests option | This option displays a list of print requests approved during the current session. Refer to the subsection Approving Print Requests. |
| [Print] icon | This icon starts the process to print the session information on the TE’s screen. |
| Tests without issue and Tests with potential issues tables | These tables display the testing progress for approved students in the test session. Entries in each table are based on whether the student requires assistance with the test session (for example, if a student had submitted a print request). This feature appears after approving students for testing. |
Alert Messages
The CDE can send statewide alerts that appear as pop-up messages on the Test Administrator Site. Refer to the sample in figure 4.
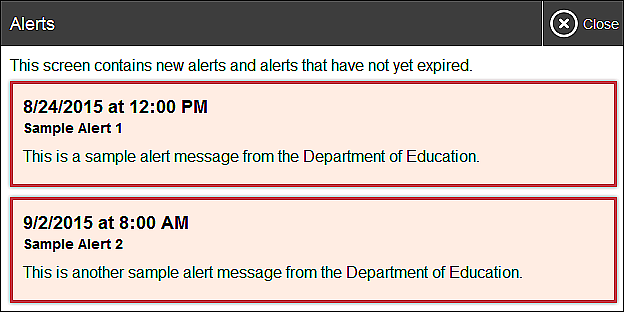
Figure 4. Record of alerts
Test Selection
It is very important that TEs monitor student progress throughout the test session. This includes verifying that students are participating in the appropriate domain and type of assessment (for example, the Summative ELPAC Grades 9–10 Listening Test) and test form. The TE monitors the assessment each student is taking by referring to the Tests without issue table in the Test Administrator Interface (figure 5). Note that the list of student names can be sorted by column headings. The TDS delivers the correct assessment to the student that is based on the student’s grade level.
In the event a student is taking an incorrect assessment, the TE should pause the student’s assessment. The TE should then instruct the student to log off and log on again to select the correct assessment. The TE should then report the incident to the site ELPAC coordinator or LEA ELPAC coordinator, who can file a STAIRS case that can result in the assessment’s being reset.
The Test column is indicated in figure 5.
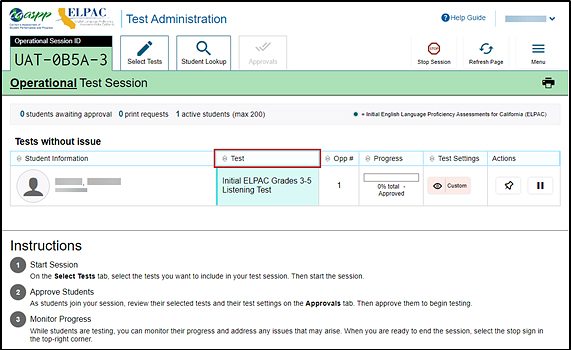
Figure 5. Monitoring student test selection in the Test Administrator Interface
How to Monitor Student Testing
A TE may also use the Test Administrator Interface to view the testing progress of any student. This screen will not show test questions or scores but will let the TE know the percentage of questions that have been delivered to each student.
At the start of the assessment, all the students in the session are listed in the Tests without issue table. If the Test Administrator Interface detects that a student requires assistance, such as a student having a pending print request or a student’s assessment having been paused because of an environment security breach or because of the launch of a forbidden application, the Tests with potential issues table appears at the top listing the students who need intervention.
The Progress column is called out in figure 6. Student sessions can be sorted by selecting any of the column heads.
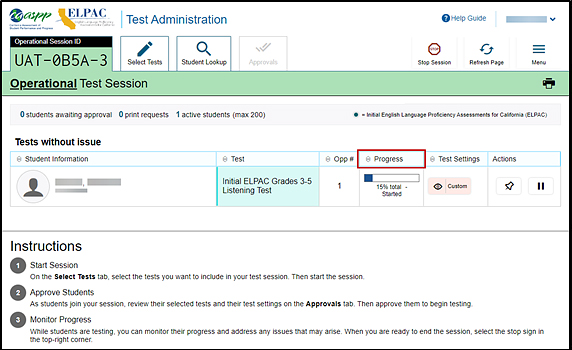
Figure 6. Monitoring student progress in the Test Administrator Interface
Table 2 describes the columns in the Tests table. To sort the table by a given column, select that column header.
| Column | Description |
|---|---|
| Student Information | This column displays the first name and last name of the student in the session as well as the SSID associated with the student (as the student appears in CALPADS and TOMS). |
| Test | This column displays the name of the assessment the student selected. |
| Opp # | This column displays the opportunity number for the student’s selected assessment. Each student has only one opportunity for each domain. |
| Progress | This column displays the student progression through the assessment that shows the percentage of items presented from the number of items available as well as the questions that were skipped (displays in a different color, not shown in figure 6) and including a status. Statuses are listed in table 3. |
| Test Settings |
This column displays one of the following: Default: Default test settings are applied for this test opportunity; there were no additional test settings assigned in TOMS for this student. Custom: One or more of the student’s test settings or universal tools, designated supports, or accommodations differ from the default settings. To view the student’s settings for the current test opportunity, select the [View] eye [ |
| Actions |
The icons in this column allow performance of an available action for an individual student’s assessment. Select the [Pause] double-line [ The [Pin] push-pin [ When a student approved for and assigned the print-on-demand designated support requests a printout of a reading passage or other test material, a [Print] button will appear in this column. Select the [Print] button to review and authorize or deny the student’s request. For more information, refer to the subsection Approving Print Requests. |
Table 3 describes the status under the student’s progress in the Progress column of the Tests table. Statuses marked with an asterisk (*) appear when the student is not actively testing. The student’s row grays out in such cases.
| Status | Description |
|---|---|
| Approved | The student has been approved but has not yet started the assessment. |
| Started | The student started the assessment and is actively testing. |
| Review | The student had gone through all questions and is currently reviewing answers before completing the assessment. |
| Completed | The student has submitted the assessment, so the student can take no additional action. |
| Reported* | The assessment passed quality assurance and is undergoing further processing. |
| Paused* | The student’s assessment is paused. The time listed indicates how long the assessment has been paused. |
| Expired* | The assessment was not completed by the end of the testing window and the opportunity expired. |
| Pending* | The student is awaiting approval for a new test opportunity. |
| Suspended* | The student is awaiting approval to resume a test opportunity. |
Using Stopping Markers
For the Initial ELPAC administration, there are stopping markers for each domain, as noted in the DFAs, that can be used if needed for one-on-one test administrations. The [Note] upside-down triangle [ ] icon indicates the stopping marker for a specific domain. If there had been no responses or correct responses up to the stopping marker, the TE may stop administering the domain by selecting the [Submit Test] button at the top of the Student Interface screen to submit the assessment.
For the Summative ELPAC administration, there are stopping markers in the Speaking domain, as noted in the DFAs, that can be used if needed for one-on-one test administrations. The [Note] upside-down triangle [ ] icon indicates the stopping marker. If there had been no responses or correct responses up to the stopping marker, the TE may stop administering the Speaking domain by selecting the [Submit Test] button at the top of the Student Interface screen to submit the assessment.
In one-on-one test administrations of the Listening and Reading domains for grades three through twelve, the TE may use the TE’s best judgment to decide if a student should continue to test based on the answer keys provided in the DFA. If the TE feels the student cannot continue in the Listening and Reading domains, select the Mark as No Response option in the context menu for each remaining item in the assessment and submit the assessment. For the Writing domain, the TE may select the [Next] button to skip through the remaining items and submit the assessment.
Test Security
Once students have started their computer-based ELPAC, the TE should monitor the room to ensure that all test security conditions are maintained. If the TE witnesses or suspects the possibility of a test security incident, the site ELPAC coordinator and LEA ELPAC coordinator should be contacted immediately in accordance with the security guidance provided in the Test Security chapter of this manual.
Enabling Screen Saver Mode
Because the student test progress tables in the Test Administrator Interface may contain sensitive student information, such as SSIDs, there is a screen saver built in to the Test Administrator Interface. The screen saver is active in the web browser application window either when the TE activates it or after five minutes, if the TE is not active in the Test Administrator Interface. It turns off when the TE returns the device’s focus to the web browser window by, for example, moving a mouse’s cursor over it. It will also turn off automatically if the test session times out because of TE or student inactivity.
The screen saver masking hides data from view and shows the session ID, as presented in figure 7. When students are awaiting approval when the screen saver is active, this information is included under the session ID.
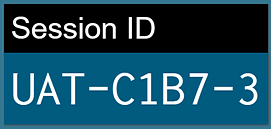
Figure 7. Sample session ID in the Test Administrator Interface screen saver
The TE can turn the screen saver on manually by selecting the Toggle Screensaver option from the Menu drop-down list. The Toggle Screensaver option is indicated in figure 8.

Figure 8. Toggle Screensaver option
Approving Print Requests
Students using the print-on-demand tool can request printouts of test passages and questions. When students send print requests, the request notification appears in the Tests with potential issues table (figure 9). The print-on-demand designated support must be assigned in the test settings in TOMS.
To approve print requests:
-
Select the [Print] printer [
 ] icon in the Actions column of the Tests with potential issues table. The Student Print Request window appears (figure 9).
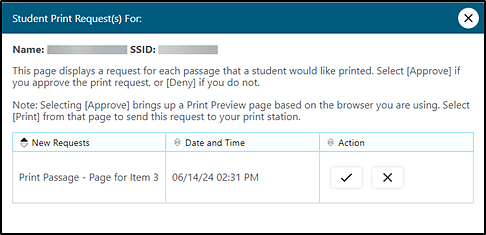
Figure 9. Student Print Request window
- Review the print request and take one of the following actions in the Student Print Request window (figure 9):
- To approve the request, select the [Approve] check mark [
 ] icon in the Action column. Proceed to step 3.
 - To deny the request, select the [Deny] “X” [
 ] icon in the Action column. In the window that appears, enter a brief reason for denying the request and select the [Deny] button. Entering a reason for denial is optional. Do not proceed to step 3.
- To approve the request, select the [Approve] check mark [
- A printer dialog box opens with a cover page and the items that were selected to print.
- Select [Print] to print the requested test elements.
Viewing Approved Requests
To view approved requests:
-
Select Approved Requests from the Menu drop-down list (figure 10).

Figure 10. Approved Requests option on the Test Administrator Interface
-
The Approved Requests window opens, listing print requests by student. To print the list of approved requests, select the [Print] button (figure 11).

Figure 11. Approved Requests window
Ending a Test Session
After answering the last item in each domain, select the [Next] button to get to the Test Review page that prompts the student to review answers for all available items prior to submitting the assessment. Mark for Review, noted by a blue flag, is provided as a reminder to the student that the student had a question or concern about a particular item. In figure 12, item 7 is marked for review.
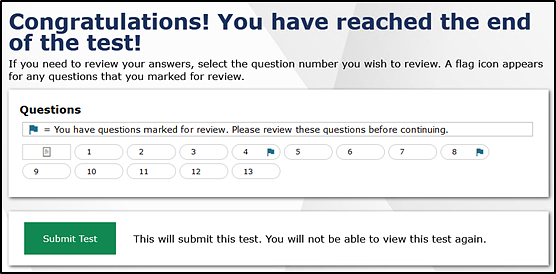
Figure 12. Test Review page
The student is permitted to review all items—marked or unmarked—within the constraints of the pause rule. Students may return to a previous question and modify their response if the assessment was not paused for more than 20 minutes.
Once students have reviewed their answers, they must select [Submit Test] to submit their assessments (figure 12). Once students have selected [Submit Test], students will not be able to review answers. In the case of one-on-one test administration (K–2 and the Speaking domain), the TE selects the [Submit Test] button to submit the assessments.
After students submit the assessment, the Test Summary page (that is, screen) appears, displaying the student’s name, the test name, and the completion date (figure 13).
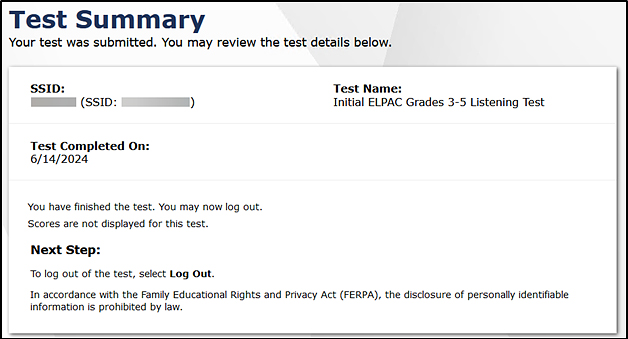
Figure 13. Test Summary page
TEs should select the [Stop Session] button (figure 14) to end the test session

Figure 14. [Stop Session] button on the Test Administrator Interface
When selected, the Important! message box appears (figure 15). However, ending the test session will pause any student assessment in the session that is still in progress.

Figure 15. Important! message box
When finished, TEs can log off the Test Administrator Interface by selecting the [Name] drop-down list at the top right and then selecting Logout. TEs should also collect any scratch paper and follow procedures for local secure destruction as outlined in the Handling Secure Materials section.
Back to Dashboard
To close the test session and return to the Test Administration Dashboard, select the [Name] drop-down list in the top-right corner of the screen, and then select Back to Dashboard (figure 16).
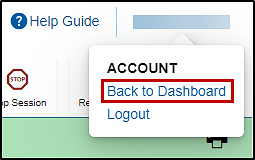
Figure 16. Return to Dashboard option under the [Name] drop-down list
Logging Off
Use caution when logging off the Test Administrator Interface, as this will log off other related systems (for example, TOMS). To log off the Test Administrator Interface, select the [Name] drop-down list in the top-right corner of the screen, and then select Logout (figure 17).
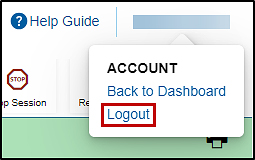
Figure 17. Logout option under the [Name] drop-down list
The session will close, and the TE will be directed to the CAASPP & ELPAC Website after the TE logs off.
Following Test Administration
Destroying Test Materials
As a reminder, the printed and paper test materials identified in the Test Security chapter must be securely destroyed immediately following each test session and may not be retained from one test session to the next.
Reporting Testing Improprieties, Irregularities, and Breaches
Throughout testing, ensure that all test security incidents are reported in accordance with the guidelines in the Test Security chapter in this manual (that is, LEA ELPAC coordinators or site ELPAC coordinators must follow the ELPAC STAIRS/Appeals process in TOMS; refer to the Security Incidents and Appeals Procedure Guide for details about this process).


 ] icon.
 ] icon to pause a student’s assessment. When an assessment pauses, this column displays an information button that opens a pop-up message explaining how the assessment became paused. For more information, refer to the
  ] icon allows educators to bring specific assessments into focus at the top of the screen during test session monitoring. This might be useful if a student needs extra time, has issues with focus, or has experienced technical issues during testing.