Scoring
Scoring the Speaking Domain Locally
The Speaking domain is administered one-on-one with the student and TE and is the only domain that is scored locally, in the moment, by the TE. The TE has two options for capturing the student’s scores in the moment. One option is to log on to the DEI before administering the Speaking domain and enter the student’s scores directly into the DEI while administering the assessment. The second option is to use the Speaking Student Score Sheet (figure 1) in the DFA or, for K–2, the Writing Answer Book, which also includes the Speaking Student Score Sheet to record the student’s scores as the assessment is administered. This second option requires the TE to log on to the DEI as soon as possible after the Speaking domain administration has been completed and enter the scores for the student. If this option is used, the Speaking Student Score Sheet should be kept secure until data entry. In the event the TE misplaces the score sheet prior to entering the scores in the DEI and cannot determine the scores from voice capture, the student might require a Reset Appeal to recapture the student’s responses.
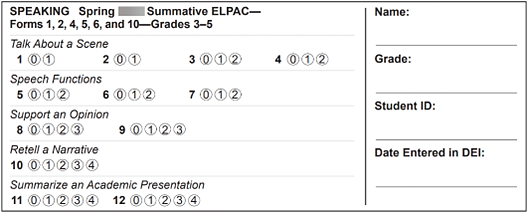
Figure 1. Sample Speaking Student Score Sheet
During the administration of the Speaking domain, the TE should not be concerned about the quality of the voice-capture response but instead should focus on scoring the oral response in the moment. Do not rerecord the student’s response. The Using the DEI chapter of this manual can be used as reference, as it provides the steps that must be followed for entering student Speaking domain scores into the DEI.
Securely destroy the used Speaking Student Score Sheet after a student’s scores have been entered into the DEI.
Audio Capture for the Speaking Domain
During the administration of the Speaking domain, the following guidelines apply to the audio capture tool. The TE should score what the student says, not what is recorded.
Rerecording: If any of the following issues occur, the TE may continue to the next question and does not need to rerecord:
- The TE forgets to record a response.
- The TE records a response on the wrong question.
- There is a red triangle in the review box when ending the test session. If the audio capture times out after two minutes, the TE should allow the student to complete the response and score the complete spoken response and not only what was recorded.
Headsets: Use of headsets with a microphone for voice capture is not recommended by the TE, to enable interaction between the student and TE.
Scoring the Initial ELPAC Writing Domain Locally
K–2
TEs will also need to score the Writing domain responses locally. Students in K–2 will receive a Writing Answer Book. Trained TEs must score the written responses on the Answer Book using the rubric and anchor samples included in the DFA. Scores for each item must be bubbled in the score sheet (figure 2) that is included in the Writing Answer Book. After, these scores must be entered in the DEI for scores to be captured and matched with other domain scores taken on the TDS. The Using the DEI chapter in this manual can also be used as reference, as it provides the steps that must be followed for entering student Writing domain scores into the DEI.
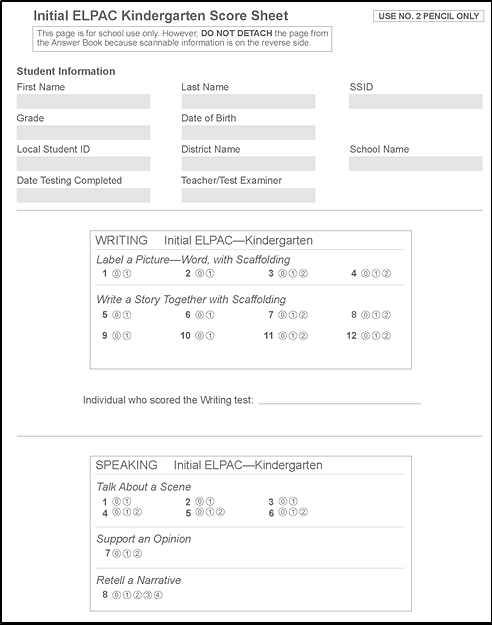
Figure 2. Grade one score sheet in the Answer Book
Grades Three Through Twelve
Students in grades three through twelve enter their Writing domain item responses into the TDS. These responses are then routed to the THSS, where trained TEs can log on to view students’ responses to each item and enter scores.
Initial ELPAC: THSS
Quick Start Instructions to Access the THSS
- Navigate to the CAASPP & ELPAC Website.
- Select the System Links menu.
- Select the THSS—Hand Scoring System item from the drop-down list.
- Log on by entering the TOMS username and password on the Logon screen and selecting the [Secure Logon] button.
- Select the school.
- Select the assessment to score; if no assessments are available to be scored, the page will be blank after the headings.
- Select item responses to score.
- Score item responses.
- Reassign items (optional).
- Select [Submit Score(s)].
More detailed procedures are outlined in the Using the THSS subsection.
THSS User Roles
Scorers
Scorers use the THSS to score the Writing domain item responses for grades three through twelve. Student responses are assigned to the scorer on the basis of the Test Session ID in which the assessment was completed. Scorers can reassign items to other scorers in the same school or score managers from within the school.
TEs are automatically assigned the role of scorer in the THSS. A TE will receive responses for scoring only for the students to whom the TE administered the assessment.
Score Managers
There are two types of score managers: LEA ELPAC coordinator score managers, who can view items completed by any student associated with their LEA; and site ELPAC coordinator score managers, who can view items completed by any student associated with their school. Both types of score managers can reassign students to any scorer within their user level. Score managers inherit scorer properties as part of their role, so they can also score item responses that have been reassigned to them. Table 1 describes the hand scoring roles and their abilities.
| Hand Scoring Role | TOMS User Role | Viewing, Scoring, and Reassigning Abilities |
|---|---|---|
| Scorer | ELPAC Test Examiner, Local Scoring Data Entry |
|
| Score Manager | LEA ELPAC Coordinator, Local Scoring Correspondence Administrator |
|
| Score Manager | Site ELPAC Coordinator |
|
Using the THSS
Step 1. Access the THSS
To access the THSS, TOMS logon credentials (i.e., username and password) are required.
- Open a web browser and navigate to the CAASPP & ELPAC Website.
- Select the System Links menu.
- Select the THSS—Hand Scoring System item from the drop-down list.
-
Enter the required email address and password in the Email Address and Password fields in the Logon screen (indicated in figure 3), and then select the [Secure Logon] button.
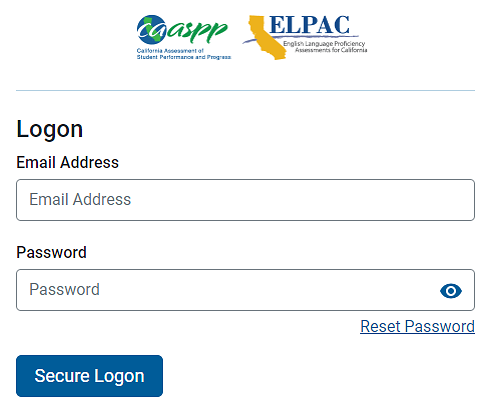
Figure 3. Logon screen
- If the password has been forgotten or otherwise needs to be reset, refer to Access, Logons, and Passwords in the TOMS User Guide for instructions on resetting.
Step 2. Select School
After logging on, the Select school screen will appear (figure 4). Scorers will select the school they wish to use by selecting the arrow from the drop-down list. Test examiners associated to more than one LEA will be asked to select the LEA first.
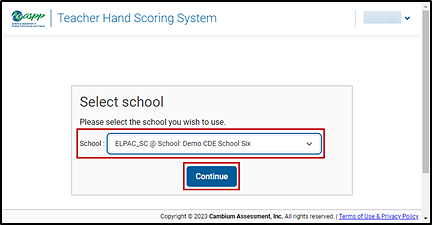
Figure 4. Select school screen—Scorer
- School drop-down list: This list includes the schools assigned to the scorer.
- [Continue] button: This button remains suppressed until the scorer selects the school (figure 4).
Step 3. Select Assessment to Score
After selecting the [Continue] button, the scorer will be directed to the Dashboard—Assessments to score screen (figure 5). The Dashboard view shows the test programs that have been assigned to the scorer. Assessments to score are listed in this table.

Figure 5. Dashboard—Assessments to score screen
- Select the [Change school] button to return to the Select school screen.
- Test Name: The selected assessment to score in this column is accessed by selecting the link.
- Manner of Administration: This column is for interim assessments only. It indicates whether an interim was administered as Nonstandardized or Standardized/Benchmark. Initial ELPAC assessments show as Unassigned.
- Student Count: This column indicates the number of students who took the assessment.
- Items to Score: This column indicates the number of items to be scored.
- Items to Submit: This column indicates the number of scored items to be submitted.
- Date Last Taken: This column indicates the last date the students took the assessment.
- Navigation arrows: These arrows are used to view item responses on other pages if the item response list includes more item to score than what is shown currently on the screen.
Step 4. Select Item Responses to Score
After selecting the assessment, the Test Scoring screen will appear (figure 6). The table on this screen is populated with the test items, which are assigned to the scorer to be scored.
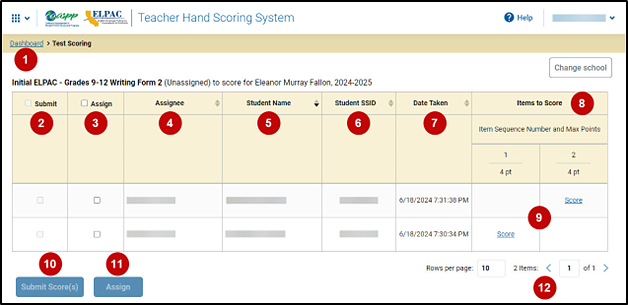
Figure 6. Dashboard—Test Scoring screen
- Select the [Dashboard] link to return to the Assessments to score screen.
- Submit: Boxes in this column remain suppressed until all of a student’s item responses have been scored.
- Assign: Boxes in this column are available to assign scorers to item responses that are to be scored.
- Assignee: This column shows the name of the scorer to which the response is assigned. Use the toggle arrows to sort the names of the assignee in the column.
- Student Name: This column indicates the student’s name. Use the toggle arrows to sort the student names in ascending or descending order alphabetically in the column.
- Student SSID: This column lists the SSID by student.
- Date Taken: This column lists the date and time the student took the assessment.
- Items to Score: This column is separated into two subcolumns on the basis of the Item Sequence Number and Max Points. The [Score] link will change to the points earned number once an item response has been scored.
- [Score] link: This column provides the scoring status of the item. Select this link to score the student’s response.
- [Submit Score(s)] button: The button remains suppressed until the student’s assessment is scored. After a student’s assessment is scored and once the Submit checkbox (callout 2 in figure 6) for one or more students has been selected, the user can select this button to submit scores for the student(s).
- [Assign] button: This button, which is used to reassign student responses for scoring, remains suppressed until an Assign checkbox (callout 4 in figure 6) is selected.
- Navigation arrows: These arrows are used to view student responses on other pages if the list of scores shows more than the designated number of rows of students per page.
The Test Scoring screen can be sorted by assignee, student name, student SSID, and date taken. Score managers can also sort the Test Scoring screen by the assigned scorer.
- Select a column header. The table lists the fields by that column in ascending order.
- To sort the responses in descending order, select the column header again.
Step 5. Score Item Responses
This section explains how to enter scores for responses.
-
In the Items to Score column of the Test Scoring screen (figure 6), select the [Score] link for the response. The Score Response screen appears, displaying the item rubric and anchor samples, which are available in the [Rubric & Resources] tab; and student response, which is located under the [Item & Score] tab (figure 7).
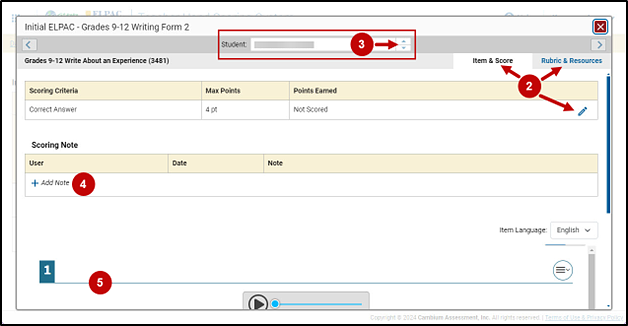
Figure 7. Score Response screen
- In the “Response” section of the Score Response screen (figure 7), the tabs to change between [Item & Score]and [Rubric & Resources] are at the top with the [Edit] pencil icon in the Points Earned column followed by the “Scoring Note” section, item prompt, stimulus, and the student’s response. Navigation buttons are at the top instead of the bottom of the screen.
- Selecting the down arrow on the spinner will go to the next student's item through the full set of students. When the bottom of the list is reached, the button will gray out. Selecting the up arrow will return the scorer to the top.
- A collaboration feature in the THSS lets a scorer add a note. Previous notes cannot be edited, but new notes can be entered into the Scoring Note field to preserve the history, including reassignment notes. Select the [plus sign] icon next to “Add Note” to add a note.
-
The scorer or score manager will scroll across in Score Response screen to view the item card with the sequence number. Table 2 defines the terms used in figure 7. To view the item’s passage and an example of responses at all score points, select the [Anchor samples] link (figure 10), which is located under the [Rubric & Resources] tab.
The three parts of the response section (figure 7) are described in table 2, which follows.
Table 2. Score Response Screen Section Terms
Term Definition Item Prompt A test question or stimulus presented to a student to elicit a response Stimulus Material or materials used in the test context that form the basis for assessing the knowledge and skills of students Student Response Area The designated area for the student’s response to the item prompt -
To enter a score for the response, select the [Edit] pencil icon in the Points Earned column to manually assign a numerical score in the Score field or use the Score drop-down list to increase or decrease the score in increments of one (figure 8). The score cannot exceed the value in the Points column.

Figure 8. Points Earned drop-down list
-
Select the [Save] button to apply the score or [Cancel] (figure 8). The applied score(s) appears on the Score Item screen (figure 9). The Score Item view moves the student’s item to tentatively scored. Scores can be changed and resaved if there is a different opinion of the score. Scores are not applied until the student’s assessment has been submitted.
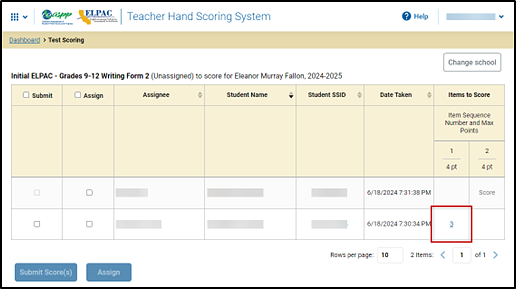
Figure 9. Test Scoring screen with an applied item score
- In the [Rubric & Resources] tab (figure 10), review the rubric description and do one of the following:
-
View anchor samples for each score point as a guide for scoring the student response. Select the [Anchor Samples] link (figure 10) located in the Resource column.
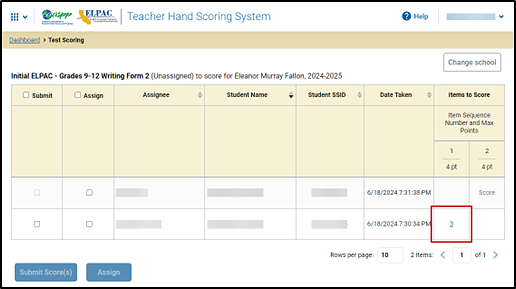
Figure 10. THSS [Anchor Samples] link in the “Resources” section
- Another resource that may be used while scoring in the THSS is a printed or online copy of the appropriate DFA. The DFAs can be accessed in TOMS.
-
-
After finishing entering scores for the response, select [Submit Score(s)] at the bottom of the screen (figure 11). Note that the [Submit Score(s)] button remains suppressed until all the student assessments are tentatively scored.

Figure 11. Navigation for the THSS
- To navigate to the Test Scoring screen for a different item, first close out of the item being scored and then select a [Score] link in an Items to Score column (figure 9); the order of responses is determined by the sorting options chosen on the Test Scoring screen.
- To return to the Test Scoring screen, select [Score].
Step 6. Reassign Responses (If Needed)
The THSS automatically assigns student responses for hand scoring to the TE who administered the session in which the student assessment was completed. If a student started an assessment in one session and completed it in another, the response will be assigned to the TE who administered the session in which the student completed the assessment.
Score managers at the school level (site ELPAC coordinators) can reassign responses to scorers in a school. Those score managers associated with an LEA (LEA ELPAC coordinators) can reassign responses to scorers within the LEA.
What follows is the process for score managers to reassign responses.
- Select the assessment being scored.
-
On the Test Scoring screen (figure 12), mark the checkbox in the Assign column on the left for any student responses intended to be reassigned.
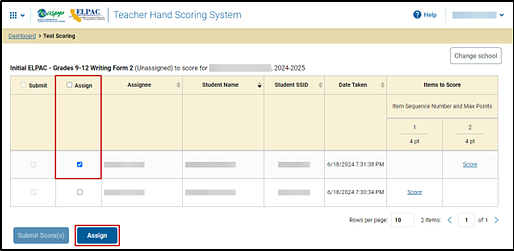
Figure 12. Assign checkbox in the Test Scoring screen
-
Select the [Assign] button at the bottom of the Test Scoring screen. The Assign to New Scorer dialog box appears (figure 13).
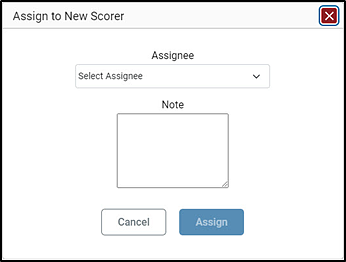
Figure 13. Assign to New Scorer dialog box
- Select a scorer from the Assignee drop-down list shown in figure 13. Only users associated with the user’s school or LEA will appear.
- Enter text in the Note field in the Assign to New Scorer dialog box (figure 13). This note will appear in the “Scoring Note” section on the [Item & Score] tab.
-
Select the [Assign] button. The selected responses are reassigned to the selected scorer. The newly assigned scorer’s name will show in the Assignee column of the table (figure 14); this display is available to score managers only. For scorers, once responses are reassigned, those responses are removed from the original scorer’s response list.
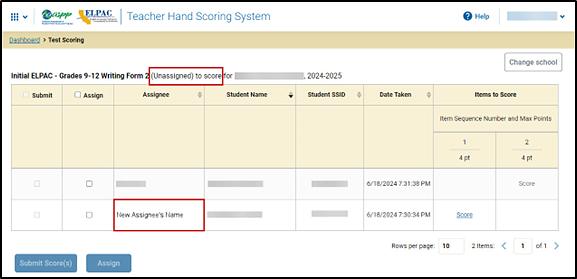
Figure 14. Test Scoring screen with reassigned scorer
Step 7. Submit Student Responses
After scoring responses, the scorer must mark the responses as complete to finish the process.
-
On the Test Scoring screen, mark the checkbox under the Submit column for any responses that have final scores (figure 15). To select all responses, mark the checkbox next to the Submit header or each item response checkbox.
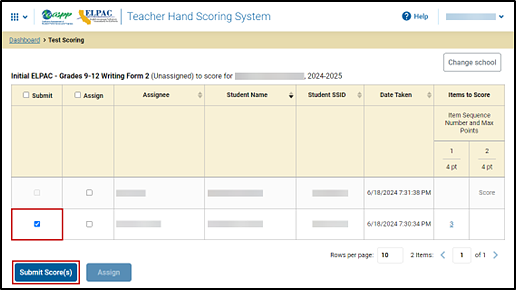
Figure 15. Response marked in the Test Scoring screen
- Select the [Submit Score(s)] button (figure 15).
-
In the Score Submit Alert message box (figure 16) that pops up, select the [Continue] button to submit the score or select [Cancel] to exit.
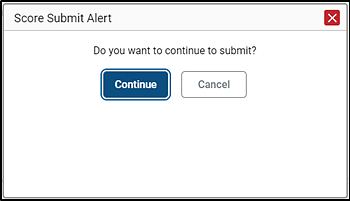
Figure 16. Score Submit Alert message box
-
Once a response has been marked as complete, it is removed from the scorer’s queue (figure 17). The score will disappear from the system.
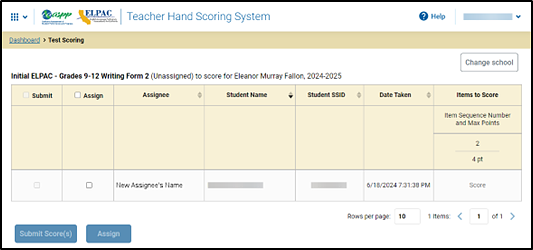
Figure 17. Test Scoring screen with Assignee column
Completed THSS scores will be merged with the other domain scores in TOMS. Once all four domain scores are in TOMS, the system will produce the Initial ELPAC SSR, which will be available in TOMS.
In the event a scorer realizes that an error was made scoring a student’s response in the THSS, the scorer must immediately alert the site ELPAC coordinator (if the scorer is the TE or local scoring data entry staff) or the LEA ELPAC coordinator (if the scorer is the LS correspondence administrator). The site ELPAC coordinator or LEA ELPAC coordinator must submit a STAIRS incident in TOMS.

