Using the Test Administrator Interface
Scheduling a Test Session
Remote test sessions can be scheduled only after the testing window has opened. Sessions can be scheduled for any date within two weeks from the current date. Take the following steps to schedule a remote assessment in advance:
- Navigate to the CAASPP & ELPAC Website on a supported web browser.
-
Select the [Administer a Test Session] button (figure 1).

Figure 1. [Administer a Test Session] button
-
Select the [Test Administrator Interface Logon] button (figure 2).
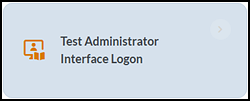
Figure 2. [Test Administrator Interface Logon] button
- Log on to the Test Administrator Interface using the current-year TOMS logon access.
-
Select the [Upcoming Sessions] tab and then either the [Schedule a Session] or [Schedule a Remote Session] button (figure 3).
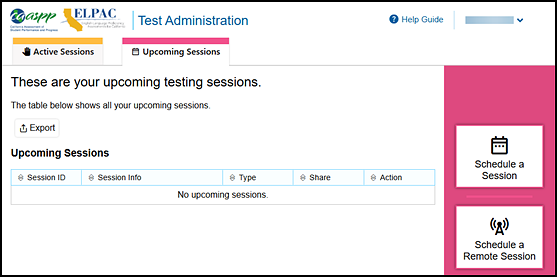
Figure 3. Test Administrator Interface Test Administration screen with the [Upcoming Session] tab and the scheduling buttons
-
In the Operational Test Selection interface, select the start and end date for the future test session and then the [Next] button, which is indicated in figure 4.
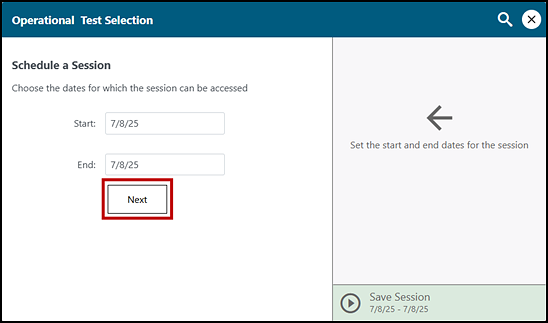
Figure 4. Operational Test Selection interface with the [Next] button
-
Choose the testing category of the assessment to schedule. An example of the Operational Test Selection screen showing the testing categories is presented in figure 5.
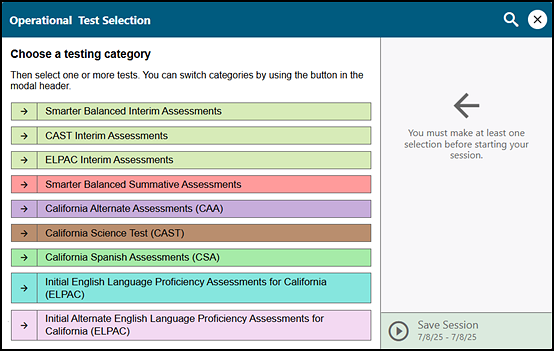
Figure 5. Operational Test Selection screen
-
Select the plus-sign [Expand] icon to expand the options for the exact grade level or grade span and name of the assessment students will take (figure 6). Test categories are separated by color and identified by name.
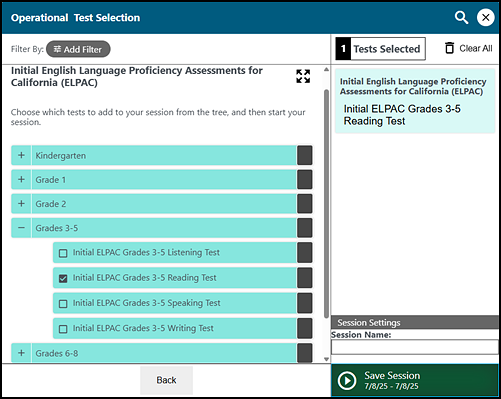
Figure 6. Expanded tests in the Operational Test Selection screen
-
Enter a session name in the Session Name field and then select the [Save Session] button. A Session Information pop-up box appears, providing the session ID and session link (figure 7).
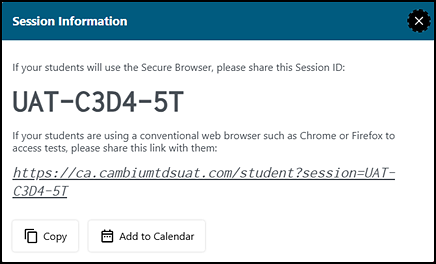
Figure 7. Session Information pop-up box with session ID
-
Edit or delete the session in the days prior to the scheduled session date. Note the following about this action:
- Session information is not editable on the day of the session.
- The edit function permits changing the date or selecting additional assessments to add to the testing session.
- Only the session type cannot be edited.
- To switch from a remote session to an in-person session or vice versa, delete the session and recreate it with the correct session type.
In-person test sessions are scheduled and administered separately from remote test sessions. This allows student results to be categorized and reported correctly.
Looking Up Students
The TE can use the student lookup feature to perform a quick or advanced search for student information. This is useful if students signing in to the test session cannot remember their logon information. The student must enter a first name exactly as it appears with the student lookup tool. If the first name contains a space or a special character, it must be entered as it appears. (Refer to the guidelines in the appropriate How to Start an ELPAC Test Session document for information about entering Unicode characters for special characters such as accented letters.)
To perform a quick search:
- In the banner at the top of the Test Administrator Interface (figure 8), select the [Student Lookup] tab.
-
Enter a student’s full SSID in the SSID field and select the [Search] magnifying glass [
 ] icon. Quick Search results appear below the search field (refer to figure 8).
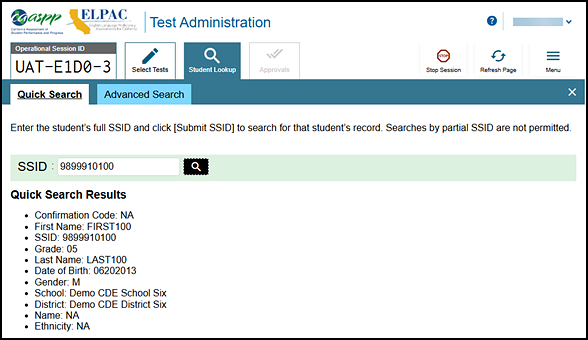
Figure 8. Student Lookup: Quick Search
To perform an advanced search:
- Select [Student Lookup] >[Advanced Search].
- Select the appropriate LEA and school from the District/School drop-down lists.
- Select the appropriate grade level.
- Optional: Enter all or part of a student’s first or last name. If there are special characters in the student’s first or last name, refer to the guidelines in the appropriate How to Start an ELPAC Test Session document for information about entering Unicode characters.
-
Select the [Search] magnifying glass [
] button. Advanced Search results appear to the right of the search fields (refer to figure 9).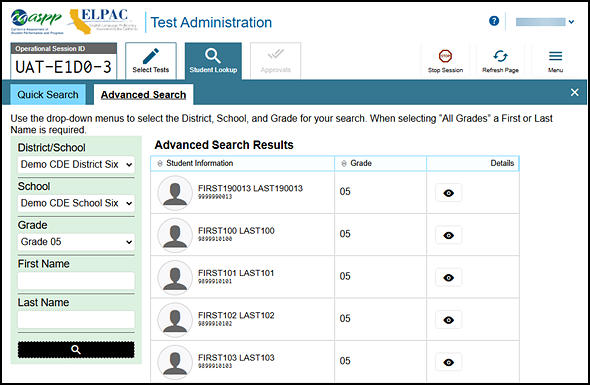
Figure 9. Student Lookup: Advanced Search
- To view a student’s information, select the [View] eye [
 ] icon in the Details column.
Approving Print Requests
Students using the print-on-demand tool can request printouts of test passages and questions. When students send print requests, the request notification appears in the Tests with potential issues table. The print-on-demand designated support must be assigned in the test settings in TOMS.
To approve print requests:
-
Select the [Print] printer [
 ] icon in the Actions column of the Tests with potential issues table. The Student Print Request window appears (figure 10).
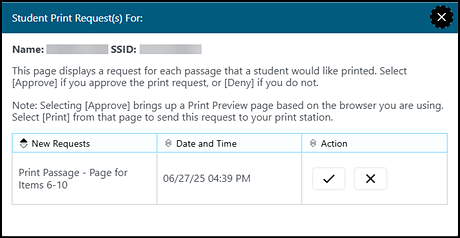
Figure 10. Student Print Request window
-
Review the print request and take one of the following actions in the Student Print Request window (figure 10):
- To approve the request, select the [Approve] check mark [
 ] icon in the Action column. Proceed to step 3.
 - To deny the request, select the [Deny]“X” [
 ] icon in the Action column. In the window that appears, enter a brief reason for denying the request and select the [Deny] button. Entering a reason for denial is optional. Do not proceed to step 3.
- To approve the request, select the [Approve] check mark [
- A printer dialog box opens with a cover page and the items that were selected to print.
- Select [Print] to print the requested test elements.
Viewing Approved Requests
To view approved requests:
-
Select Print Requests from the Menu drop-down list (figure 11).
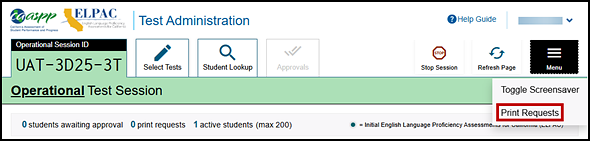
Figure 11. Print Requests option on the Test Administrator Interface
-
The Approved Requests window opens, listing print requests by the student. To print the list of approved requests, select the [Print] button (figure 12).
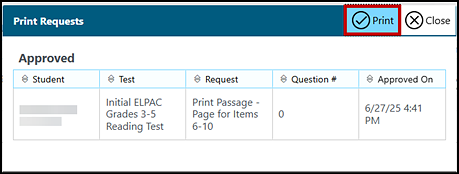
Figure 12. Approved Requests window
Printing Test Session Information
The TE can print a snapshot of the Test Administrator Site as it currently appears if a hard-copy record of the session ID or list of approved students is wanted.
To print a snapshot of the screen:
- In the banner at the top of the Test Administrator Interface, select the [Print Session] printer [
 ] icon. The device’s print dialog window appears.
 - Select the required print settings and then select the approval button ([Print] or [OK], depending on the web browser).
Pausing a Student’s Assessment
Steps
The TE can pause a student’s assessment via the Actions column in the Tests table (refer to figure 13). For information about pause rules, refer to the next subsection, Pause Rules.
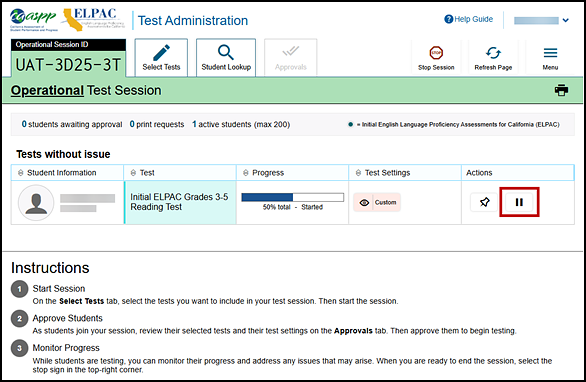
Figure 13. [Pause] button in the Test Administrator Interface
To pause an individual student’s assessment:
- Alert student(s) the assessment is being paused.
- In the Actions column, select the [Pause] double-line [
 ] icon for a student (figure 13).
 - Select [OK] to confirm. The TE logs the student off, and an information button appears in the Actions column.
Pause Rules
The pause rules that follow apply regardless of whether the student or the TE pauses the assessment, or there was a technical issue (for example, power outage or network failure) that resulted in the student being logged off. For the computer-based ELPAC, there will only be pause rules for the Listening and Reading domains. This means the following:
- When a Listening or Reading assessment is paused for less than 20 minutes, the student must still log back on to the student interface to resume testing. The student will be able to review and edit any previously answered items. Upon resumption, the student is automatically directed to the first page that has an unanswered item.
- When a Listening or Reading assessment is paused for more than 20 minutes, the student must still log back on to the student interface to resume testing. Upon resumption, the student is automatically directed to the first page that has an unanswered item. The student will not be able to view and change any previously answered items.
- For a student to resume testing and change previously answered items, the LEA must submit a Grace Period Extension Appeal. Without the Grace Period Extension Appeal, the student will not be permitted to review or change any previously answered items, even if the items are marked for review. An assessment is reopened or reset within 24 hours of the Appeal’s approval.
- Any highlighted text and notes in the digital notepad will be saved when an assessment is paused.
The Writing domain for grades three through twelve and the Speaking domain for all grade levels do not have pause rules. This means the following
- When the Writing or Speaking assessment is paused for more than 20 minutes, the student must log back on to the student interface to resume testing. Once logged on again, the student can continue entering responses or review or change any previously answered items.
- Any highlighted text and notes entered in the digital notepad will be saved when an assessment is paused.
Enabling Screen Saver Mode
Because the student test progress tables in the Test Administrator Interface may contain sensitive student information, such as SSIDs, there is a screen saver built in to the Test Administrator Interface. The screen saver is active in the web browser application window either when the TE activates it or after five minutes, if the TE is not active in the Test Administrator Interface. It turns off when the TE returns the device’s focus to the web browser window by, for example, moving a mouse’s cursor over it. It will also turn off automatically if the test session times out because of TE or student inactivity.
The screen saver masking hides data from view and shows the session ID, as presented in figure 14. When students are awaiting approval when the screen saver is active, this information is included under the session ID.

Figure 14. Sample session ID in the Test Administrator Interface screen saver
The TE can turn the screen saver on manually by selecting the Toggle Screensaver option from the Menu drop-down list. The Toggle Screensaver option is indicated in figure 15.
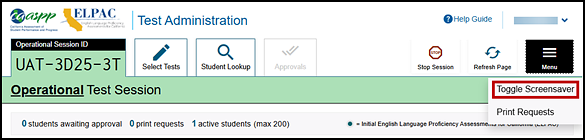
Figure 15. Toggle Screensaver option
Transferring a Test Session
The TE can transfer an active test session from one device or web browser to another without stopping the session or interrupting in-progress assessments. This is useful in scenarios when a device malfunctions while a session is in progress.
The TDS ensures that the TE can only administer a test session from one web browser at a time. If the TE moves a test session to a new device, the TE cannot simultaneously administer the session from the original web browser or device.
These instructions apply to both the Test Administrator Interface and Test Administrator Training Site. Additionally, the TE cannot transfer a session from the Test Administrator Interface to the Test Administrator Training Site or vice versa.
To transfer a test session to a new device or web browser:
-
While the session is still active on the original device or web browser, log on to the Test Administrator Site on the new device or web browser. The [Active Sessions] tab appears, listing the active session (figure 16).

Figure 16. [Active Sessions] tab
- Select [Join]. The test session screen appears, allowing the TE to continue monitoring students’ progress. The test session on the previous device or web browser automatically closes.
Managing Test Expiration
“Opportunities” refers to the number of times a student can take an assessment within a range of dates. “Test session” is a timeframe in which students actively test in a single sitting.
For ELPAC, a student has only one opportunity to take each domain of the assessment. The test remains active until the student completes and submits the assessment or until the assessment expires, whichever occurs sooner. The following are the expiration rules:
- Initial ELPAC
- 30 days for all domains
- Summative ELPAC
- 20 days for Speaking and Writing domains
- 45 days for Listening and Reading domains
Once a test opportunity expires, the student cannot complete or review the test unless a Reopen Appeal is submitted through STAIRS.