ChromeOS
This section describes how to configure Chrome desktop, laptop, and mobile devices for online testing. These instructions assume the user is a Google administrator and can Sign in to access the Admin console.
Testing Device
Disabling Auto Updates
A device administrator may want to disable auto updates during the LEA’s or test site’s scheduled testing days or time frames to avoid unknown issues that may be introduced by future operating system updates (although versions of Chrome are presumed to be supported). For example, if CAI supports up to ChromeOS version 139, and version 139 is installed on students’ Chromebooks, a user can prevent auto updates to any later version. (Alternatively, a user can allow auto updates to a specific version supported by CAI; for details, refer to the next subsection, Limiting Updates to a Specific Version for Managed Chrome Devices.)
Take these steps to disable auto updates for ChromeOS:
- Display the Device Settings page by following the procedure in any of the topics at Manage updates on Chrome OS devices. The steps in that procedure assume that the Chromebooks are managed through the admin console.
- From the Device updates list, select Block updates.
- Select [Save].
Limiting Updates to a Specific Version for Managed Chrome Devices
CAI has tested the operational software being used (such as the Test Administrator Interface) and the practice and training tests up to the supported stable, LTS, or LTC version of the ChromeOS; a user may want to prevent a Chromebook from auto-updating beyond that version. Alternatively, a user can disable auto updates entirely; for details, refer to the subsection Installing the SecureTest Kiosk App on Managed Chromebooks.
LEAs also have the option to switch student devices to Google’s LTC and LTS channels, which will limit updates to critical bug fixes and security enhancements, while releasing new features only every six months. Refer to the Google support topic Long-term Support (LTS) on Chrome OS for additional information and instructions.
Take these steps to limit ChromeOS updates to a specific version:
- Display the Device Settings page by following the procedure in any of the topics at Manage updates on Chrome OS devices. The steps in that procedure assume that the Chromebooks are managed through the admin console.
- From the Device updates list, select Allow updates.
- From the Restrict Google Chrome version to at most list, select the required ChromeOS version.
- Select [Save].
Secure Browser
This subsection contains instructions for installing SecureTest, the secure browser app for ChromeOS versions 132+, as a kiosk application—if an update to SecureTest is released to the Chrome Web Store, the app will automatically update on all devices to which it is installed. Users do not need to take any action to manually update SecureTest after it is installed on a device.
Installation
Installing the SecureTest Kiosk App on Managed Chromebooks
These instructions are for installing SecureTest secure browser as a kiosk app on domain-managed Chromebook devices. The steps in this procedure assume that the Chromebooks are already managed through the admin console.
Chromebooks manufactured in 2017 or later must have an Enterprise or Education license to run in kiosk mode, which is necessary to run the secure browser.
- Set up a free Google Apps for Education account or an account with access to the Google Admin Console and enroll all managed Chromebooks.
- As the Chromebook administrator, access Sign in to log on to the Admin console.
-
When the Google Admin console opens, select [Devices] from the selection panel on the left (figure 1).
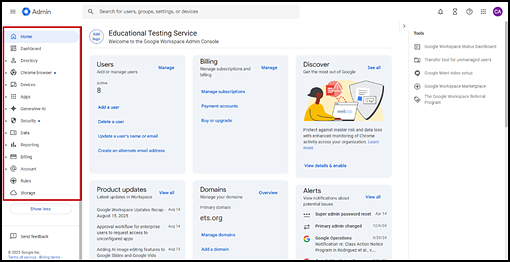
Figure 1. Chrome Admin Console
- To access the Kiosks section of Apps & Extensions, first open the “Device” tree in the left navigation panel of the Admin screen (as indicated in figure 2) by selecting
- [Devices]; and then
- [Chrome]; and then
- Apps & extensions; and then
- [Kiosks].
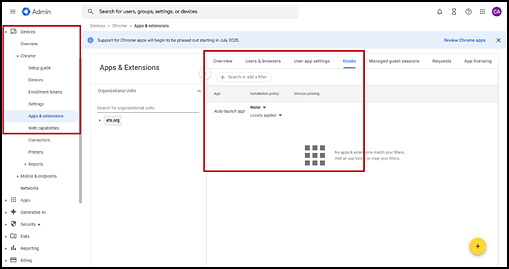
Figure 2. Admin selections and the [Kiosks] tab
- The Apps & Extensions screen opens with the information in the [Kiosks] tab displayed; this is also indicated in figure 2.
- Select the Organizational Unit where SecureTest should be added.
- Take the following steps to add the SecureTest app:
- Hover over the [Add] plus-sign [
 ] icon.
 - Select the [Add by URL] globe [
 ] icon to add a Chrome app or extension by ID.
 - Enter https://mobile.cambiumtds.com/launchpad/ as the URL.
- Select [SAVE].
- Select [AGREE] in the dialog prompt to confirm the addition of a web app.
- Take the following steps in the “Installation policy” section in the right panel to configure SecureTest:
-
In the “Kiosk Settings” section, disable all settings by toggling them off (left) (figure 3).
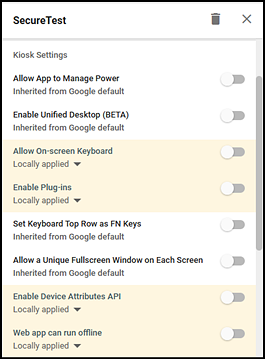
Figure 3. Settings for the SecureTest app
-
Scroll down to the “Additional URL origins for this kiosk app” section. In the Additional URL origins field, add the following base URL; note that no final slash is required: https://[*.]cambiumtds.com.
-
Scroll down to the “Extensions” section and select [ADD EXTENSION] and then Add from a custom URL from the pop-up list. The Add Chrome app or extension by ID dialog box appears (figure 4).
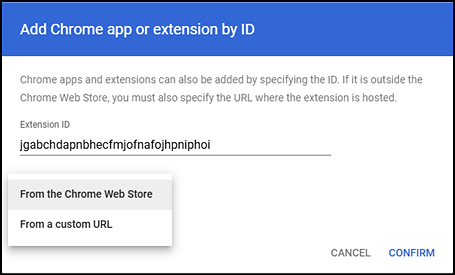
Figure 4. Add Chrome app or extension by ID pop-up message
- Switch the source from “From the Chrome Web Store” to “From a custom URL.”
- Enter the following character string for the SecureTest Progressive Web Application into the Extension ID field:jgabchdapnbhecfmjofnafojhpniphoi.
- Enter the following custom URL of the extension: https://pwa.cambiumtds.com/kiosk_extension.xml.
- Select [CONFIRM].
-
- Ensure Installed is selected in the Installation Policy drop-down list at the top of the SecureTest settings.
- Hover over the [Add] plus-sign [
-
The only setting to be toggled in the “on” position—to the right—is Enable Plug-ins. All other settings, including Allow Virtual Keyboard, must be toggled “off,” to the left. This is shown in figure 5. (Select [SAVE] if any edits were made.)
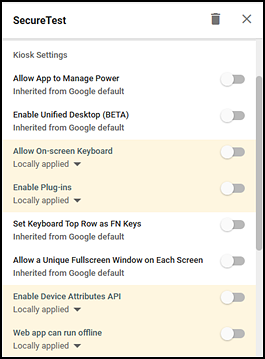
Figure 5. Settings for the SecureTest app
-
To launch the secure browser, select the [Apps] link in the menu row of the Chromebook’s logon screen (indicated in figure 6). and select the [SecureTest] app.

Figure 6. Chromebook logon screen
-
Next, select the [SecureTest] app, which is indicated in figure 7.
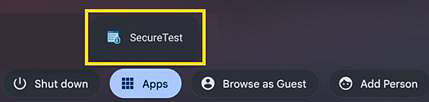
Figure 7. [SecureTest] app in the Chromebook logon screen
Using Verified Mode Setup
Verified mode ensures that only enrolled, trusted ChromeOS devices can run SecureTest, helping to maintain a secure testing environment by monitoring system integrity while it is running. Take the following steps to use verified mode:
- As the Chrome administrator, access Sign in to log on to the Admin console.
- When the Google Admin console opens, first open the “Device” tree in the left navigation panel of the Admin screen by selecting
- [Devices]; and then
- Chrome; and then
- [Settings].
- Select the Organizational Unit where SecureTest was added.
-
Select the [Device settings] tab (indicated in figure 8).
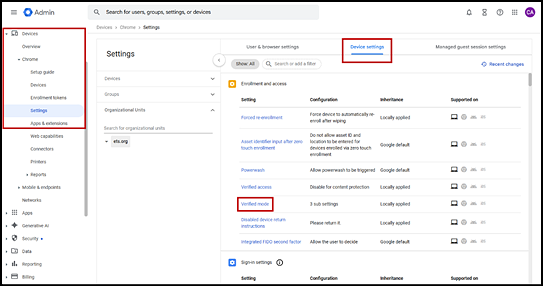
Figure 8. Admin selections and the [Device settings] tab
- Under “Enrollment and access,” select the [Verified mode] link (also indicated in figure 8).
-
Select Required verified mode boot for verified access from the Locally applied drop-down list (figure 9).
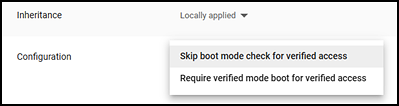
Figure 9. Verified mode configuration options list
- Add the Verified Access Service Account cai-sb-pwa@cbpwakiosk.iam.gserviceaccount.com in the Services with full access text box.
- Select [Save] at the bottom of the setting page.
Opening the SecureTest Kiosk App and Selecting the Assessment Program
The first time the SecureTest kiosk app is opened, a Launchpad appears. The Launchpad establishes the state and test administration for students.
-
In the Please select your organization or state drop-down list (indicated in figure 10, select California.
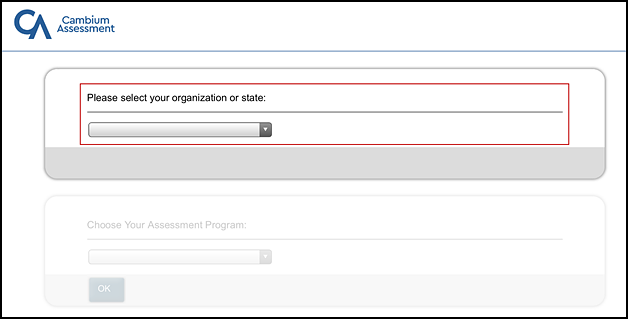
Figure 10. Select the state from the Launchpad
-
In the Choose Your Assessment Program drop-down list (indicated in figure 11), select California Assessment System.
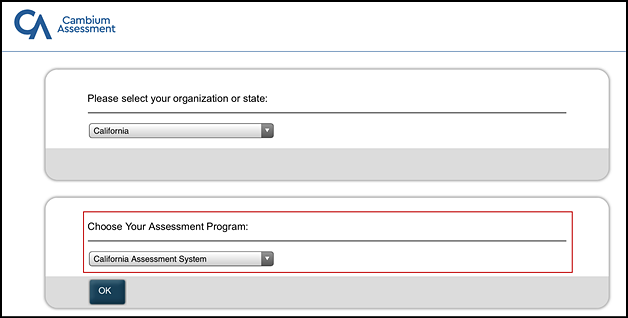
Figure 11. Select the assessment from the Launchpad
- Tap or select [OK]. The student logon page appears. The secure browser is now ready for students to use.
The Launchpad screen appears only once. The student logon page appears the next time the secure browser is launched.
Uninstallation
To uninstall the SecureTest app, select the app name to display the app settings, select the [Remove] trash can [![[Remove] trash can icon](/s/tech-specs-and-config/operating-system-configuration/chrome/2025-5d-image063.jpg) ] icon, and then select [SAVE].
] icon, and then select [SAVE].