Testing Students Requiring Braille
Administration Considerations
Planning
The administration of the braille assessment requires advanced preparation for both the TA or TE and the student. The student accesses the computer-based assessment via assistive technology using an RBD and screen-reading software along with embossed materials, which are downloaded directly from the testing platform. A braille embosser that can produce text and graphics may be needed. This may require the student to be tested in a separate location and provided with additional time for testing. The protocol for secure testing should be followed.
Although CAASPP and ELPAC are not timed, students taking the computer-based braille assessment may need additional time because of the need for embossing test materials throughout the assessment. If there are multiple students testing at the same time who require the braille accommodation, logistical planning should occur in advance of the test administration. Ensure that adequate numbers of embossers are available on site. If there are shared resources throughout an LEA, planning in advance of the test administration to alleviate disruption of services for students not taking the assessment is important to consider.
Prior to administering an assessment, TAs, TEs, and any other individuals who are administering any secure CAASPP or ELPAC assessment should read the test administration manual associated with these programs and view any associated training modules.
List of Preparatory Actions
The following items will aid in administration of braille assessments.
- Ensure that the TA or TE has adequate training for administering the computer-based braille assessment.
- As the embossed braille files do not have print indicators, consider having a person who reads braille and has training on the testing protocol available during the entirety of testing. (This may be the TA or TE.)
- Ensure that all assistive technology is properly installed and functioning with the secure browser, including configuring the screen-reading program to ensure the screen-reading program is recognized by the secure browser and that the assessment is reading properly.
- Install Duxbury or BrailleBlaster and ViewPlus Desktop Embosser driver software on the TA or TE device. Ensure that the TA or TE has a working knowledge of these programs.
- Ensure that either a print embosser—used for BRF file types—or a graphic embosser—used for PRN file types—is installed and functioning on the TA or TE device.
- Ensure that the student has had adequate opportunity to practice navigating with a screen reader within the testing environment. (Refer to information about practice and training tests in the subsection Configuring and Navigating Assessments with JAWS.)
- Emboss the navigation quick key reference guide—available from the secure browser—to have available for the student during testing.
- Select the appropriate summative assessment option for the student.
- Ensure that the student has been registered for the appropriate braille code. This information can be gained from the student’s IEP team or the teacher of the visually impaired who is responsible for this student.
- Ensure the appropriate braille code for the student is available for the specific assessment. (Refer to the About Assessments and Braille subsection for more information.)
- Ensure that Emboss Type is set to on-request or auto-request for each assessment. This may vary from student to student. Often, students prefer emboss on-request for ELA, while the default setting for mathematics is auto-request.
- Gather additional resources the student may need for the day of the assessment such as an abacus, Perkins Brailler, braille paper, braille notetaker (if allowed as an accommodation for notetaking), talking calculator (if using a calculator other than the embedded calculator as an accommodation), other notetaking tools, headphones, and other resources.
About Assessments and Braille
The online TDS is available to students who use braille, allowing them to access the adaptive algorithm and use the online systems in a similar fashion to general education students.
Students who have a braille accommodation will receive the computer-based assessments in an accessible format via streamlined mode (refer to figure 2). The streamline feature is optimized to allow supported screen-reading software and embossing passages and test questions to braille embossers.
All test content may be delivered to a braille embosser.
Overview of Braille Types
For braille assessments, students can use any of the following braille options, depending on the assessment:
- UEB contracted
- UEB uncontracted
- UEB contracted with Nemeth
- UEB uncontracted with Nemeth
- UEB contracted with UEB Math (technical)
- UEB uncontracted with UEB Math (technical)
The braille types for the computer-based Smarter Balanced for ELA and the CSA can be broken down into three formatting characteristics: braille type, grade of braille, and test type. These are listed in table 1.
The braille types for the computer-based Initial ELPAC and Summative ELPAC can also be broken down into three formatting characteristics: braille type, grade of braille, and test type. These are listed in table 2.
| Braille Type | Grade of Braille | Test Type |
|---|---|---|
|
UEB |
Contracted |
Computer-based, grades three through twelve |
|
UEB |
Contracted |
PPT, grades three through twelve (CDE approved) |
|
UEB |
Uncontracted |
Computer-based, K–2 (Listening, Speaking, Reading) |
|
UEB |
Uncontracted |
PPT, K–2 (Writing) |
The braille types for the Smarter Balanced for Mathematics can be broken down into four formatting characteristics: braille type, math type, grade of braille, and test type. These are listed in table 3.
The braille types for CAST can be broken down into three formatting characteristics: braille type, math type, grade of braille, and test type. These are listed in table 4.
| Braille Type | Math Type | Grade of Braille | Test Type |
|---|---|---|---|
|
UEB |
Nemeth |
Contracted |
Online CAT |
|
UEB |
Nemeth |
Contracted |
PPT |
|
UEB |
Nemeth |
Contracted |
Tactile graphics package |
Content Areas and Braille
ELA
The Smarter Balanced for ELA assessments will present students with questions in either contracted or uncontracted literary braille:
- Questions that contain only text will be sent to an RBD.
- Questions that contain text and images that cannot read by an RBD should be sent to a braille embosser.
Mathematics
Students can take the Braille HAT Adjusted option for the Smarter Balanced Summative Assessments for Mathematics. Braille HAT Adjusted is delivered in UEB with Nemeth math code (contracted and uncontracted) and UEB with UEB Math code (contracted and uncontracted).
The Braille HAT Adjusted includes the following:
- Adaptive segment, which will include only questions that have no graphics
- Fixed-form segment, which will include questions with graphics
- Pre-embossed graphic supplement
Refer to the subsection Using Braille HAT Adjusted for additional details about the braille HAT option.
Listening, Speaking, Reading, and Writing Domains for ELPAC
The ELPAC domain assessments will present students with questions in either contracted or uncontracted literary braille:
- For each question, on-screen text and picture descriptions will be sent to an RBD.
- For each question, there is a BRF or PRN file with on-screen text and a tactile representation of any graphic. This file may be sent to a braille embosser.
CSA
Students who have been assigned the braille accommodation will have access to the test questions in uncontracted Spanish braille [Spanish world language braille code]. Through the use of individually allowed accommodations on the test delivery platform, a student will be able to access the CSA test questions using assistive technology, such as the student’s RBD, as well as through a student request to emboss (print) the test questions on demand.
CAST
Students who have been assigned the braille accommodation for CAST have the option of receiving questions via embosser, RDB, or both.
Additionally, an optional, supplemental tactile graphics package can be ordered for a student to minimize the amount of embossing that must be done during testing. This package includes pre-embossed materials for all test questions that include a graphic. (Print-on-demand [embossing] is still available for test questions that are text-only.) Content is available only in contracted braille.
Refer to the subsection Using CAST Tactile Graphics for additional details about the CAST tactile graphics.
Using Braille HAT Adjusted
Serving as an alternative to the online adaptive and paper fixed-form options, the Braille HAT Adjusted allows LEAs to order a set of preprinted, embossed or raised line graphics for grades three through eight and high school students’ mathematics assessments when the students do not otherwise have access to an embossing printer that produces tactile graphics for the Smarter Balanced assessment questions. Questions that do not have tactile graphics should still be embossed for students, as the braille is not displayed accurately on the RBD.
This option provides students with access to an efficient online adaptive test that simplifies logistical burdens for educators and students. With the Braille HAT Adjusted option, students can use the online test administration platform, including embedded accessibility resources, while also accessing the pre-embossed or raised-line graphics.
These graphics packages must be ordered by the LEA CAASPP coordinator for a Smarter Balanced Summative Assessment for Mathematics by entering the requested information into the Request for Braille Graphics Packages for Math/Science Hybrid Adaptive Tests (HAT) web page at least 14 business days prior to the start of testing at the school. Materials are available only for students in the LEA who have the braille accommodation assigned. An LEA can follow up with the LEA’s assigned Success Agent after ordering.
Order of Testing
The Braille HAT Adjusted consists of a computer adaptive segment, a fixed-form segment, and a PT. The segments are presented to students in this order.
- Computer Adaptive Segment: The computer adaptive segment does not include questions with tactile graphics. Questions that do not have tactile graphics should still be embossed for students, as the braille is not displayed accurately on the RBD.
- Fixed-Form Segment: The fixed-form segment includes questions with tactile graphics. These questions can be embossed at the testing location or received as a package of pre-embossed materials ordered from the LEA’s assigned Success Agent. Questions in a performance task that do not have tactile graphics should still be embossed for students, as the braille is not displayed accurately on the RBD.
-
PT: The PT does not include questions with tactile graphics. Questions that do not have tactile graphics should still be embossed for students, as the braille is not displayed accurately on the RBD.
Selecting Braille HAT Adjusted
The mathematics section of the Smarter Balanced Summative Assessments listing on the Operational Test Selection screen in the Test Administrator Interface includes an option for selecting the Mathematics Braille Hybrid Adaptive Test, indicated in figure 1.
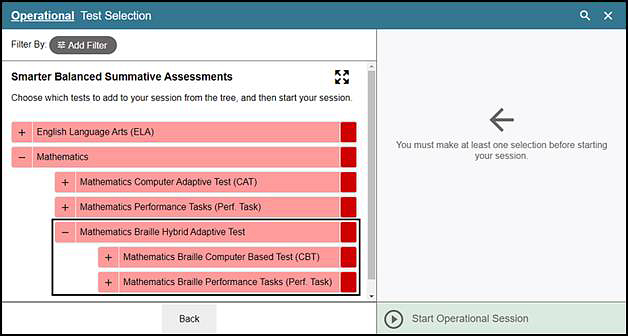
Figure 1. Operational Test Selection screen showing the option for Braille HAT
When starting test sessions, be sure to select the appropriate option for students.
The Your Tests page in the student TDS also lists the HAT option. Verify that students selected the appropriate option when approving them for testing.
Using the CAST Tactile Graphics Package
The CAST tactile graphics package allows LEAs to order a set of preprinted, embossed graphics for students’ science tests when the students and TAs do not otherwise have access to an embosser that embosses tactile graphics.
This option simplifies logistical burdens for educators and students. With the CAST tactile graphics package, students can use the online test administration platform, including embedded accessibility resources, while also accessing the pre-embossed graphics.
These graphics packages must be ordered by the LEA CAASPP coordinator for CAST by entering the requested information into the Request for Braille Graphics Packages for Math/Science Hybrid Adaptive Tests (HAT) web page at least 14 business days prior to the start of testing at the school. Materials are available only for students in the LEA who have the braille accommodation assigned. An LEA can follow up with the LEA’s assigned Success Agent after ordering.
Using Streamlined Mode
The braille reading format is selectable for interim assessments within the student’s test presentation field within the TDS. For summative CAASPP and ELPAC assessments, the braille reading format is set in TOMS.
When braille is selected, the test layout will default to streamlined mode. The streamlined mode layout, shown in figure 2, is different from the standard test interface and is designed to interact with JAWS navigation. When streamlined mode is enabled, the test content is laid out vertically. Passages and stimuli are located at the top of the screen, with questions appearing beneath them.
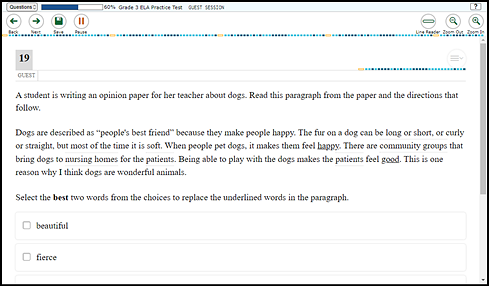
Figure 2. Sample streamlined mode layout
Increasing Font Size
Students who have a braille accommodation and also have usable vision may use the embedded zoom resource available in the assessment to adjust the size of text and graphics as necessary. Test content is arranged vertically with the streamlined mode required for testing in braille.
- No zoom, 14-point text
- 1.50× zoom
- 1.75× zoom
- 2.00× zoom
- 2.50× zoom
- 3.00× zoom
- 5.00× zoom
- 10.00× zoom
- 15.00× zoom
- 20.00× zoom
Configuring and Using Embossing Software
The TDS is designed to allow students to emboss secure test material with TA or TE approval. This means that the software used for sending print requests to the braille embosser must be installed on the computers that TAs and TEs will use for test sessions.
The embossed output for student print requests varies depending on the file type associated with a test question. A TA or TE must ensure that the student has the braille test setting prior to approving the student for testing, as this determines which file type is used for embossing. There are two types of files:
- BRF: The BRF file type handles print requests for questions containing only text, including formatted tables and poems. This file type is handled by the DBT or BrailleBlaster software.
- PRN: The PRN file type handles print requests containing tactile or spatial components such as images, diagrams, etc. This file type is handled by the ViewPlus software (Tiger Viewer or Tiger Designer).
Upon approving a print request, the TA or TE must send the file to the embosser using either the DBT or BrailleBlaster software (for BRF files) or ViewPlus software (for PRN files). The following subsection provides steps for configuring BRF and PRN files using sample files that are available under the Help Guide menu on the Test Administrator and Test Examiner Practice and Training site, which is linked at Practice and Training Tests.
Instructions for embossing files are located in the Sending Requested BRF and PRNs to the Embosser subsection.
Opening Sample BRF and PRN Files on TA or TE Computers
This subsection contains instructions for opening sample BRF and PRN files with the correct software program and setting default embossing preferences if these settings are not preconfigured.
The DBT or BrailleBlaster and ViewPlus Tiger Designer software must already be installed.
Downloading a BRF or PRN File
Take these steps to download the BRF or PRN file from the Test Administrator Interface. Then, follow the steps in the one of the next subsections to configure the file using DBT or BrailleBlaster for BRF; or ViewPlus Tiger for PRN.
- Navigate to the CAASPP & ELPAC Website.
- Select the [Test Administrator Interface for All Online Tests] button.
- Log on using a Single Sign-On account.
-
Select the [Help Guide] button on the top-right corner of the Test Administrator Interface screen (shown in figure 3).

Figure 3. Selecting the [Help Guide] icon
-
Select the [Appendices] link in the left navigation panel and then the [Sample Braille Files] link in the left navigation panel. These are indicated in figure 4.
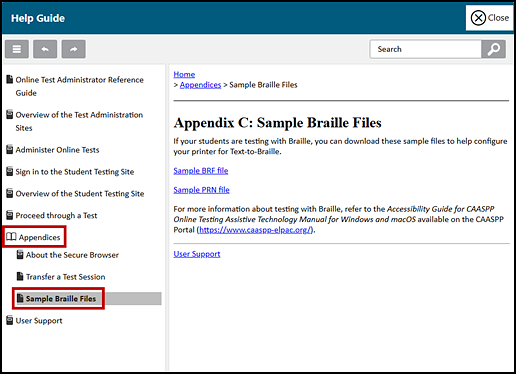
Figure 4. Help Guide screen in the Test Administrator Interface
- Select the [Sample BRF File] or [Sample PRN File] link in the content section of the Help Guide. Depending on the web browser type and configuration, either the user will be prompted where to save the file or the file may download directly.
Configuring BRF Files with the DBT Software
Once the BRF file has been downloaded, take these steps when using the DBT software:
- When opening a file of this type for the first time, select Duxbury Braille Translator (default) if prompted and then select the [OK] button. This will open the sample file in the DBT program. Continue to step 8.
-
In the Duxbury Braille Translator window (shown in figure 5), open the Global menu and then select Embosser Setup.
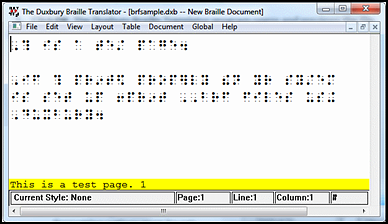
Figure 5. The Duxbury Braille Translator window
- Take the following steps to add a new embosser, if needed:
- Select [New]; the Embosser Setup—Untitled Configuration window appears.
- From the Embosser Model drop-down list, select the required embosser type.
- From the Send to Printer drop-down list, select the required embosser’s name and then select [OK].
- In the Global: Embosser Setup window, select [OK].
- In the Duxbury Braille Translator window, go to Global ➔ Embosser Setup to open the Global: Embosser Setup window (shown in figure 6) and then ensure the following settings are selected:
- Brailler Device: ViewPlus Max (or other supported ViewPlus embosser)
- The following Desired Braille Document Formatting options:
- Emboss in Interpoint checkbox not selected (optional)
- Top margin in lines: 2
- Binding margin in characters: 5
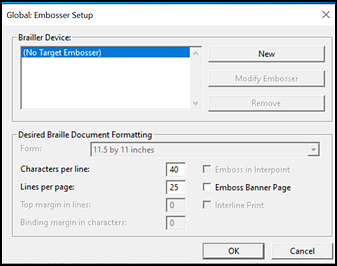
Figure 6. Global: Embosser Setup window
- If the Duxbury Braille Translator is not available as a selectable program, take these steps to add DBT as the default program for opening BRF files. Note that images may differ on the basis of the operating system being used.
- Double-click the filename.
- Select the [More apps] link in the How do you want to open this file? list that opens.
- Scroll down or navigate to the “Duxbury” item and open it. If the Always use this app to open .brf files is checked, DBT is assigned as the default program for opening files of this type.
- Take the following steps if “Duxbury” is not on the list:
- Select the [Look for another app on this PC] link after the last item on the list.
- Find and open the “DBT” folder in the “Program Files” folder.
- Select dbtw.exe.
-
Select [OK]. The Duxbury Braille Translator program will open and preview the file.
- Select [OK] when finished.
- In the Duxbury Braille Translator window (figure 7), open the Global menu and then select Formatted Braille Importer. The Global: Formatted Braille Importer window will open.
- In the Global: Formatted Braille Importer window, select the Read formatted Braille without interpretation box and then select [OK].
- In the Duxbury Braille Translator window (shown in figure 7), select the File menu and then select Emboss. The File: Emboss… window will open.
- In the File: Emboss… dialog box, shown in figure 7, ensure the following options are selected:
- Copies: 1
-
Page range: All
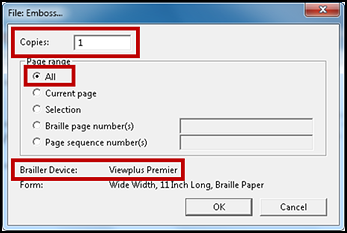
Figure 7. File: Emboss… dialog box
- Select [OK].
Configuring BRF Files with BrailleBlaster
Once the BRF file has been downloaded, take these steps when using BrailleBlaster:
- When opening a file of this type for the first time, select BrailleBlaster if prompted and then select the [OK] button. This will open the sample file in BrailleBlaster.
- If the BrailleBlaster is not available as a selectable program, take these steps to add BrailleBlaster as the default program for opening BRF files. Note that images may differ on the basis of the operating system being used.
- Double-click the filename.
- Select the [More apps] link in the How do you want to open this file? list that opens.
- Scroll down or navigate to the “BrailleBlaster” item and open it. If the Always use this app to open .brf files is checked, BrailleBlaster is assigned as the default program for opening files of this type.
- Take the following steps if “BrailleBlaster” is not on the list:
- Select the [Look for another app on this PC] link after the last item on the list.
- Find and open the “BrailleBlaster” folder in the “Program Files (x86)” folder.
- Select brailleblaster.exe.
-
Select [OK]. The BrailleBlaster program will open and preview the file (figure 8).
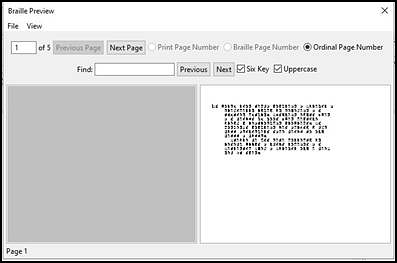
Figure 8. Braille Preview window
- In the BrailleBlaster window, go to Settings > Embosser Settings. The Settings window appears. Take the following steps to add a new embosser:
- Select [Add]. The Edit Embosser Configuration window appears.
- Enter the embosser name in the Name field.
- In the Embosser Device drop-down list, select the required embosser.
- In the Embosser Manufacture and Embosser Model drop-down list, select the required manufacturer and model.
- In the Settings window, select arrow keys and select the Translation Settings window to set the Braille Standard to UEB.
-
In the Settings window, select the [Page Properties] tab (figure 9).
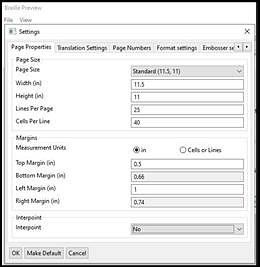
Figure 9. Settings: Page Properties
- Select No from the Interpoint drop-down list and then select [OK].
- In the BrailleBlaster window, go to File > Emboss. The File: Emboss… window opens.
- In the File: Emboss… window, ensure that only one copy is being printed and that the page range is set to All.
- Select [OK].
Configuring PRN Files with the ViewPlus Tiger Viewer or Tiger Designer
This subsection contains instructions for opening PRN files with ViewPlus software and setting default application preferences. Although Tiger Viewer may be used as the default application for opening PRN files, if it is used alongside an embosser other than ViewPlus Max, Rogue, or Premier, the files may need to be converted for the embosser type before embossing. Because of this, CAI strongly recommends using Tiger Designer as the default application with a non-Max embosser.
Once the PRN file has been downloaded, take these steps when using the ViewPlus software.
- When opening a file of this type for the first time, select Tiger Designer and then select the [OK] button. This will open the sample file in Tiger Designer.
- If Tiger Designer is not available as a selectable program, take these steps to add Tiger Designer as the default program for opening PRN files. Note that images may differ on the basis of the operating system being used.
- Double-click the filename.
- Select the [More apps] link in the How do you want to open this file? list that opens.
- Scroll down or navigate to the “Tiger Designer” item and open it. If the Always use this app to open .prn files is checked, Tiger Designer is assigned as the default program for opening files of this type.
- Take the following steps if “Tiger Designer” is not on the list:
- Select the [Look for another app on this PC] link after the last item on the list.
- Find and open the Tiger Designer folder in the Program Files folder.
- Select the executable file.
- Select [OK]. The Tiger Designer program will open and preview the file.
-
In the Tiger Designer window shown in figure 10, open the File menu and then select [Print]. The Print window will open.
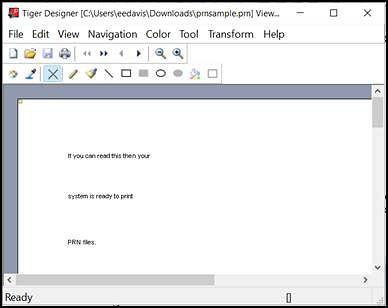
Figure 10. The Tiger Designer window
- In the Print dialog box, the following must be selected:
- Printer: Select ViewPlus Max or other supported ViewPlus embosser.
- Copies: Ensure that only one copy is being embossed.
-
When finished, select [Print].
Student Submittal of Print Requests
A student takes the following steps to submit a print request for embossing:
- For assessments that require manual embossing requests or enlarged printing, a student must open the context menu for a passage or question and then select the print option. The request is sent to the TA or TE. The [Context Menu] parallel-line [
 ] icon is indicated in a practice test question in figure 11.
- For passages, the student must select the print option in the passage menu. To print a passage, the student selects the [Print Passage] printer icon.
- For questions, the student must select the printer option in the question’s menu. To open the menu, the student selects the [Context Menu] icon [] at the top of the question. The menu will include a print option. The student selects [Print Item].
- For passages and questions, the student must select the [Print Page] button on the upper-right side of the student interface.
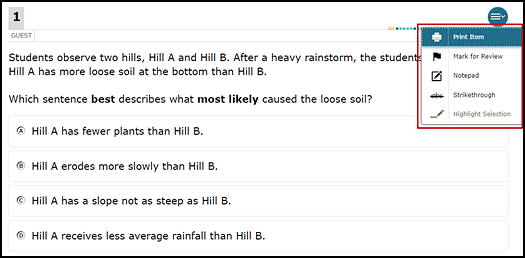
Figure 11. Submitting an embossing request
Reminder: For assessments that have auto-request enabled for the Emboss Request Type test setting, the embossing requests will automatically appear on the Test Administrator Interface as the student moves through the assessment. Mathematics assessments will default to auto-request and ELA assessments will default to on-request unless otherwise indicated by the TA in step 4.
A TA or TE takes the following steps to approve a print request:
- Start a test session using the process described in the Approving Print Requests subsection from the CAASPP Online Test Administration Manual or the Approving Print Requests subsection from the ELPAC Online Test Administration Manual.
- Process the print requests. (For more information, refer to the Sending Requested BRF and PRN Files to the Embosser subsection for more specific information about processing BRF and PRN requests.)
Sending Requested BRF and PRNs to the Embosser
The instructions in this subsection assume the TA or TE has begun a test session and approved a print request from a student.
The process for embossing print requests is slightly different for BRF and PRN file types. PRN files may be embossed with either Tiger Viewer or Tiger Designer. However, Tiger Designer is the recommended software, as it also allows file types to be converted, if necessary.
Embossing BRF Files
BRF files must be embossed with Duxbury Braille Translator or BrailleBlaster; refer to Configuring BRF Files with the DBT Software or Configuring BRF Files with BrailleBlaster for configuration instructions.
Take the following steps to emboss BRF files:
-
Upon approving a print request for a test passage or question that will be embossed in BRF format, a print dialog box like the one shown for Firefox in figure 12 will open. (When Edge is the browser, the downloaded file appears in the lower-left corner of the screen.)
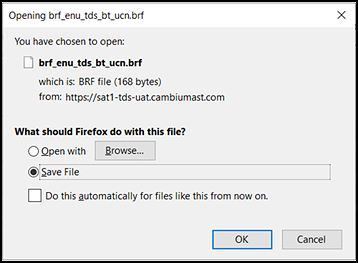
Figure 12. BRF printing dialog box
- Select the Open with radio button (not Save File).
- In the drop-down list, make sure either Duxbury Braille Translator or BrailleBlaster is selected.
- Select the [OK] button. The Import File dialog box will open.
- On the Import File dialog box (refer to figure 13), ensure that the following are selected:
- Template: English (UEB) – basic
- Import Filter: Formatted braille
- Code Page: North American English
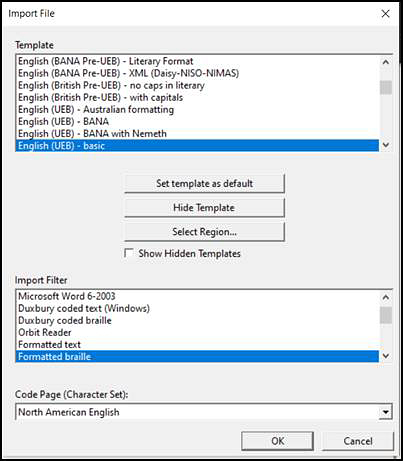
Figure 13. DBT Import File dialog box
-
Select [OK]. The Duxbury Braille Translator preview window will open (refer to figure 14).
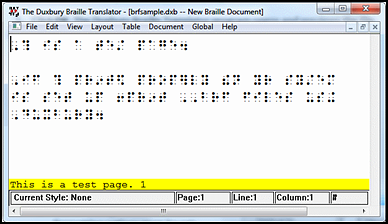
Figure 14. Duxbury Braille Translator preview window
- In the Duxbury Braille Translator preview window, shown in figure 14, open the File menu and select [Emboss…]. The File: Emboss… dialog box will open.
- In the File: Emboss… dialog box, shown in figure 15, ensure the following are selected:
- Copies: 1
- Page range: All
- Brailler Device: ViewPlus Premier (or other embosser)
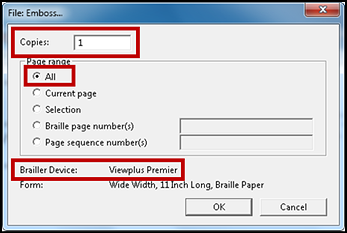
Figure 15. File: Emboss… dialog box
- When ready, select [OK]. The print request will be sent to the selected ViewPlus embosser.
Sending PRN Files to the Embosser with Tiger Viewer
PRN file print requests can be embossed in Tiger Viewer. However, if the print option is grayed out when embossing a file, the file cannot be converted with Tiger Viewer. PRN files can only be converted in Tiger Designer (refer to Converting and Embossing PRN Files in Tiger Designer). Take the following steps to send a PRN file to the embosser:
- Locate the approved file the web browser downloads. (Contact local IT support for assistance editing these settings to be able to easily find files.)
- If Tiger Viewer is set up as the default application for opening PRN files, either open the downloaded file in Tiger Viewer directly from the web browser or from the Download folder and then open it in Tiger Viewer manually.
- When Tiger Viewer is the default application for embossing PRN files in the web browser, the Print PRN File screen appears. Take the following steps to emboss a file that was saved to a local device:
- Launch Tiger Viewer.
- Select File ➔ Print File and then choose the PRN file to be embossed.
After ensuring that only one copy is being embossed and that the Printer Name is set to the embosser that will emboss the braille files, select the [Print] button (figure 16).
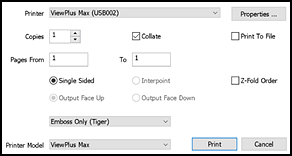
Figure 16. Tiger Designer Print PRN file window
Converting and Embossing PRN Files in Tiger Designer
Tiger Designer is the recommended software for embossing PRN files. When approving a print request for a PRN file, the web browser downloads the file. If Tiger Designer is set up as the default application, the downloaded file can be opened in Tiger Designer directly from the web browser. The file can also be saved to the computer and opened in Tiger Designer manually (refer to Sending PRN Files to the Embosser with Tiger Viewer for information about how to access PRN files from each supported web browser). Note the following about the need to convert files for embossing:
- The option to print might be grayed out if an embosser other than ViewPlus Max or Rogue is being used. If this is the case, convert the file by following these steps:
- Launch Tiger Designer.
- Access File ➔ Open.
- Locate the file that is not embossing properly and open it. It might be necessary to use the drop-down list above the [Open] button to change the file type to Tiger PRN files (*.prn) prior to opening it.
-
If a pop-up message appears indicating that the file needs to be converted, select the [Yes] button; this message is shown in figure 17.
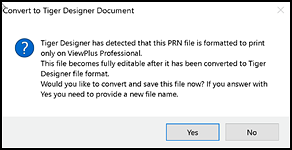
Figure 17. Convert file message
-
If this pop-up message does not appear, then go to File ➔ Save As to convert the file manually by saving the file as a (*.prn) file type from the Save as type drop-down list and then selecting the [Save] button (figure 18).
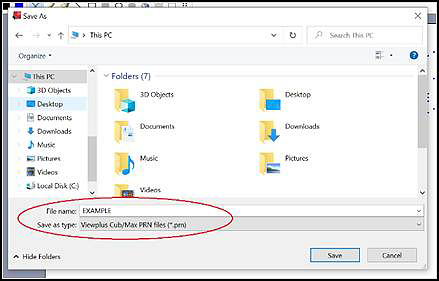
Figure 18. Saving as a .prn file
- Exit Tiger Designer, and then reopen the newly saved PRN file in Tiger Designer.
- In the top toolbar, select File ➔ Print. After ensuring that only one copy is being embossed and the Printer Name is set to ViewPlus Max (or whichever supported ViewPlus embosser is being used) in the Print window, select [Print].
Removing Files from the Web Browser Download Archive
Most supported web browsers automatically save downloaded files. If the device being used automatically saves the BRF and PRN files, ensure that no one else can emboss the requested test materials. For security purposes, all test-related files must be deleted from a web browser’s download archive, and all hard copies must be securely destroyed.
Google Chrome
- Open Google Chrome.
- Select the [Customize and control Google Chrome] vertical dots icon [
 ] in the upper-right corner of the application window.
 - Select Downloads. The Downloads page opens.
- Remove all test-related files by completing one of the following actions:
- For each file, select the [X] icon [
 ] associated with each file.
 - Select the [More actions] vertical dots icon [] on right side of the “Downloads” bar at the top of the page and then the Clear all list item. (This will not delete any files that may have been saved to the device being used.)
- For each file, select the [X] icon [
Mozilla Firefox
- Open Firefox.
- Select the [Open application menu] three lines icon [
 ] in the upper-right corner of the application window.
 - Select Downloads to open the Library window.
- Delete all test-related files by completing one of the following actions:
- Select each file and press the [Delete] key on the keyboard.
- Select the [Clear Downloads] link located at the top of the Library window. This will remove all temporary downloaded files, including any other files that may have downloaded. (This will not delete any files that may have been saved to the device being used.)
Microsoft Edge
- Open Microsoft Edge.
- Select the [Settings and more] horizontal dots icon [
 ] in the upper-right corner of the application window.
 - Select Downloads from the drop-down menu.
- Delete all test-related files by completing one of the following actions:
- For each file, select the [Delete file] trash can icon [
 ].
]. - In the Downloads drop-down list, select the [More options] horizontal dots icon [], and then select the [Clear all download history] button.
- For each file, select the [Delete file] trash can icon [