Place Supplemental Orders
ELPAC users can use the Place Supplemental Orders screen to place a supplemental order for test materials for the selected LEA, test administration, testing program, and test form type needed.
To locate the Place Supplemental Orders screen, select the [Orders] tab in the navigation bar, and then select the [Place Supplemental Order] action tab, as shown in figure 1.

Figure 1. [Place Supplemental Order] action tab
Select one of the following links for help in placing a supplemental order:
- Quick Instructions—Select for quick instructions for placing a supplemental order.
- Detailed Instructions—Select for detailed instructions, including screen captures, for placing a supplemental order.
Quick Instructions
Use the following steps to place a supplemental order:
- Enter the supplemental order criteria on the Select Supplemental Order screen.
- Select the [Continue] button to continue to the Select a shipping address confirmation message.
- Select the [Clear] button to remove all criteria and start over.
- In the Select a shipping address confirmation message, select either the primary or secondary shipping address of the organization where the supplemental order will be sent.
- To edit the selected address, select the [Edit] button.
- After choosing the shipping address, select the [Confirm] button to continue placing the supplemental order.
- In the “Enter Material Quantities” section, enter the required quantities for each grade level or grade span.
- Select the [Review Order] button to advance to the “Review Order for” section.
- Select the [Clear] button to clear all entered quantities and start again.
- Review the supplemental order in the Place Supplemental Orders screen—“Review Order for” section.
- Select the [Edit Order] button to edit the supplemental order. The Place Supplemental Order screen—“Enter Material Quantities” section is displayed, where the order can be edited.
- To submit the order, select the [Submit Order] button.
- When the Confirmation message appears, select the [Cancel] button if the material counts are not approved and need to be reviewed again. Select the [Confirm] button to confirm the order for supplemental materials.
- Select the [Close] button to close the Thank you for your order message.
Detailed Instructions
Use the following detailed steps, each of which must be completed in the order listed, to place a supplemental order:
I. Select Supplemental Order Criteria
- Use the Select Supplemental Order Criteria screen to enter criteria to place a supplemental order for the selected LEA. The criteria are displayed in figure 2 and all are required.
- Select the [Continue] button to continue to the Select a shipping address confirmation message.
- Select the [Clear] button to remove all criteria and start over.
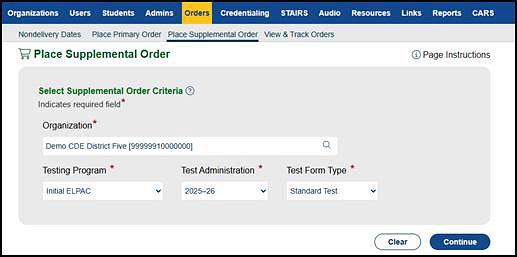
Figure 2. “Select Supplemental Order Criteria” section
-
On the next screen, a confirmation pop-up message (figure 3) is displayed to confirm the shipping address. If the selected organization has both a primary and a secondary shipping address, select the address to be used for this order. Otherwise, confirm that the primary shipping address is correct.
- If the shipping address needs to be changed for the order, select the [Edit] button. The [Addresses] tab of the organization, where the shipping address can be changed, will be displayed.
- Otherwise, select the [Confirm] button to continue placing the order.
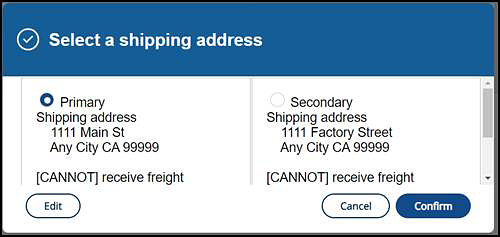
Figure 3. Select a shipping address confirmation message
II. Enter Material Quantities
The quantities by grade level or grade span can be entered in the “Enter Material Quantities” section of the Place Supplemental Order screen.
The top of the “Enter Material Quantities” section displays information about the organization for which the supplemental order is being placed. It displays the name and CDS code of the organization as well as the test administration, testing program, and test form type.
The search criteria in the “Enter Material Quantities” section narrows the list of material types displayed. To use the search criteria to limit a search, enter a keyword or select a grade level, as shown in figure 4, and then select the [Search] button.
The materials list displayed is filtered to include only materials that match the entered search criteria. If nothing is entered in the search criteria fields, the materials list displays all available material types.
To enter material quantities for a supplemental order, follow these instructions:
-
In the “Enter Material Quantities” section—Materials column (figure 4), enter the required quantities for each grade level.
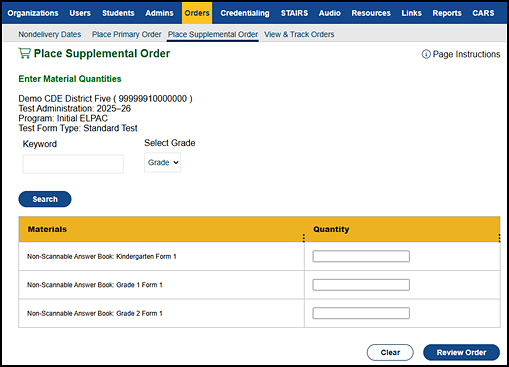
Figure 4. Place Supplemental Orders screen—“Enter Material Quantities” section
- Select the [Review Order] button to advance to the “Review Order for” section.
- Select the [Clear] button to clear all entered quantities and start again.
III. Review Order
Use the Place Supplemental Order screen— “Review Order for” section (figure 6) to verify, edit, and submit the supplemental order.
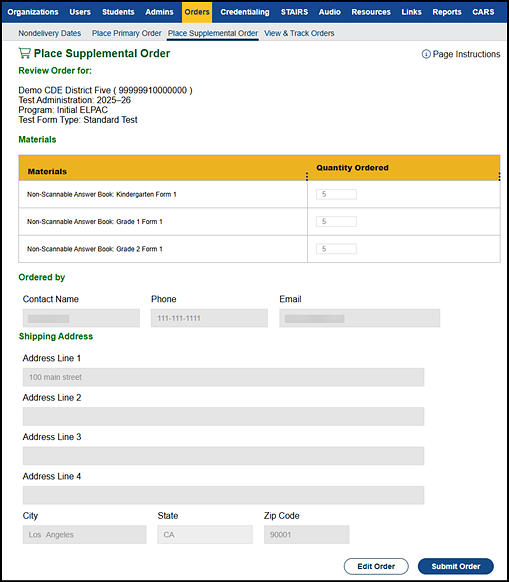
Figure 6. Place Supplemental Order screen
Use the following detailed steps to review a supplemental order:
- To edit the supplemental order, select the [Edit Order] button. The “Enter Material Quantities” section is displayed where the order can be edited.
- To submit the order, select the [Submit Order] button. A confirmation pop-up message appears (figure 7).
- Select the [Confirm] button to confirm the order for supplemental materials.
- Select the [Cancel] button to close the pop-up message without submitting the supplemental order.
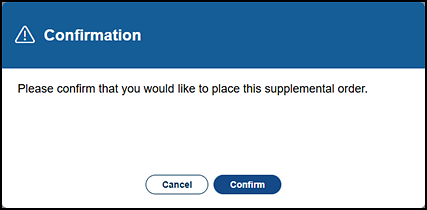
Figure 7. Supplemental order Confirmation message
- When the order is successfully placed, the Thank you for your order message is displayed (figure 8).
- Select the [View & Track Orders] link to dismiss the pop-up message and go directly to the View and Track Orders screen.
- Select the [Close] button to close the pop-up message.
- Otherwise, to cancel the order, select the [Cancel] button.
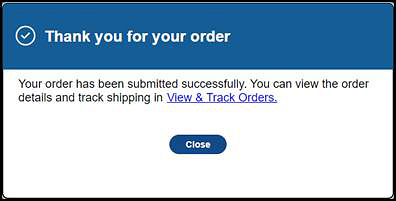
Figure 8. Thank you for your order message