Organizations: Overview
To view the organization profile for a specific LEA or school, use the [Organization] navigation tab. To edit shipping addresses, LEA CAASPP and LEA ELPAC coordinators can use the [Addresses] tab, under the [Organizations] navigation tab.
For information on searching, viewing, or editing an organization’s profile, select from the following links:
- Search for an Organization—To search for an LEA or school
- Organization Profile—General Information—To update freight shipment settings for the LEA (but not for individual schools within the LEA)
- Organization Profile—Addresses—To view or update the shipping addresses for a school or the LEA
- Organization Profile—Users—To view a list of users associated with the LEA or school (LEA CAASPP and ELPAC coordinators can also use this tab to toggle a user’s status between Active and Inactive, reset the user’s password, and edit the user’s preexisting profile.)
- Organization Profile—Contacts—To view a list of contacts for the LEA or school (The two types of contacts, “Special Education Coordinator” and “Technology Coordinator,” do not have access to TOMS.)
- Organization Profile—Reporting—To view the reporting options that have been set for the LEA or a school
Select the [Organizations] navigation tab from the top navigation bar to access the View & Edit Organizations screen (figure 1).
Figure 1. Organizations Navigation
Search for an Organization
Use the View & Edit Organizations screen to search for a specific organization.
Select the [Organizations] navigation tab from the top navigation bar to access the View & Edit Organizations screen (figure 2).
Figure 2. Search for an Organization
On the Search for Organizations screen (figure 3), enter characters into some or all of the search fields to return a specific LEA or school that is associated with the user’s role. To return all LEAs and schools associated with the user’s role, do not enter anything in the search fields. Figure 3 shows the search fields and the search results.
- Select [CLEAR] to remove any text entered in the search fields.
- Select [SEARCH] to begin the search.
- When the results are displayed, select the [Edit] pencil [
 ] icon to view and edit the details of the selected organization. The Organization Profile screen will display the details along with the following tabs: [General Information]; [Addresses]; [Users]; [Contacts]; and [Reporting]. The information displayed depends on whether the organization is a school or an LEA.
The Status field allows users to select one of three options:
- All—Displays all organizations that meet the selected search terms
- Active—Displays only “active” organizations with students assigned to the organization in CALPADS
- Inactive—Displays only “inactive” organizations with no students assigned in CALPADS
The name of the organization, followed by its 14-digit CDS code:
- CDS code key: (CCLLLLLSSSSSSS)
- CC represents the county code.
- LLLLL represents the LEA within the county.
- SSSSSSS represents the school within the LEA (in most cases). For LEAs, this portion is 0000000.
The CDS code for the state of California is 00000000000000.
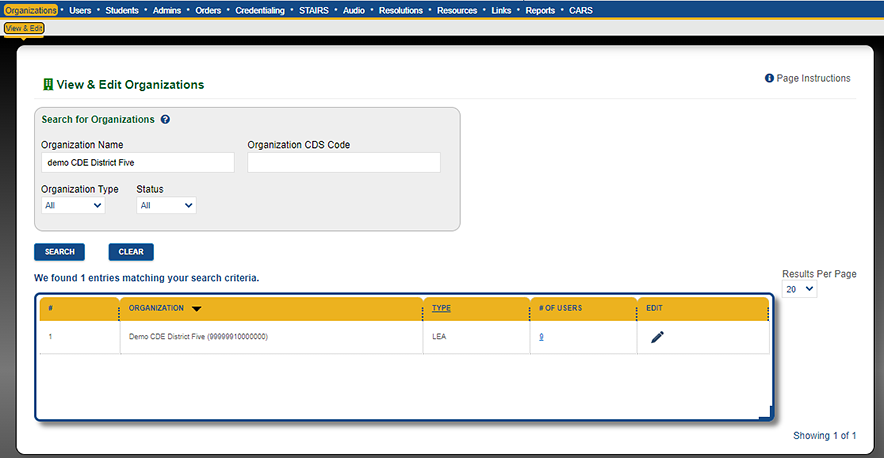
Figure 3. Search for Organizations Screen
Organization Profile—General Information
The [General Info] tab (figure 4) of the “Organization Profile” section is displayed after an LEA or school is selected from the search results.

Figure 4. [General Info] Tab Navigation
School and LEA profile information is generated from CALPADS. Use the [General Info] tab on the Organization Profile screen to view the organization’s general information, including name, CDS code, status (whether active or inactive), NPS indicator, and the name of the responsible organization (the county if an LEA, or the LEA if a school).
An organization can be either an LEA or a school. LEAs and schools display different information (figure 5 and figure 6).
LEA coordinators can update freight shipment settings for their LEA but not for individual schools within the LEA.
- Select or deselect the “Can receive freight shipments” checkbox, and then select the [SAVE] button to update this field.
The name and code of the responsible organization is displayed for both LEAs and schools.
- LEA—The local county office of education is indicated as the responsible organization.
- School—The local LEA is indicated as the responsible organization.
LEA coordinators can update the “Ready for Remote Test Administration” for the entire LEA or for individual schools within the LEA. The checkboxes for both the LEA and each school within the LEA are selected by default.
- Deselect the LEA “Ready for Remote Test Administration" checkbox to indicate that the LEA is not ready for remote test administrations. If the checkbox for the LEA is deselected, then all schools included in the LEA also are deselected.
-
Deselect the school “Ready for Remote Test Administration” checkbox to indicate that a school within the LEA is not ready for remote test administrations. This field is view only for the school’s general information.
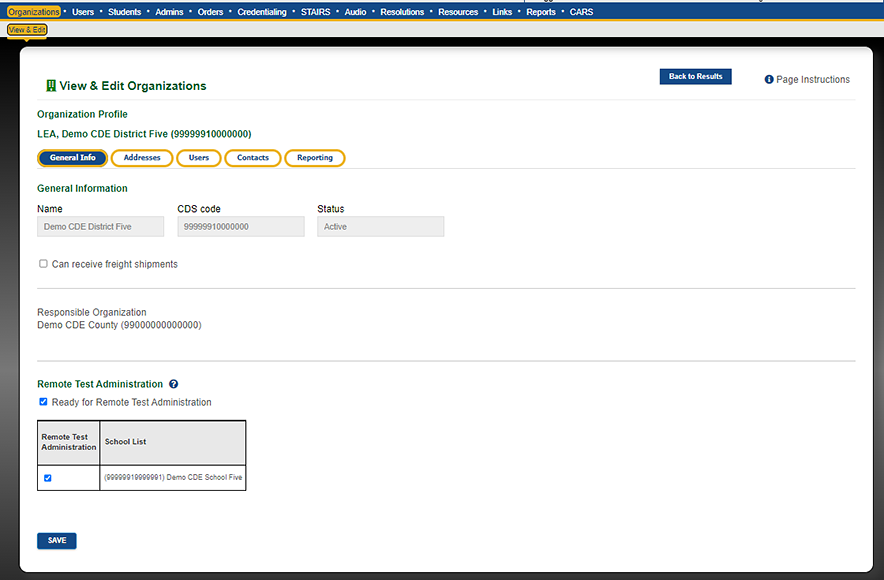
Figure 5. LEA [General Information] Tab
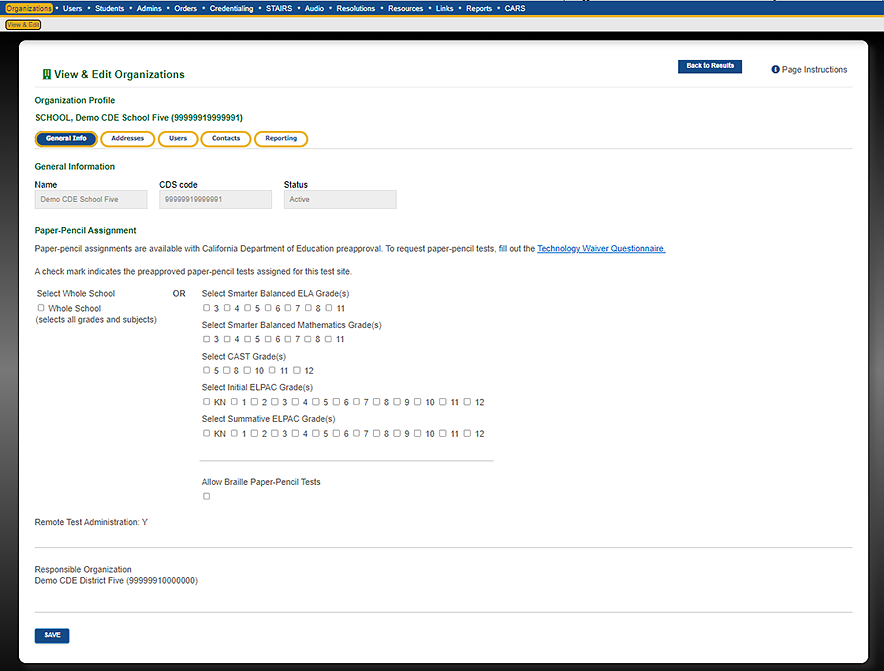
Figure 6. School [General Information] Tab
Organization Profile—Addresses
After an LEA or school is selected from the search results, the [General Info] tab of the Organization Profile screen will be displayed. Select the [Addresses] tab (figure 7) to view or edit the shipping address for the LEA or school.

Figure 7. [Addresses] Tab Navigation
Use the [Addresses] tab on the Organization Profile screen to view or update the shipping addresses for a school or the LEA (figure 8). Each organization must have at least one mailing address. An organization can choose to have a second address specifically for shipping.
For organizations with more than one associated shipping address:
- View or edit the information for an associated mailing address by selecting the [Edit] pencil [
 ] icon.
 - Delete an address associated with the organization by selecting the [Delete] trash can [
 ] icon. Once selected, a confirmation pop-up message will be displayed. To confirm the deletion of this address, select the [YES] button; otherwise, select the [NO] button.
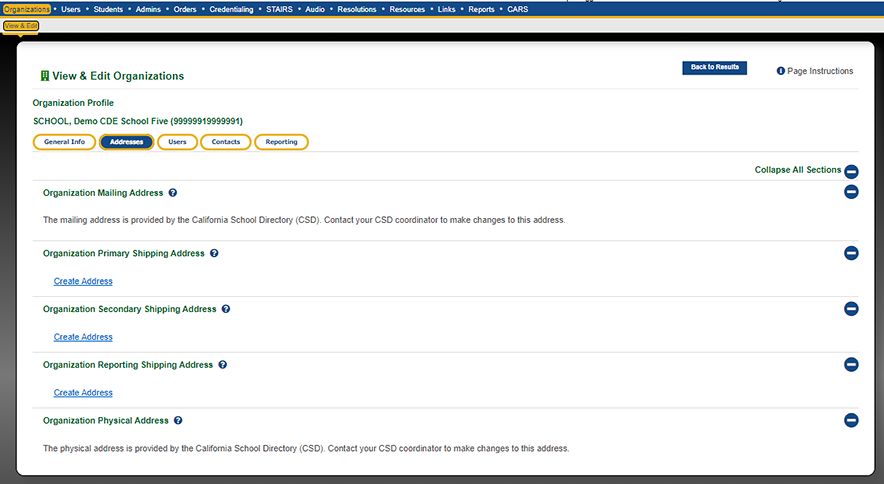
Figure 8. [Addresses] Tab
Table 1 describes each field on the [Addresses] tab of the Organization Profile screen.
| Name | Description |
|---|---|
| Organization Mailing Address | The mailing address is provided by the CSD. This field is view only. Contact your CSD coordinator to make changes to this address. |
| Organization Primary Shipping Address | The organization’s primary shipping address. If none exists, select the [Create Address] link to enter the address. |
| Organization Secondary Shipping Address | The organization’s secondary shipping address. This allows LEAs to have a choice of shipping addresses when placing orders. If no choice is displayed, select the [Create Address] link to enter the address. |
| Organization Reporting Shipping Address | The organization’s reporting shipping address is the address to which the SSRs will be shipped. If the address is not displayed, select the [Create Address] link to enter the address. |
| Organization Physical Address | The physical address is provided by the CSD. This field is view only. |
Create Address
If no shipping addresses are displayed for the organization, enter an address to be used for all shipments. Do this by selecting the [Create Address] link provided for that type of address (figure 9).

Figure 9. [Create Address] Link
Important information about addresses:
An organization’s mailing address is provided by CALPADS. CALPADS pulls this address from the CSD. It is used for all mailing and shipments unless a different shipping address is specified. If the mailing and shipping addresses are the same, only the mailing address is needed.
- The organization mailing address is originated by the CSD. Contact the CSD coordinator to make changes to this address.
- For the Organization Primary Shipping Address field, enter an address. Test books are sent to the primary address if applicable.
- For the Organization Secondary Shipping Address field, enter an address only if it is different than the mailing and primary shipping addresses.
- For the Organization Reporting Shipping Address field, enter an address if the SSRs should be shipped to a different location than the primary shipping address.
- The Organization Physical Address is provided by the CSD. Contact the CSD coordinator to make changes to this address.
After selecting the [Create Address] link, the Create Address screen will be displayed on the [Addresses] tab (figure 10). Enter all the required fields and optional fields as needed, and then do one of the following:
- To save the address and return to the previous screen, select the [SAVE] button.
- To return to the previous screen without saving, select the [CANCEL] button.
-
To remove unsaved information, select the [CLEAR] button.
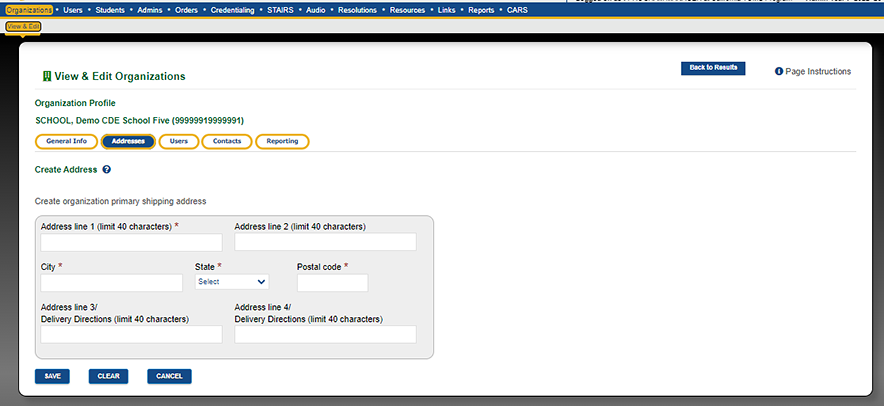
Figure 10. Create Address Screen
Organization Profile—Users
After selecting an LEA or school from the search results, the [General Info] tab of the Organization Profile screen is displayed. Select the [Users] tab (figure 11) to view a list of users for the LEA or school.

Figure 11. [Users] Tab Navigation
The [Users] tab displays a list of users associated with the LEA or school (figure 12). LEA CAASPP and LEA ELPAC coordinators can also use this tab to toggle a user’s status between Active and Inactive, reset the user’s password, and edit the user’s preexisting profile. Users can view information about other users who are at the same level or lower in the organizational hierarchy.
To deactivate a user, select the [Deactivate] link.
A user’s roles in more than one organization might prevent a role from being deactivated. If all of a user’s roles are removed from TOMS, the user’s account will be removed from TOMS. To reactivate that user, at least one role must be added.

Figure 12. [Users] Tab
Organization Profile—Contacts
After selecting an LEA or school from the search results, the [General Info] tab of the Organization Profile screen will be displayed. Select the [Contacts] tab (figure 13) to view a list of contacts for the LEA or school.

Figure 13. Contacts Navigation
Use the [Contacts] tab (figure 14) to view, add, edit, or delete from the list of special education and technology contacts for the LEA or school. Contacts are view only for LEA coordinators. To add or edit a contact, please contact CalTAC. Contacts do not have access to TOMS and do not have an active role created in TOMS. Special education coordinators and technology coordinators serve as point persons to resolve any issues reported by the school or LEA.
- The special education coordinator is the contact person for questions regarding students’ special needs configuration.
-
The technology coordinator is the contact person for questions regarding technical issues related to the organization.
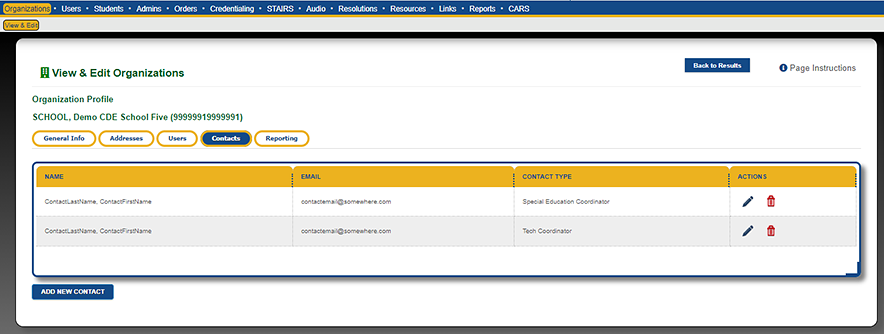
Figure 14. [Contacts] Tab
Add, Edit, or Delete Contact
To add, edit, or delete a contact from the list, follow these steps:
- From the [Contacts] tab of the View & Edit Organizations screen (figure 14), do one of the following:
- Select the [ADD NEW CONTACT] button to add a new contact for the organization.
- Select the pencil [
 ] icon to edit an existing contact.
 - Select the trash can [
 ] icon to remove an existing contact from the organization.
-
The Add Organization Contact screen is displayed on the [Contacts] tab (figure 15).
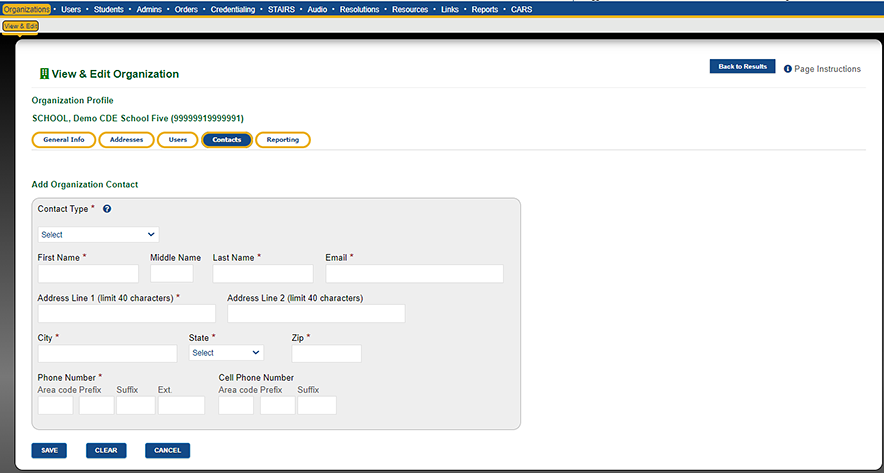
Figure 15. Add Organization Contact Screen—[Contacts] tab
- Enter all the required fields and optional fields as needed, and then do one of the following:
- To save the contacts and return to the previous screen, select the [SAVE] button.
- To return to the previous screen without saving, select the [CANCEL] button.
- To remove unsaved information, select the [CLEAR] button.
Organization Profile—Reporting
After selecting an LEA or school from the search results, the [General Info] tab of the Organization Profile screen will be displayed. To view the reporting options that have been set for an LEA or school, select the [Reporting] tab (figure 16).

Figure 16. [Reporting] Tab Navigation
Use the [Reporting] tab on the Organization Profile screen to view the reporting options selected for an LEA (figure 17) or a school (figure 18).
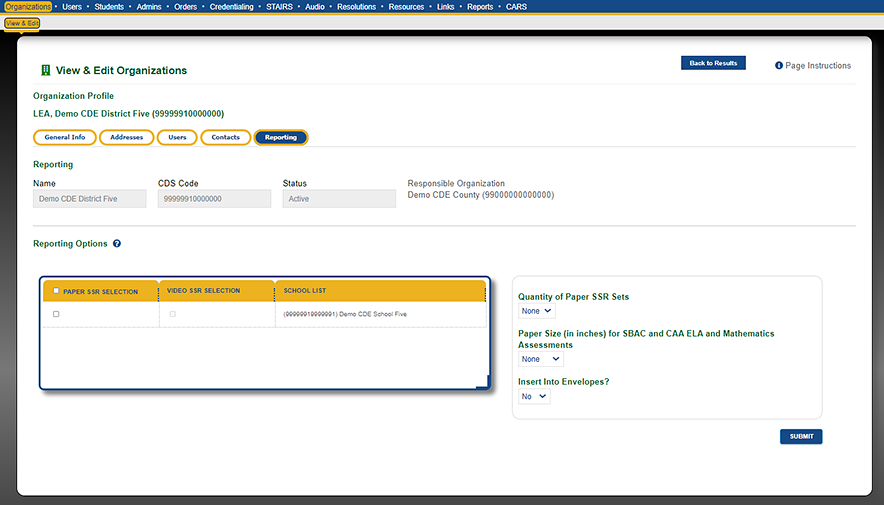
Figure 17. LEA [Reporting] Tab
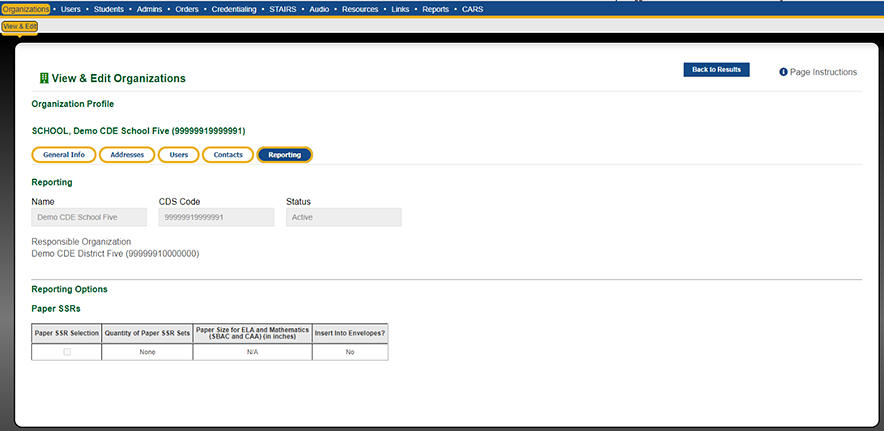
Figure 18. School [Reporting] Tab

