Practicing for Testing
Recommendations to Prepare for Testing
To have the best experience with testing, it is recommended that test examiners and test administrators run at least two practice sessions with students. The first session can be set up using a video meeting application, with students using the web-based version of the student testing interface. The second session can be set up with students using the secure browser.
Why Two Practice Sessions?
By completing at least two sessions, students and test administrators or examiners can become comfortable with logging on to a test session remotely and using the new widgets in the student testing interface. During the first practice, students can stay on the video session as the test administrator or examiner walks them through logging on, testing the camera and microphone, and using the new widgets.
During the second practice attempt, students will need the test session ID and their SSID. Students will use the secure browser to log on. This means that students will not be able to communicate with the test administrator or examiner until they have entered the actual practice assessment. This will work the same way when they take the actual assessments.
Preparing Students for the First Practice Session
Prior to running a practice assessment with students, the test administrator or examiner must provide students with their SSIDs. This can be done by mail, in a private chat with a student, or by some other means that keeps the SSID number confidential between the student and the test administrator or examiner, or teacher.
The test administrator or examiner should provide a video meeting link to students with a set date and time for the practice session.
For the first round of practice assessments, including the Smarter Balanced for ELA and mathematics, the CAST, the CSA, and the ELPAC, the test administrator or examiner will log on to the Test Administrator and Test Examiner Practice and Training Site.
Once logged on, the test administrator or examiner will select a practice or training assessment for the students. This is accomplished by selecting the type of assessment and any subsequent levels. Prior to starting the practice session, the test administrator or examiner will also select the Remote or Hybrid radio button as the “Session Type” (figure 1).
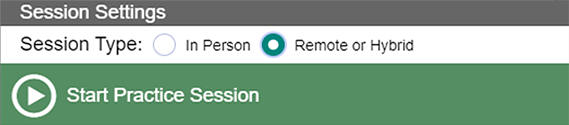
Figure 1. Selecting the Session Type
The test administrator or examiner will select the [Start Practice Session] button. To initiate the remote tools, the test administrator or examiner will have to select the “I agree” checkbox in the communication widget (figure 2) and select the [Allow] button.
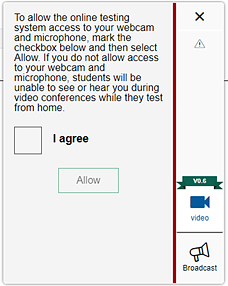
Figure 2. Permission Box for Remote Tools
The practice or training assessment will be ready for students. The test administrator or examiner will save the session ID to provide this to students prior to testing. By preparing the session prior to meeting with students, the test administrator or examiner will save time.
Although students will be using the standard secure browser during the actual assessment, for the purposes of this first practice test session, students will use the web-based version of the student interface. This will allow students to join a video meeting while testing.
The test administrator or examiner should have all students join a video meeting (e.g., Zoom, Google Meet, etc.). In the video meeting, test administrators or examiners will have the ability to talk students through the log on process.
Signing Students into the Practice Session
The test administrator or examiner should ask students to turn off their cameras in the video meeting. The remote tools will be unable to function if the camera is on in a program other than the Student Interface Practice and Training Tests.
Using the chat feature in the video meeting, the test administrator or examiner will provide the link for the Student Interface Practice and Training Tests (http://bit.ly/studentpractice). Students will need to use either the Chrome or Firefox browser for this session. Prior to selecting the [Sign In] button, students need to toggle off the Guest User and Guest Session (figure 3). The screen will display boxes for the student's first name, SSID, and the session ID.
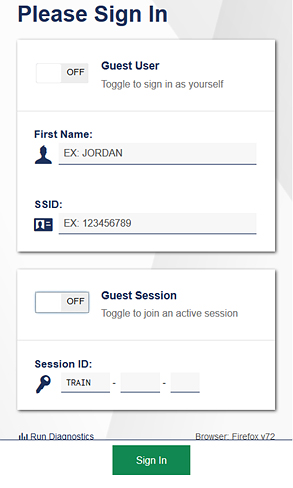
Figure 3. Student Sign In with Guest User and Guest Session Toggled Off
Students should move through the following instructions with the test administrator or examiner.
Students will enter their names into the First Name field as they appear in the Test Operations Management System (TOMS), their SSIDs, and the session IDs provided by the test administrator or examiner, and they will select the [Sign In] button.
The screen will display the individual student's information. Once the student has confirmed this information, the student will select the [Yes] button (figure 4).
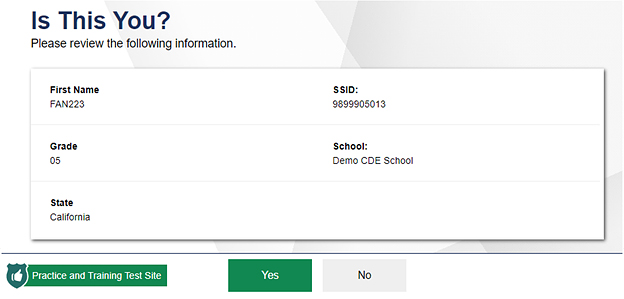
Figure 4. Student Information Confirmation
Students will have the option of selecting the assessment chosen by the test administrator or examiner. Students should select the assessment. The page will state that the program is “Waiting for Approval” (figure 5). The test administrator or examiner should take this time to assist students to ensure that all students have the same screen displayed on their monitor.

Figure 5. Waiting for Approval
Once all students are waiting for approval, the test administrator or examiner will approve these students in the same manner used during the actual assessments.
The following steps will be new for students who have tested in the past. Students should follow the instructions of the test administrator or examiner and not jump ahead.
Students will complete the Audio/Video Checks screen by selecting the checkbox with the statement “I agree to grant the browser permission to access the camera.” Some browsers will use a pop-up box to confirm that the student will allow the program to use the camera and microphone. Students should select the [Allow] button.
At this point, their cameras should turn on and students should be able to view themselves on screen (figure 6). They can complete the video check by selecting the [I see myself] button.
![Audio/Video Checks screen with permission box checked, an image of a teddy bear on camera, and the [I see myself] button displayed](/s/spring-21-educators/practicing-for-testing/clip_image011.jpg)
Figure 6. Audio/Video Checks Screen
Students will check their microphones. The screen will display a microphone icon. Students will select the microphone icon and speak a test phrase of their choosing into the computer's microphone. Again, some browsers will ask for permission for the microphone to be used. Students should select the [Allow] button.
The microphone icon will be replaced with a [Recording] square icon. This indicates that the computer is recording audio. After students have said a phrase, they will select the square icon to stop recording; they will then select the [Play] arrow icon to listen to their recording to ensure that their microphone worked (figure 7 ).
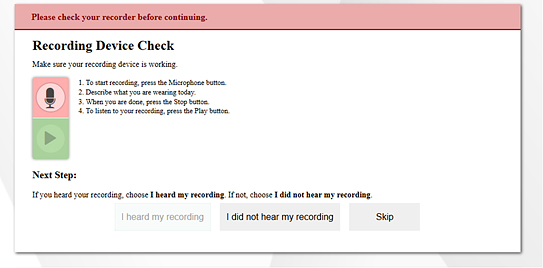
Figure 7. Recording Device Check
If students can hear the recording, they will select the [I heard my recording] button.
This will take students to the Sound and Video Playback Check screen. To ensure that their sound and video are working, students will select the [Play] arrow icon in the center of the box (figure 8 ). A short video and song will play. Students who can play the video and audio will select the [I could play the sound and video] button.
![Sound and Video Playback Check screen displaying a 'Please check your audio or video before continuing' message and the [I could play the sound and video] button](/s/spring-21-educators/practicing-for-testing/clip_image015.jpg)
Figure 8. Sound and Video Playback Check
The final check is for the Text-to-Speech Sound Check screen. All students will have text-to-speech turned on for broadcast messages from the test administrator or examiner. Please note that this will not turn on the text-to-speech designated support for questions unless it has been assigned in TOMS prior to testing.
Students will select the speaker icon (figure 9 ). If they can hear the automated voice, they will select the [I heard the voice] button, followed by the [Continue] button.
![Text-to-Speech Sound Check screen with a 'Please check text-to-speech before continuing' message and the [I heard the voice] button on display](/s/spring-21-educators/practicing-for-testing/clip_image017.jpg)
Figure 9. Text-to-Speech Sound Check
Students have an option to [View Test Settings] which will list any designated supports or accommodations assigned to them in TOMS. They will then select the [Begin Test Now] button to enter the practice assessment.
Practice Using the Remote Widget
Once in the assessment, students will notice a small circle in the lower-right corner of the screen. They should notice that their own image is in the circle. This allows students to view what is being shown to the test administrator or examiner. If they select the circle, the remote widget will expand and offer other tools (figure 10 ).
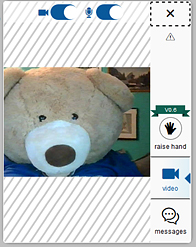
Figure 10. Remote Widget
Students and test administrators or examiners should test out the different tools in the communication widget. If a student selects the [raise hand] hand icon, the student’s information will move to the top of the page under the “Tests with potential issues” section of the Test Administrator (TA) Interface. The test administrator or examiner can choose to select the [lower hand] icon, individually message the student, or enter into a video and audio chat with the student. Please note that the student will not be able to interact with the assessment when the widget is expanded. The widget must be minimized in order for the student to return to the assessment.
The student may also select the [messages] speech bubble icon to send an individual chat message to the test administrator or examiner. Students with unread messages will remain in the “Tests without issues” section of the TA Interface but will have a red message icon in the student’s information column.
Ending the Practice Session
Once students and the test administrator or examiner are comfortable with the tools, students should select the [Pause] button at the top left of the screen (figure 11 ). Students will then select yes to leave the assessment.
![Top-left corner of screen with [Pause] Button to end the practice test](/s/spring-21-educators/practicing-for-testing/clip_image020.png)
Figure 11. Pause Button
Once all students have paused their assessments, the test administrator or examiner will select the [Stop] button to end the test session. The test administrator or examiner will now be able to log off of the TA Interface.
Facilitating the Second Practice Session
After students have had a chance to enter an assessment while in a video meeting, they should try to log on using the standard secure browser application on their device. This practice session can occur on the same day as the first session or on another day.
Students should have the secure browser installed on their device prior to beginning a second practice session. Educators should confirm with their school’s technology coordinator that all students have the secure browser downloaded on their device. Students using a personal device can follow the instructions on the Secure Browsers web page to download the application.
Since the secure browser will not function when other applications are running, students will not be able to be in a video meeting with the test administrator or examiner while the secure browser is running.
To assist students with this logon, test administrators or examiners can start a video meeting with students and provide the test session ID. Students will then need to leave the meeting and close any running applications. If students are on a Chromebook, they will need to sign out of their computer in order to have access to the Secure Browser.
Students should select the secure browser on their device. They will need to enter their first name, SSID, and the provided test session ID. They will need to go through the same steps that they accomplished when logging in with their test administrator or examiner in the first practice session.
Test administrators or examiners will know that their students are successful if they are able to approve students and admit them into the assessment. They will also notice that as students enter the assessment they also appear on screen.
It is suggested that test administrators or examiners keep the video meeting open in case a student is unable to enter the assessment. Students can come back into the video meeting for technical assistance or to ask questions.
How Often Should I Practice with My Students?
Each class is different. Test administrators or examiners and students should practice logging on and becoming familiar with the communication tools until the students are comfortable with the testing interface. This will allow them to concentrate on the assessments and not the tools that will be used when the time comes for the real assessments.